GOST framework for word how to make
So, the first thing to do is split the document into several sections (here we read how to split a PDF into pages), for example, a table of contents, a title page and the main part. This is done so that the frame is only where it is needed, namely, in the main part. In Microsoft Word 2010, go to the tab Page layout, and choose Breaks/Next Page(learn how to convert from Word to PDF here).
We do this for all sections of your document.
So that the stamp we subsequently created does not repeat itself on pages we do not need, go to the tab Insert, then press Footer/Change Footer. Disable the function for the selected sections As in the previous section.
Now let's move on to creating the frame. The requirements of GOST are such that the indents from the edges of the sheet for the frame should be 20x5x5x5 mm, so we will make the settings for these sizes.
Go to tab Page layout, press Margins/Custom Margins.
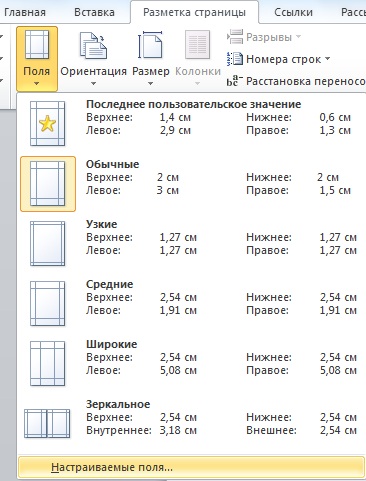
In the window that appears, make the settings as in the screenshot.

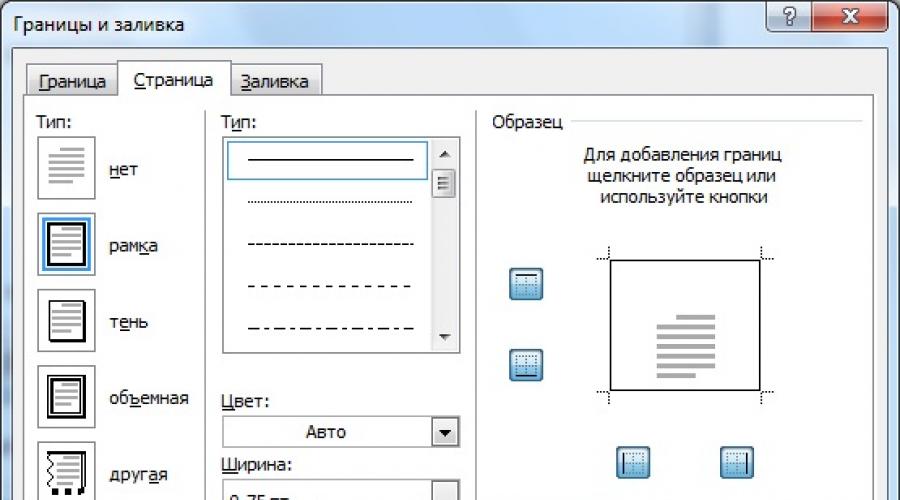
In the window that appears, select Frame, here we put Apply to this section and press the button Options.
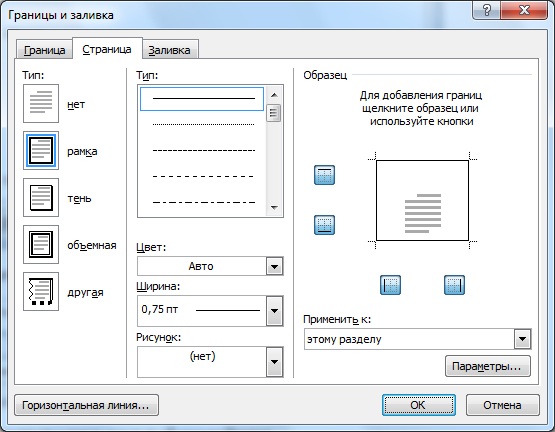
In the settings window that appears, do as in the screenshot.
Click OK and voila - the frames appeared in the section we need.
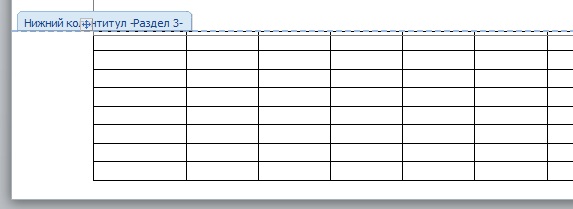
Now we will make a stamp or a main inscription. To do this, we need to insert a table in the footer.
Double click on the bottom of the page to open the editor Footer. On the tab Constructor in Group Position, change the value from 1.25 to 0.
We insert a table with a size of 9 columns and 8 rows (table insertion and other basic Microsoft Word functions are described here).
Then, holding down the left mouse button, move the left part of the table to the left margin.
Now select all the cells and on the tab Layout in Group Cell size change cell height from 0.48 to 0.5.
After that, we set the following column widths from left to right: 0,7 – 1 – 2,3 – 1,5 – 1 – 6,77 – 1,5 – 1,5 – 2 .
In different educational institutions, the main inscription may differ. Shown here is just one of the options.
Now it remains only to fill in the main inscription, and our stamp will be ready.
That's all. I hope this article will be useful to students and all students.
How to insert a formula in Microsoft Word read here.
Who does not want to bother with creating frames on their own, I suggest downloading ready-made ones.
Tags: Word, main inscription according to GOST, frames according to GOST, stamp
Also articles about creating frames in Word:
- How to make a frame in Word?
- How to adjust frame indents in Word?
- How to insert a picture frame in Word 2013?
- How to make a frame in Word 2013 on one page?
- How to make a frame around text in Word 2013?
- How to remove the border in Word 2013?
When making official documentation, it is often necessary to create various stamps in which you have to adhere to some design rules, and then we will consider how to make a frame in Word according to GOST.
According to GOST, frameworks for theses are usually performed, for term papers, and especially this rule is followed when designing drawing frames, which can cause a lot of problems when designing in Word. There are several ways to make a drawing frame in Word according to GOST:
- use ready-made drawing frame templates for Word;
- independently create a drawing frame in Word according to GOST.
On the Internet, you can download ready-made templates for drawing frames for Word and successfully use them also in graduation and term papers. Frame templates are presented in the form of a file with the “dot” extension, which may also be accompanied by instructions for use and, possibly, a file with the font used in the templates may also be attached. Usually, to use a frame template, you just need to run this file and enable macros in the new Word file that opens.
After completing all the proposed actions, a new tab “Add-ons” appears in the Word menu, in which the available frames in this template are located. To use them, just place the cursor on the corresponding sheet and select a frame from the list. The rhinestone frame will be on the sheet and will be available for filling.
There are different versions of frame templates for Word, so finding the right frame should not be a problem.
It is also not difficult to create drawing frames in Word according to GOST on your own, but this will require the dimensions of each frame and the installation of fields with page numbering in the appropriate places in the frame if you do not want to put it all down manually.
Such a frame is created by setting a standard frame in Word with the necessary indentation from the edge of the page or from the text, and inserting tables into the header and footer, setting the required size of each cell. But, as a rule, this method is associated with some inconveniences and "whims" of Word, so using stamp templates is the best option for creating a drawing frame in Word according to GOST.
Learning to work in Word

The academic year has just begun, but soon students will begin to carry out computational, graphic, term papers, and scientific work. For such documents, of course, extremely high requirements for registration are put forward. Among these are the presence of a title page, an explanatory note and, of course, frames with stamps created in accordance with GOST.
Lesson: How to make a frame in Word
Each student has his own approach to paperwork, but in this article we will talk about how to properly make stamps for an A4 page in MS Word.
Lesson: How to make A3 format in Word
Splitting a Document into Sections
The first thing to do is to break the document into several sections. Why is this needed? To separate the table of contents, title page, and body. In addition, this is how you can place the frame (stamp) only where it is really needed (the main part of the document), without allowing it to “climb” and move to other parts of the document.
Lesson: How to make a page break in Word
1. Open the document in which you want to make a stamp, and go to the tab "Layout".
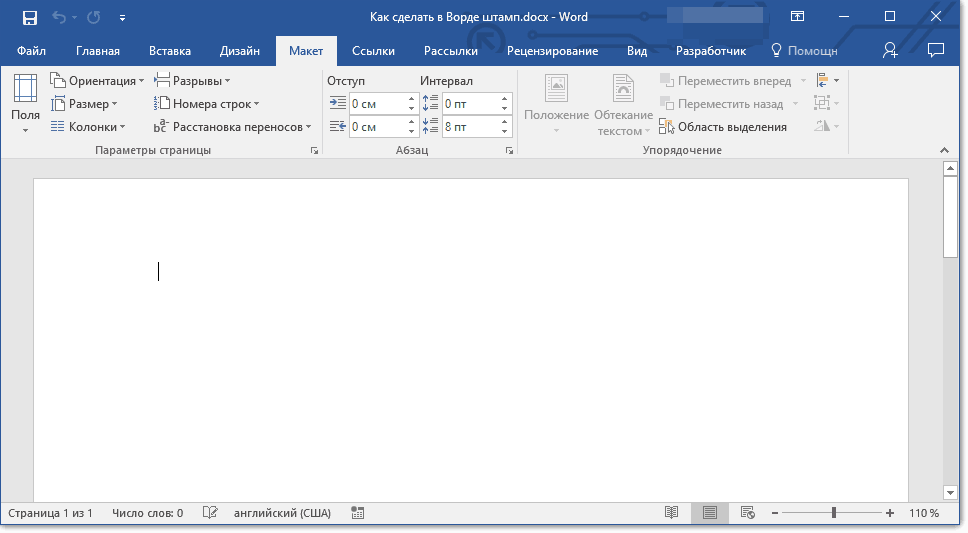
Note: If you are using Word 2010 and earlier, you will find the necessary tools for creating gaps in the tab "Page layout".
2. Press the button “Page breaks” and select from the dropdown menu "Next page".

3. Go to the next page and create another gap.
Note: If your document has more than three sections, create as many breaks as needed (in our example, it took two breaks to create three sections).
4. The required number of sections will be created in the document.
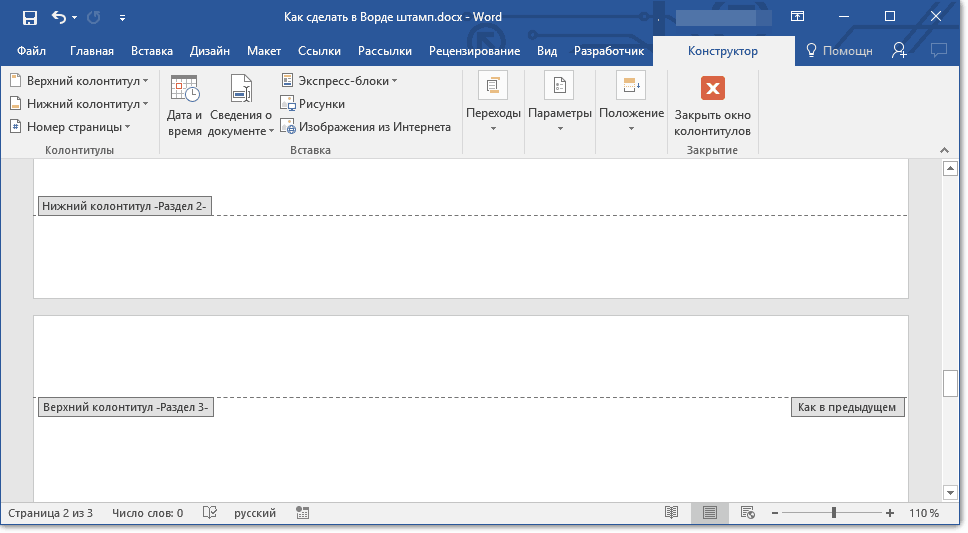
Eliminate links between sections
After we have divided the document into sections, it is necessary to prevent the repetition of the future stamp on those pages where it should not be.
1. Go to the tab "Insert" and expand the button menu "Footer"(group “Headers and footers”).
2. Select an item “Change Footer”.
3. In the second, as well as in all subsequent sections, click the button “As in the previous section”(group “Transitions”) - this will break the link between sections. The headers and footers, in which our future stamp will be located, will not be repeated.
4. Close the header and footer mode by clicking the button “Close Header Window” on the control panel.
Creating a Stamp Frame
Now, in fact, you can proceed to the creation of a frame, the dimensions of which, of course, must comply with GOST. So, the indents from the edges of the page for the frame should have the following values:
1. Open a tab "Layout" and press the button "Fields".
Lesson: Changing and setting fields in Word
2. In the drop-down menu, select the item “Custom fields”.
3. In the window that appears in front of you, set the following values in centimeters:
Top - Left - Bottom - Right
4. Click "OK" to close the window.
Now we need to set the page borders.
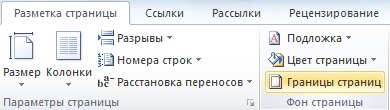
1. Tab "Design"(or "Page layout") click on the button with the appropriate name.
2. In the window “Borders and Shading”, which will open in front of you, select the type "Frame", and in the section “Apply to” specify "this section".
3. Press the button "Options" located under the section “Apply to”.
4. In the window that appears, set the following field values in “Fri”:
Top - Bottom - Left - Right -
5. After you press the button "OK" in two open windows, a frame of the specified size will appear in the desired section.
Create a stamp
It's time to create a stamp or title block, for which we will need to insert a table in the footer of the page.
1. Double click on the bottom of the page where you want to add a stamp.
2. The footer editor will open and the tab will appear along with it. "Constructor".
3. In a group "Position" change the header and footer value in both lines from standard to.
4. Go to the tab "Insert" and insert a table with dimensions of 8 rows and 9 columns.
Lesson: How to make a table in Word
5. Left-click on the left side of the table and drag it to the left margin of the document. You can do the same for the right margin (although it will still change in the future).
6. Select all cells of the added table and go to the tab "Layout" located in the main section “Working with tables”.
7. Change cell height to cm.
8. Now you need to change the width of each of the columns one by one. To do this, select the columns in the direction from left to right and change their width in the control panel to the following values (in order):
0,7 1 2,3 1,5 1 6,77 1,5 1,5 2
9. Merge the cells as shown in the screenshot. To do this, use our instructions.
Lesson: How to merge cells in Word
10. A stamp that meets the requirements of GOST has been created. It remains only to fill it. Of course, everything must be done in strict accordance with the requirements put forward by the teacher, educational institution and generally accepted standards.
If necessary, use our articles to change the font and its alignment.
Lessons:
How to change the font
How to align text
How to make cells fixed height
To ensure that the height of the table cells does not change as you enter text into it, use a small font size (for narrow cells), and also follow these steps:
1. Select all the cells of the table-stamp and right-click and select the item “Table Properties”.
Note: Since the stamp table is in the header, selecting all its cells (especially after merging them) can be problematic. If you also encounter such a problem, select them in parts and follow the described steps for each section of the selected cells separately.
2. Go to the tab in the opened window "Line" and in the section "Size" in field "Mode" select “exactly”.
3. Click "OK" to close the window.
Here is a modest example of what you can get after partially filling the stamp and aligning the text in it:
That's all, now you know exactly how to make a stamp in Word correctly and definitely earn respect from the teacher. It remains only to earn a good grade by making the work meaningful and informative.
We are glad we were able to help you resolve the issue.
Ask your question in the comments, describing in detail the essence of the problem. Our experts will try to answer as quickly as possible.
Did this article help you?
Hello my hardworking readers! In this "Cheat Sheet" we will figure out how to make a frame with a stamp in Word. Spring is on the street, and students and schoolchildren are suffering. The end of the academic year means inevitable exams for them, and in front of them is the delivery of all kinds of settlement and graphic works, term papers, and even diplomas. Therefore, I think this topic will be useful to many students. As always, - extremely detailed, understandable, with screenshots using the 2016 version as an example ... Let's go?
Create sections in a document
Please do not confuse, friends, our sections (technical) with the semantic division of your document. In this case, we will talk about the ability to set different formatting for certain pages. As a rule, frames with stamps are not put on the title page, table of contents and bibliography. The main part is drawn up in two ways:
- the middle stamp is inserted on all pages;
- the middle stamp is placed only on the first page, and on the second and all subsequent sheets a small stamp is placed.
Accordingly, taking into account the requirements for the design of school and student papers of your particular educational institution, the document will need to be divided into 4 or 5 sections. However, there may be more such sections if there are pages in the main part of the document on which frames and stamps are not needed. That is, you should now understand the main thing that we are creating a section where we need to change the formatting. By default, WORD will set frames and stamps in a row on all sheets.
I will not give an algorithm for creating partitions in this article. For those of you who have forgotten how to do this, I refer you to the article "How to make different headers and footers in one WORD 2016 document". This process is described in detail there.
Guest drawing frames for WORD
Then the requirements of ESKD (Unified system for registration of design documentation) for A4 format, the indent from the borders of the sheet should be 20 x 5 x 5 x 5mm. The same dimensions are repeated by GOSTs and all training manuals. So let's set them for the necessary sections.
In order for the Word to understand which section it will work with, simply place the cursor on the desired page. Next from tab "Layout" go to section "Page settings" and open the window of the same name by clicking on the arrow at the bottom right.
In the pop-up window in the tab "Fields" set the following values:
- top field - 1.4 cm;
- lower - 0.6 cm;
- left - 2.9 cm;
- right - 1.3 cm.
Don't worry about the fact that these numbers bear little resemblance to the required 20*5*5*5. It's just that the Word file is not familiar with Russian GOSTs, and in this case we make an allowance for its American "stupidity".
This is, of course, a joke. I have a lot of respect for this text editor. I assure you, after printing you will see your desired frame sizes in full compliance with our standards.
But let's finish the job "Page Options". In line "binding" leaving zero, "binding position" - "left", orientation - "book", in line "pages" choose "usual". per line "apply" don't pay attention at all. Click OK(Figure 1).
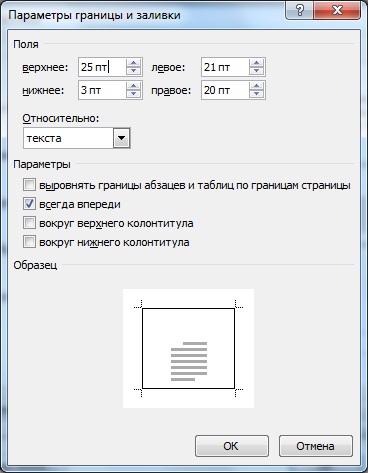
Next, go to the tab "Design", click the button "Borders pages". In the opened window "Borders and Shading" choose "type" - "frame", "width"- , line "apply" - "to this section" and open a window "border and fill options".
Here we set the field values, that is, the text indent from the frame in Word units pt (points). They should be like this:
- upper - 25 pt;
- lower - 3 pt;
- right - 20 pt;
- left - 21 pt.
In line "relatively" choose "text", V "parameters" put a mark next to "Always ahead", press OK. This window closes but remains open "Page Borders". Don't forget to click there too. OK. After that, the frames will appear on all pages of your section. The frame for A4 Word format is ready. For the remaining sections of the document that you have selected, for example, for a small stamp, the procedure for inserting frames will have to be repeated again (Fig. 2).
How to make a stamp according to GOST in Word
Friends, after reading the two previous parts of this post, did you have a question why we are talking only about medium and small corner stamps? What is big? Does this happen at all? Of course, but the fact is that it is not used for A4 format. Therefore - away from doubts and proceed to the creation of the middle stamp - the so-called main inscription.
Middle corner stamp in WORD
The corner stamp, of course, we will insert into the footer. To open it first in a tab "Home" press the button "show hidden format characters", then mark the spaces between the sheets (double-click on the dividing line). With the same double click on the bottom of the page, select the header. This opens the toolbar at the top. "Constructor". In his section "Position" in two lines with numerical data we set zeros(Fig. 3).
Now you can start creating the stamp. In fact, this is a table with given dimensions. Therefore, I recommend that you remember how to create tables and resize them (links will open in new windows, so you will not lose this article). Remembered? Well, now let's start.
Put the cursor in the footer area, go to the tab "Insert" and click on the button "table". Select a table from a template with 9 columns and 8 rows. All. Our plate still faintly resembles a real corner stamp, but it is already in place. The only thing is that it should be dragged to the left flush with the text border using the move handle (the cross above the upper left corner).
to the tab "Layout", chapter "Cell Size" and increase their height to cm (Fig. 4).
The next step is to set the desired sizes for the columns. We select them one by one and select their width using the button, which in Fig. 4 is highlighted in blue. Here is how wide the columns should be in the middle corner stamp (from left to right, in cm): - - - - - - - -. The table takes the following form (Fig. 5).
Her dimensions 40 x 185. Neighboring cells filled with the same color must be merged. We do this in the panel "Working with tables" tab "Layout" with a button "merge cells"(Fig. 6).
The cell, circled in red, must, on the contrary, be divided into three. We do this with a button. "split cells"(Fig. 6). The middle corner stamp is ready and in place.
How to make a small stamp in Word
A small stamp according to GOST 2. 104-2006 is placed on the second and subsequent pages of the main part of the explanatory notes for term papers and theses. Its overall dimensions 15 x 185. The initial table template should have 3 rows and 7 columns. The height of the cells here is the same - cm, and the width of the columns is as follows: - - - - - - . For school work, the main inscription is even smaller, but this will no longer be in accordance with GOST. However, friends, I hope that you now understand how to make a stamp in Word, regardless of the specified conditions. Good luck in your battles with the granite of science. For your and our victory!
Your guide to WORD 2016 copywriter GALANT.
Did you forget to look at these "Cribs"? Come on, this is interesting:
- How to make a table from text in Word and vice versa - from a table to text
- How to arrange text vertically in Word 2016