Step-by-step instructions: how to make a stamp in Word
Students and pupils often use the Word text editor to complete term papers, diplomas, essays and reports. This is a very handy program with an intuitive interface that even a beginner can handle. But only if we are talking about ordinary actions, such as writing text, creating a table, adding an image.
Some teachers require a frame with a stamp in accordance with GOST, the creation of which for a student can be a rather problematic task. The article will tell you how to make a stamp in Word according to GOST.
Step One: Breaking the Document into Sections
The first step on how to make a stamp in Word begins with dividing the entire document into sections. This is necessary to separate the body of the text, the table of contents and the title page. But this is not the only reason: the division is necessary in order to place the stamp in the place where it is needed, and to exclude its displacement into unnecessary ones.
So, how to make a stamp in Word? We need:
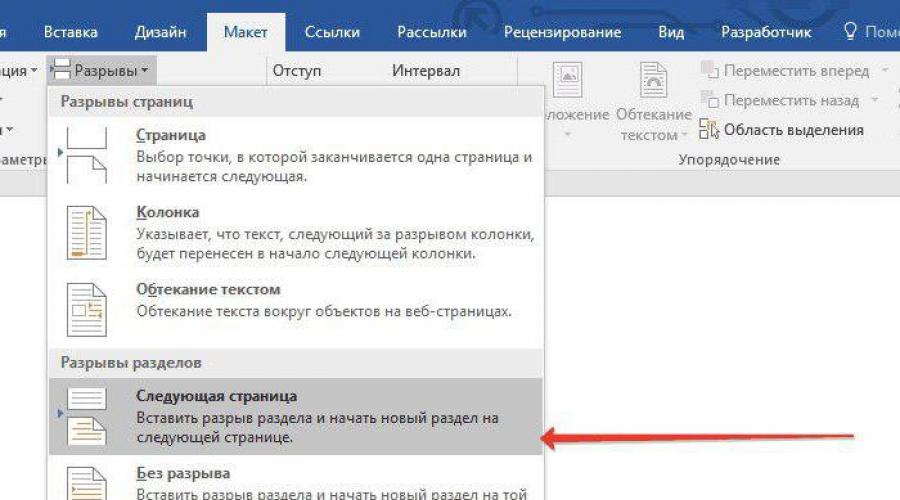
- Click on the "Layout" or "Page Layout" tab (depending on the version of the program).
- Open Breaks.
- Select "Next Page".
- Repeat all steps to create another gap.
- Click "Close Header Window".
That's all, the first stage of the instruction on how to make a stamp in Word has been completed, let's go directly to the second.
Step Two: Eliminate Links Between Sections
So, we proceed to the second stage of the instruction on how to make a frame with a stamp in Word. Now we need to eliminate links between all previously created partitions. This is necessary so that the stamp does not spread to all pages, but remains only on one.
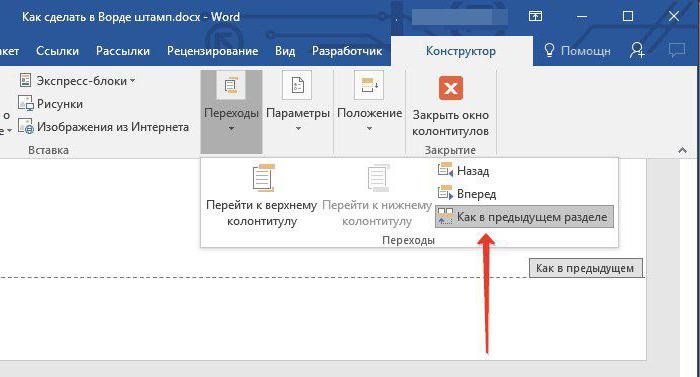
- Click on the "Insert" tab to go to it.
- Click on the arrows next to the "Footer" button to display a drop-down list.
- In the list, click on "Edit footer" and a group of tools for working with headers and footers will appear.
- In the "Transitions" group, click on the "As in the previous section" button.
After the steps taken, the stamp will not apply to all pages, which means that we have completed the second step of the instruction on how to make a frame and a stamp in Word. Let's move on to creation.
Step three: create a frame
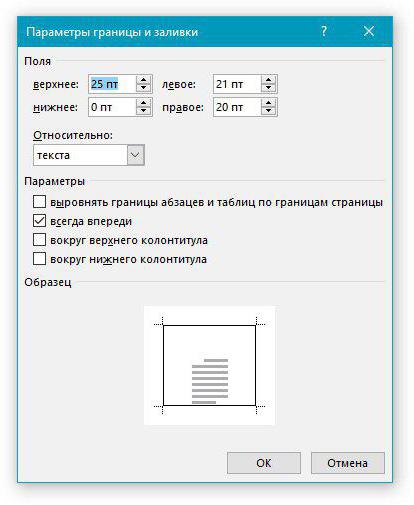
Now, finally, we got to the creation of the stamp itself with a frame. However, this is far from the last stage, but more on the rest later. We will create a frame, of course, in accordance with GOST, so the first thing we need to do is add a frame, with the following indents along the edges:
- Left - 20 mm.
- Top - 5 mm.
- Right - 5 mm.
- Bottom - 5 mm.
To do this, follow the instructions:
- In the program, go to "Layout".
- In the Page Setup group, click the Margins tool to expand the drop-down list.
- Select Custom Fields from the list.
- In the "Margins" area, set the values: left - 2.9 cm, bottom - 0.6 cm, top - 1.4 cm, right - 1.3 cm. This is necessary so that the text does not go beyond the borders of the frame.
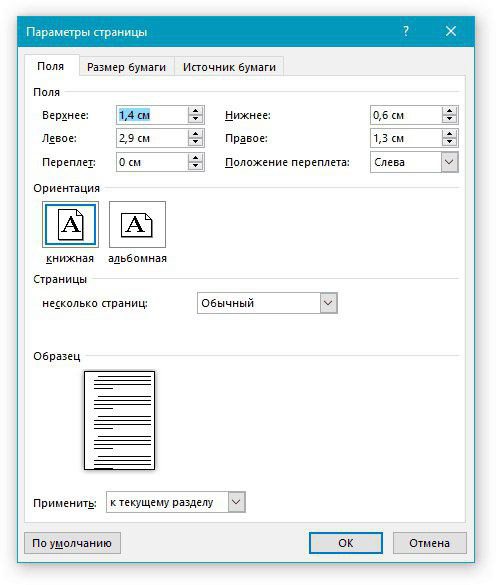
After the done actions, press the "OK" button to apply all the changes.
Now let's move on to adding a frame to the document. To do this, you need to do the following:
- In the program, go to "Page Layout" or "Design" (depending on the version).
- In the "Page Background" tool group, click the "Page Borders" button.
- Next, go to "Pages".
- Select "Frame" in the first column.
- In the "Apply" drop-down list, select "To this section".
- Click the "Settings" button, which is located just below the drop-down list.
- In the window that appears, specify the values: bottom - 0, right - 20, top - 25, left - 21.
After that, click OK - a frame will appear in the document.
Step Four: Create a Stamp
So, we have created a frame, now let's talk about how to make a stamp in accordance with GOST in Word. This is done using a table, here is a detailed instruction:
- Go to the footer of the page you want to place the stamp on. To do this, double-click on the bottom border of the sheet.
- In the designer that appeared on the toolbar, in the "Position" group, replace all the values with zero - the default is 1.25.
- Go to the "Insert" tab.
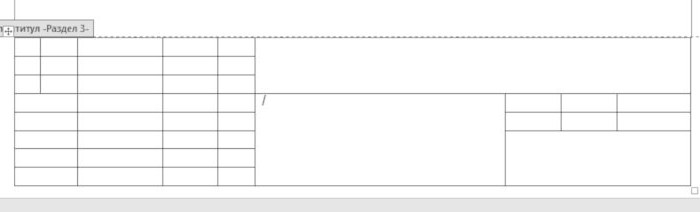
- Use the Table tool to create it. In the size selection menu, specify 9 columns and 8 lines.
- Hold LMB on the left border of the table and drag its edge to the left edge of the frame. Do the same with the right edge of the table.
- Select the entire table by clicking on the four arrows in the upper left corner.
- Go to "Layout" in the "Table Tools" tab group.
- Change the height of all cells to 0.5 cm.
- Select the columns one by one, starting from the left edge, and change their width. The first column is 0.7 cm, the second is 1 cm, the third is 2.3 cm, the fourth is 1.5 cm, the fifth is 1 cm, the sixth is 6.77 cm, the seventh is 1.5 cm, the eighth is 1, 5 cm, ninth - 2 cm.
- Merge the cells where necessary, refer to the image below.
That's all, the stamp with the frame is created, but there are still a few details left.
Step Five: Fix Cell Heights
So that when entering data into the cells of the stamp, they do not stretch, it is necessary to fix their height. This is done as follows:
- Select cells.
- Press RMB.
- In the menu, click on the "Table Properties" tool.
- In the "Line" tab, check the box next to the "Height" button and select the "Precise" mode.
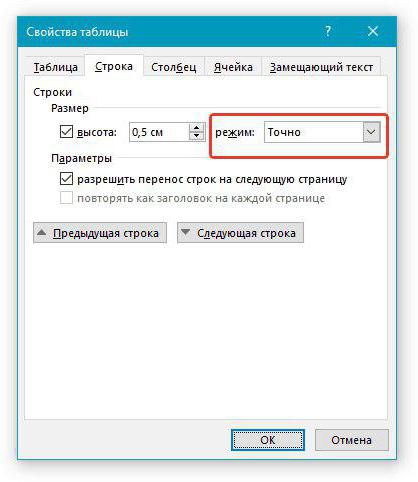
Click on OK - your table will become fixed.