Auto Table of Contents in Word: How to Create Auto-Updating Content in Microsoft Word
The table of contents is an indispensable means of navigation when working in Microsoft Word, especially if you have to work with a large amount of text. This feature is available in all versions of Word without exception. However, many users do not know how to work with it and continue to “collect” the table of contents manually, spending time and effort on this. While the principle of putting down an auto-table in Word is very simple and takes only a few seconds.
What is auto heading
An automatic table of contents is, by and large, a complex system of links that appears in a location of your choice and allows you to easily navigate between sections of text. You can jump to the desired chapter directly from the table of contents; To do this, you need to hold down the "Ctrl" key and click the left mouse button on the desired item.
How to make an auto-table in Word
First you need to write the text (or, at least, create its frame by putting down the titles of the chapters, in which information will then be added).
Then you need to make the subtitles visible to the program. This is done through the "Styles" panel on the main tab. Only after that it makes sense to add an auto-table of contents in the "Word":
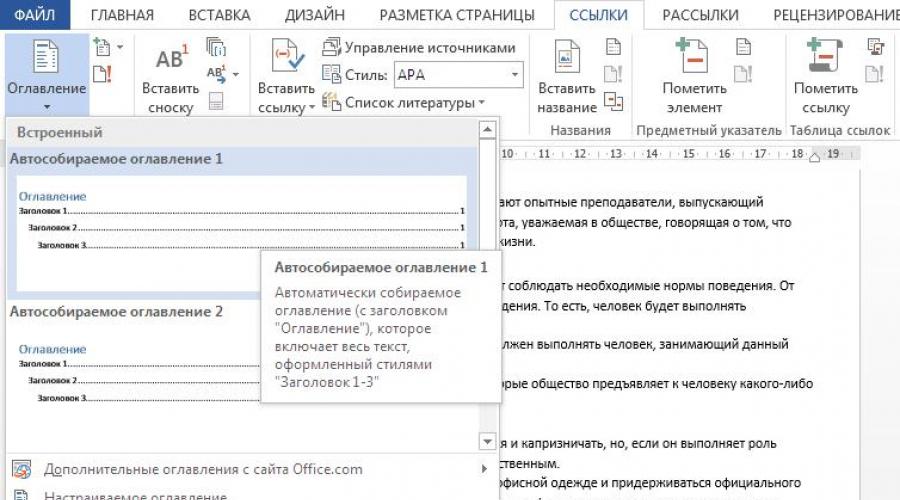
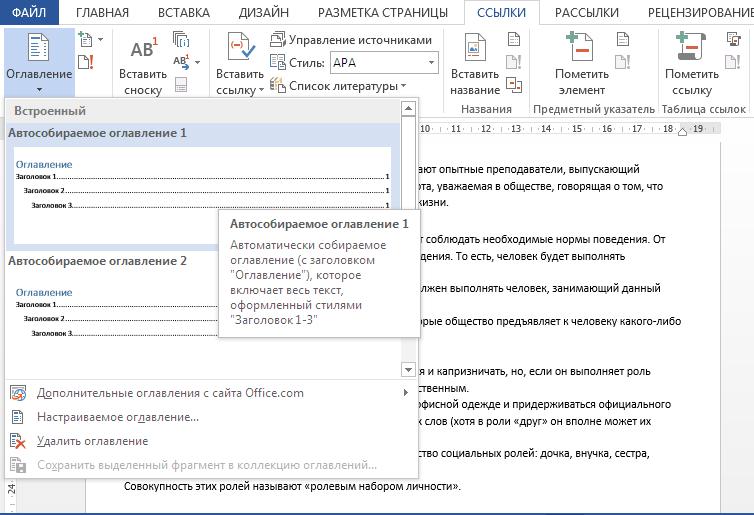
- Go to the "Links" tab.
- Click on the "Auto-Collect Table of Contents" button.
- And choose from any of the options (they differ only in the format of the links).
If desired, you can also select a custom table of contents and set all the parameters yourself.
This option is suitable for versions 2003, 2007 and 2010. In Word-2016, the auto-assembled table of contents is located on the Insert panel, in the Link section, where you need to select the Table of Contents and Indexes item from the list.
Before you assemble an auto-table of contents in Word, make sure that the title of each chapter is highlighted with one of the design styles: "Heading 2", "Heading 3", and so on. Bold font, which is often used to highlight chapters, will be ignored by the program.
Is it possible to make a table of contents with multiple levels of subheadings
In order to make the table of contents multi-level, you need to highlight the chapters with different styles. For example, the introduction, appendices, list of references are usually marked as "Subheading 1": it will be located close to the left edge of the table of contents.
Independent chapters and section titles are marked with the "Heading 2" style and are placed in the table of contents indented from the left margin. "Heading 3" is used to mark individual small parts of text in chapters. Simply put, these are subheadings of the format "3.1.2." or "Chapter 1, paragraph 4, subparagraph 2."
To save time, all subheadings of the same level can be selected at the same time. To do this, press "Ctrl" and, without releasing it, select each of the subheadings in turn. Then click on the desired design style (for example, "Heading 2"). Please note that the "Subtitle" style will not be displayed in the content.
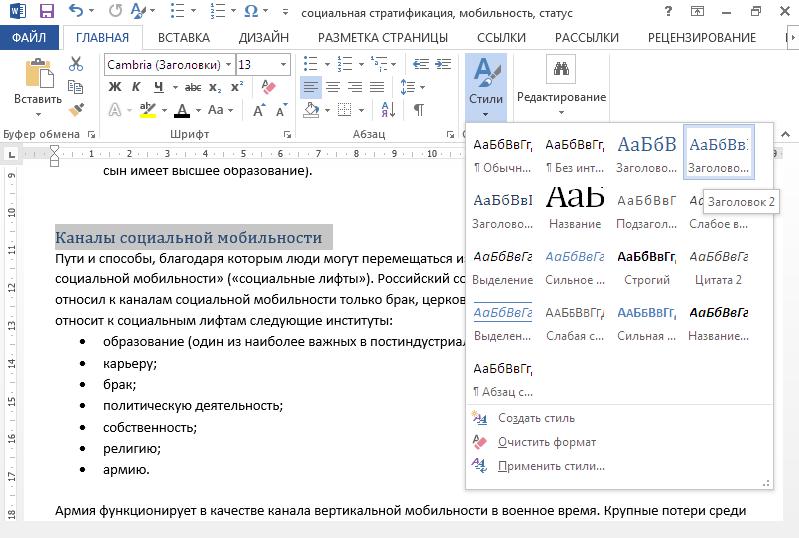
Table of contents update
Despite the name, the auto-table of contents in Word does not update automatically. If you change something in the text (add or expand a chapter, move it to a new location, change the name of a subheading) the content will show the old version until you update it.
It's very easy to do this:
- Click with the left mouse button on any place within the table of contents (for example, on the title of one of the chapters).
- Once clicked, the autocontent window will become visible; in its upper left corner, select the “update table” function and click on it once with the left mouse button.
- In the window that appears, select one of the options: “Update only page numbers” (in the event that you did not add new chapters, but wrote in one of the existing ones). Or "Refresh Entire" if you want the table of contents to reflect the changes in the subheadings. This method should also be used if you have changed only the titles of the chapters, but not their number.
- Press the "OK" key.
For those users who have problems with the mouse (for example, it regularly “freezes” and moves the cursor not where you planned), the second way of setting autocontent is more convenient:
- Click on the table of contents box to activate it.
- Press the "F9" key on your keyboard.
- Use the up and down arrows on your keyboard to select the appropriate update mode.
- And press "Enter".
How to remove automatic content
Often, the table of contents is needed solely to facilitate the work on the text, and in the final version of the document it is not required. In such cases, the question arises: "How to remove the auto-table of contents in Word, and will the marking of subheadings be violated? Good news: cutting out automatic content does not affect the design of the text in any way, even if this window occupied 2-3 pages The text will simply move to the first page, taking the place of the table of contents that disappeared, so sections starting on pages 4 and 17 will now be on pages 1 and 14.
You can remove the automatic table of contents in two equally simple ways:
- Click on the table of contents to activate it, click on the arrow next to the file icon in the upper left corner and select the "Delete table of contents" function from the drop-down list.
- Select the table of contents with the mouse, as a normal part of the text, and click on "Delete" or "Backspace".

Often, after finishing work on the text, there is a need to add something, correct it, or simply find the necessary information. In order not to search for the desired section manually, you can create automatic content, follow the link to the chapter of interest, and after finishing work, delete the table of contents again.