Как редактировать файл Hosts на Mac и зачем это нужно делать? Где находится файл hosts? Как редактировать файл hosts в mac.
Читайте также
В операционных системах macOS и Windows есть файл hosts, который работает как локальный распределитель адресов и их доменных имен (на манер DNS). Он настраивается администратором компьютера самостоятельно, и параметры, внесенные в него, касаются только конкретного устройства.
Рассказываю, где отыскать файл hosts, как его отредактировать и зачем это может понадобиться.
Редактирование файла hosts в текстовом редакторе
Обычно, чтобы внести изменения в файл hosts, администраторы открывают его через «Терминал», но не все пользователи достаточно хорошо владеют командной строкой. Если вам привычнее работать в графическом интерфейсе, то отредактировать файл hosts можно следующим образом:
По умолчанию этот файл защищен, и редактировать его нельзя, поэтому делаем следующее:

Редактирование файла hosts через приложение nano в «Терминале»
Если желание копаться в файлах, создавать копии и переносить их из папки в папку не хочется, а нужно быстро отредактировать файл hosts, то это можно сделать через редактор текстов nano в «Терминале». Для этого:

Обновление кэша DNS
Все изменения вносятся в реальном времени, и обычно они сразу оказывают эффект на работу сети. Если этого не произошло, то необходимо сделать сброс параметров DNS. Для этого:
- Открываем «Терминал» (как это сделать описано в «Редактирование файла hosts через приложение nano в Терминале»).
- Вводим в него команду dscacheutil - flushcache; sudo kilall -HUP mDNSResponder .
После этого новый файл hosts точно заработает.
Зачем изменять файл hosts?
Блокировка рекламы или ускорение загрузки сайтов
Можно вписать в hosts домен сайта, распространяющего рекламу, и перенаправить его на адрес 127.0.0.1. Туда же можно прописать сайты, которые вы хотите сделать недоступными на компьютере. Просто сопоставляем адрес сайта с вышеописанным IP-адресом и все.

Администратор сети может ускорить загрузку сайтов, отредактировав файл hosts. Достаточно внести туда домен сайта и привязать к нему реальный IP-адрес соответствующего ресурса. Таким же образом делаются перенаправления внутри локальной сети.
Сброс параметров iOS через hosts
Есть и более практическое применение. Чаще всего к редактированию hosts прибегают те, кто взломал прошивку мобильного устройства Apple.
При их прошивке используется программа TinyUmbrella. Она заменяет конфигурацию файла hosts, чтобы при необходимости можно было установить устаревшую версию iOS или устаревшую версию программ из App Store на взломанный гаджет.
Эти изменения впоследствии мешают восстановить смартфон или планшет через iTunes. То есть установить официальную прошивку уже не получится. Компьютер не сможет связаться с серверами Apple, так как в файле hosts появится дополнительная строка 74.208.105.171 gs.apple.com, перенаправляющая на серверы разработчиков программного обеспечения для взлома iOS.
Поэтому, перед тем как переустанавливать систему на мобильном устройстве, придется удалить эту строку.
Post Views: 17
Если вы настраиваете новый веб-сервер или другое устройство, которое подключается к Интернету, и хотите протестировать его, прежде чем оно появится в сети, либо прежде чем у вас возникнут проблемы со шпионскими и рекламными сетями, то на компьютере есть невидимый файл, который может помочь. Этот файл называется Hosts , а ниже описано, как его использовать.
Система доменных имен
Когда вы вводите доменное имя любого сайта, хотите увидеть все, что происходит «за кулисами». Каждый сайт, каждый сервис и практически каждое устройство, подключенное к Интернету, обладает уникальным числовым адресом, который говорит о местонахождении других устройств – это TCP/IP адрес. Система доменных имен (DNS) преобразует эти числовые адреса в нечто более узнаваемое и запоминающееся для человека (к примеру, «www.microsoft.com»).
Когда вы впервые вводите адрес сайта, ваш Mac пингует сервер DNS. Ваш Mac накапливает скрытый кэш-файл, чтобы помнить эти детали позже, когда вы посетите тот же сайт снова.
Файл Hosts
Система доменных имен и связанный с ней кэш на вашем компьютере являются стандартным способом выяснения, как добраться туда, где он побывал в Интернете, но есть еще один файл, который является очень полезным. Он называется Hosts и может использоваться для отмены информации DNS по умолчанию.
Есть некоторые практические причины, почему вам нужно использовать файл Hosts , а не просто позволять DNS делать свою работу. К примеру, вы тестируете сервер разработки, который собираетесь привести в действие, и хотели бы использовать собственное доменное имя вместо конкретного IP-адреса устройства. Перед онлайн системами и доступом к любому использующемуся DNS, вы можете использовать файл Hosts вместо «Введите IP-адрес устройства». Когда вы используете доменное имя, Mac автоматически перейдет на данное устройство.
Также вы можете использовать файл Hosts , чтобы заблокировать или обойти шпионские и рекламные сети посредством "обнуления" их IP-адресов – введя 0.0.0.0, а затем имя домена, который хотите заблокировать.
Как отредактировать файл Hosts
Лучше всего работать с файлом Hosts через специальное приложение Terminal, которое расположено в папке «Утилиты» на компьютере. Вам нужно узнать IP-адрес устройства, на которое нужно перенаправить на ваш компьютер Mac, либо доменные имена, которые вы пытаетесь сохранить отдаленно от своего компьютера.
· Дважды щелкните на Terminal.
· Введите sudo nano /etc/hosts и нажмите Return.
· Вам будет предложено ввести пароль. Введите пароль администратора.


Теперь вы в текстовом редакторе Nano. Если хотите добавить новое устройство или домен, переместите курсор с помощью клавиш управления курсором и зафиксируйте его после текста, который вы видите, затем начинайте вводить. Если вы сопоставляете особый IP адрес в вашей локальной сети к домену, то можно ввести IP-адрес, нажать Tab, а затем ввести имя домена.

И наоборот, если хотите убедиться, что URL-адрес не переходит на сайт, используйте «127.0.0.1». Это сопоставит его обратно в ваш компьютер. Даже если вашему компьютеру присваивается разный IP-адрес его маршрутизатором, 127.0.0.1 будет по умолчанию использоваться на локальном компьютере благодаря стандартным настройкам в файле Hosts .
Как только вы закончите, нажмите и удерживайте control и клавишу O, чтобы сохранить файл, а затем – control и X для выхода. Вернитесь к командной строке и введите «sudo killall -HUP mDNSResponder», а затем – return. Это очистит DNS кэш вашего компьютера и не собьется изменениями, которые вы сделали в файле Hosts .
Не забывайте, что вы изменили файл Hosts , так как в любой момент может понадобиться отменить изменения, которые вы сделали, чтобы сохранить правильную работу компьютера.
Как редактировать файл Hosts на Mac и зачем это нужно делать?:
рейтинг 80
из 80
на основе 80
оценок.
Всего 80
отзывов.
First of all, what is the hosts file, and how does it differ from the more commonly known DNS?
The Domain Name System is the database that corresponds an IP address’ “dotted quad” numerical format with a website’s alphabetized web address. It’s a giant directory of which name belongs to which IP address, like an online yellow pages.
Your Mac’s hosts file, however, is localized to your own device, like a list of contacts in your phone: The web address acts as your contact’s name - that’s how you find who you want to talk to - and the IP address is their cell phone number, which is your actual way of getting in touch with them.
How editing the hosts file works
Editing your Mac hosts file is a bit like changing the phone number in your contact book. If you save the contact details with the wrong name, well, it’s still going to connect to that person when you ring the contact. If, however, you entered an incorrect phone number in our contacts analogy, whether that’s an invalid number or one that links to someone else’s, then you have no chance of getting through to that particular cell phone.
Editing the hosts file reroutes the IP address, but only from your own Mac. Entering the web address will bounce you to a different IP address of your choosing (and therefore a different website) or to an invalid IP, which will give you an error page on your browser that says it can’t find the site you’re looking for.
Can it boost my Mac"s speed?
Editing a hosts file is a way to speed up your browser performance. But if you"re tired of half-measures and want some solid improvement, we recommend a full browser cleanup, including deletion of browser cache. Our personal favorite is as it has a tool to uninstall browser extensions and the rest of the garbage Macs accumulate from the web, emails and message chats. Check it out - .
So why would you want to change your hosts file?
Typically if you enter a web address in your browser, it’s because you want to reach that IP address. So what are the benefits of rerouting?
Network Testing: If you’re developing a network, you can reroute the real domain name to the development site to see how real users experience it. This will not affect other users accessing the real site.
Block Malicious Sites: Apart from the risk of viruses and malware, undetected add-ons can also find their way into your system and begin slowing things down. Although it’s always worth investing in pop-up ad blockers, editing the hosts file prevents known malicious sites from being accessed. If a link or pop-up attempts to enter the site, your OS simply re-routes it and takes you to a safer page.
Increased Speed: As we said earlier, finding a website via the DNS is like flicking through the yellow pages for the correct address. With the hosts file being localized to your Mac, this could potentially speed up your browsing by omitting the middle man.
Improved Productivity: Maybe you or your team are getting distracted with social media sites or video streaming. Blocking access to time-wasting sites is a good way of keeping focused on the job at hand.
How to edit the hosts file with Terminal
Note: You will need administrator privileges, including the password, to edit the Mac hosts file.
1) Find the Terminal application on your system. You can do this by either:
Use the Spotlight application to search for it.
Select Applications from the sidebar of a Finder window, and from there select Utilities and then double-click on Terminal.
2) Once you have the Terminal window open, you can access the Nano text editor, which is where you will edit the hosts file. Type sudo nano /etc/hosts and hit Enter. You’ll then be prompted for your administrator password. Once you’ve entered it, hit Enter again and you will be in the Nano text editor.

The Nano text editor might look intimidating if you’re not used to coding on your OS, but don’t worry: it’s very simple, and very easy to do.
3) Use your keyboard arrow keys to position your cursor beneath the text that is already there. This is where you’re going to enter your alternative IP address. Type the IP address that you want the site to reroute to, hit tab, and then type the domain name you want to be associated with it. So, if you would prefer that YouTube reroutes to your homepage, simply type the numerical IP address of your site, hit Tab, and then type www.youtube.com. To add another entry, simply enter a new line of text.
If you have no particular alternative site in mind, or you simply want to block access to it entirely, you can either enter an invalid IP address, such as 000.0.0.100, or use 127.0.01, which always refers back to your own system.
4) Save the changes by pressing control and O, and then exit the Nano text editor by pressing control and X, which will return you to the main Terminal screen.
5) To make sure your Mac doesn’t get confused by the conflicting information from its hosts file and the DNS, before you exit the command line type sudo killall -HUP mDNSResponder and hit Return. This clears your Mac’s DNS caches so that the old directory doesn’t conflict with your newly updated hosts file.
How to edit the hosts file with TextEdit
An alternative to the Terminal application is to use TextEdit instead.
1) Click Finder > Go > Go to Folder...
Then type /private/etc/hosts and press Go. This will locate the hosts file in the ‘etc’ folder.

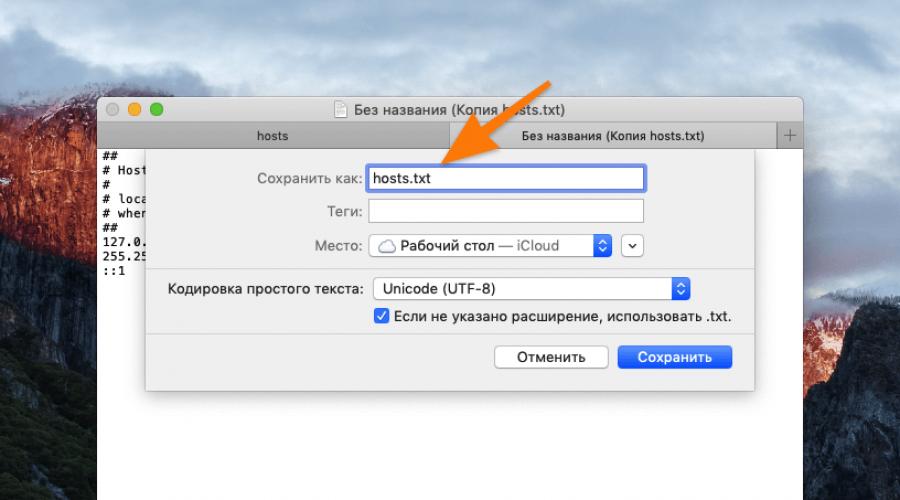
2) Copy the file onto your desktop, and then double-click the copied file to edit it. In the open text file, add your line of alternative IP addresses just as you would in Terminal: First the rerouted IP address and then the corresponding domain name. Make sure that there is a space between the IP address and the domain name, otherwise it won"t work.
If you don"t want your Mac to access certain websites, use 127.0.0.1 for IP address. This will reroute the address back to your Mac. For example, if I wanted to block the access to Facebook on a particular Mac, I would edit hosts file to look like this:

Note: If the file is locked to prevent you from editing it, which is likely if you’re running on OS X 10.11 or later, you must disable SIP protection before you can make any changes.
3) Save the file, and then drag it back into the ‘etc’ folder. Your Mac will ask if you want to replace the file, which you do, and you will have to enter your administrator password to save the changes.
Remember, even if you own the domain name you are rerouting, the web address itself will not be affected. The hosts file only changes what happens on the Mac that contains it.
The risks of editing hosts file
Remember, you’re rerouting a domain to an IP address, not specifically a website. So if you have set one domain to be sent to another site, this depends on the IP address staying the same. If the destination website changes its IP address, your new route will no longer be valid, with the domain either ending up in a new website or producing an error message.
If your server is still taking too long to process requests, it may not be the DNS lookup that is slowing you down. It might be worth running a full clean of your OS to make sure the lag isn’t coming from your Mac.
How else you can protect privacy on your macOS
Anyone reading this is concerned enough about privacy and security to want to find a solution. As we’ve outlined in this article, there are several ways this can be done manually. Some of these fixes take time. Other solutions are fairly quick and easy to implement.
With , you can clean your system cache, user cache (which includes app and DNS cache history) and your browser cache. Of course, there is the manual way, as outlined in this article, or you can save a lot of time with one download and a few clicks to remove any digital footprints you want to delete.
If you want to clear cache safely and easily, here is how you can with CleanMyMac X:
- Launch CleanMyMac X ()
- Select System Junk.
- Click Scan > Clean.
In case you need to remove just DNS cache, do the following:
- Go to the Maintenance module.
- Choose Flush DNS Cache.
- Click Run.

Done! Your DNS cache flushed.
That’s all you need to do. Give it a try, or go through the steps outlined above to do this manually.
Один из самых распространённых вопросов касательно Windows - где находится hosts . В этой статье я расскажу о расположении этого файла в любой ОС, зачем он вообще нужен и для чего его редактируют. Обычно его ищут для того, чтобы исправить проблему с доступом к сайту или наоборот закрыть к нему доступ. В любом случае, в этой статье я расскажу вам не только где находится файл hosts в Windows 10, но и рассмотрю другие ОС, даже Linux,
Hosts в Windows 10
Обычно файл hosts в Windows находится в папке
%windir%/system32/drivers/etc/
Путь к ней можно вставить в проводник.

Или открыть файл напрямую через команду выполнить (Win + R):
%windir%/system32/drivers/etc/hosts
 Путь к файлу hosts
В пути неслучайно указана переменная %windir% - она содержит в себе путь к папке Windows независимо от того, где она находится. Например, папка может называться . Независимо от разрядности системы, файл hosts всегда находится в одном и том же месте в Windows 10. Единственная проблема, с которой вы можете столкнуться - это запрет на редактирование файла. На этот случай рекомендую ознакомиться со статьей .
Где находится файл в hosts windows 7
Путь к файлу hosts в Windows 7 ничем не отличается от пути в других версий ОС Windows. Однако, на всякий случай я приведу здесь скриншоты как найти файл hosts в Windows 7 64 и 32 бита.
 Файл hosts в Windows 7
 Введите путь к файлу hosts %windir%/system32/drivers/etc/hosts и воспользуйтесь программой Блокнот, а ещё лучше установите Notepad++. В ней у вас не возникнет никаких проблем с правами.

Ну и напоследок расскажу где находится файл в других операционных системах, отличных от семейства Windows.
Hosts в Mac OS
Возможно вам понадобится отредактировать файл hosts в MacOS X. Для того, чтобы это сделать, откройте программу «Терминал» и введите в ней команду:
Sudo nano /private/etc/hosts
Введите пароль и нажмите Enter. Перемещайтесь по файлу стрелками, внесите необходимые изменения и нажмите Ctrl + O для сохранения файла. Утвердительно ответьте на вопрос о сохранении. Либо нажмите Ctrl + X для выхода в терминал и утвердительно ответьте на вопрос о сохранении файла. После данной процедуры желательно .
Кстати, в Linux файл hosts обычно находится по адресу /etc/hosts . Отредактировать его вы сможете таким же образом, как и MacOS - через редактор nano .
Во всех системах Windows файл hosts всегда находится в одной и той же папке, об этом уже было сказано выше. Вы можете запомнить этот простой путь, скорее всего, вам придётся пользоваться этим не раз и не два. Лично мне очень часто приходится редактировать файл hosts и довольно удобно делать это не прибегая к помощи инструкции. Если у вас есть комментарии относительно этой статьи, поделитесь ими в форме ниже. Удачи!
Your Mac’s hosts file is a small, but important text document that has the ability to map hostnames to specified IP addresses. Although the modern Internet uses a variety of public and private DNS servers to map IP addresses, the hosts file is a handy way to override those DNS servers, allowing you to manually point a website address to the desired IP address, or block access to a site altogether by pointing to an unused or internal IP address.
Here’s how to edit the Mac hosts file on macOS (previously known as Mac OS X).
Edit Your Mac Hosts File with Text Edit
There are two primary ways to edit the hosts file in Mac OS X. The first is by using TextEdit since the hosts file is a plain text document. However, you can’t open the file directly, since it resides in a protected area of the file system. Instead, we need to copy the file to an unprotected location, like the Desktop, edit it, and then copy it back.
To find the hosts file, open the Finder, which you can access by clicking on the desktop, the smiley face finder in the lower left of your screen, or by pressing command + spacebar + “Finder” . Then follow these steps:


To open it, simply double-click and it will display the file’s contents in TextEdit (or the text editor of your choice).
Block IP Addresses
By default, the /etc/hosts file is relatively simple. It contains a number of lines of descriptive text which are “commented out” with the pound or number (also called a pound or hashtag) sign (#).
Any line that starts with a # sign is a comment and is not read by the /etc/hosts file. So comments are how you can add notes to your hosts file and comment out any lines that you want the /etc/hosts file to stop reading as entries but do not want to delete in case you need them in the future.
For each line, any text after the pound sign is ignored by the computer, making it a good way to add notes and descriptions to your files. It also contains default IP values for localhost and broadcasthost. To edit the file, you’ll add your own lines after broadcasthost.

In addition to testing newly developed websites and web hosting migrations, another reason to edit the hosts file is to block access to specific websites.
In our example, we’ll pretend that the computer we’re using is a device that we want to use exclusively for work, not allowing ourselves to get distracted by Facebook on our work machine.
To do this, type the IP address you wish to assign, followed by two tabs and the hostname. In our case, we want to block Facebook so we’ll map www.facebook.com to 0.0.0.0 which, as an invalid IP address, will result in an error.

Now, whenever we try to go to www.facebook.com from our Mac, the Web browser will fail to load the page, hopefully encouraging us to get back to work!
Reroute Web Addresses
Alternatively, you can enter the IP address of a valid site instead of 0.0.0.0, which will result in users attempting to access Facebook being directed to the site of your choosing.
To determine a website’s IP address, you can use the dig command, which comes standard with macOS. To “dig” the site via Terminal, we simply open up Terminal and then run the dig command on URL, which will then return the IP address as output.
$ dig www.сайт +short
104.25.27.105
Note: The +short option keeps the output to just the information we need, which is the IP address.
Make note of the IP address that’s returned and use it in your Mac hosts file mapping. For example, The New York Times website at www.nytimes.com returns an IP address of 170.149.172.130. If we map that to Facebook in our hosts file, any time someone using the Mac tries to go to Facebook, they’ll see The New York Times load instead.

Note: Many websites won’t allow you to map a domain name to the IP address currently mapped to the site so you’ll get a security error when you try.
You can add as many entries to the hosts file as you wish by entering new mappings on each line. Once you’ve made your desired changes to the hosts file, save it in its current location on the Desktop.
Then, drag and drop the hosts file from your Desktop back to its original location at /private/etc . If you’ve closed the Finder window pointing to this directory, simply use the Finder > Go > Go to Folder command, discussed above, to reopen it.
When you drop the hosts file back in its original location, macOS will ask you what to do about the unmodified hosts file that’s already there. Choose “Replace” and then enter your administrative user password to authenticate the transfer.
With the modified hosts file now in place, fire up your Web browser to test the changes.
Flush Your DNS Cache
In most cases, the new mapping should work immediately, but if you’re not seeing the correct behavior, you may need to flush your DNS cache, forcing the browser to read from your hosts file to determine the mapping.
To flush the DNS cache on your Mac, open Terminal and use the following command (sudo enables you to run this command as the admin of your machine):
$ sudo killall -HUP mDNSResponder
Note: You will need to enter your admin password to execute this command.
To get your Mac to clear your DNS cache, then confirm it’s cleared your cache by echoing a confirmation, enter these two commands separated by a semi-colon as shown here:
$ sudo killall -HUP mDNSResponder;say DNS cache has been flushed
Edit Your Mac Hosts File In Terminal With Nano
The steps in the previous section are easy enough, but if you want to avoid copying the hosts file you can edit it directly in Terminal using the UNIX Nano Text Editor, which is built into macOS.
To get started, launch Terminal, type the following command, and press Return. As with all sudo commands, you’ll need to also enter your admin password to execute it:
$ sudo nano /private/etc/hosts
You’ll now see the hosts file open in the Nano
editor or vim
or another editor of your choice. To navigate and edit the file in Nano, use the arrow keys on your keyboard.
Just as we did with the TextEdit method, above, we can add, edit, or remove hostname mappings at will. Because we launched Nano using sudo, any changes will be authenticated and saved directly to the original hosts file, without the need to copy it outside of its home directory.
When you’re done making changes, press Control-X to exit the editor, Y to save, and Return to overwrite the existing hosts file.
As we mentioned earlier, make sure to flush your DNS cache if you notice that your new mappings aren’t working properly.
Our examples mentioned blocking and redirecting distracting sites in a work environment but you can also use these steps to manually block access to malicious websites and, of course, other uses as well.
If you ever make a mistake and you’re not sure how to fix it, you can always restore the default hosts file contents by using one of the methods above to enter the following default information:
##
# Host Database
#
# localhost is used to configure the loopback interface
# when the system is booting. Do not change this entry.
##
127.0.0.1 localhost
255.255.255.255 broadcasthost::1 localhost
fe80::1%lo0 localhost
If you are a Mac user and found this article useful, you might want to check out other TechJunkie tutorials, including and
What’s the reason you are seeking to edit your Mac’s hosts file? How did it work out? Please tell us about it in the comments below!