Download directly to your desktop. Disable or enable the top left and top right hotspots
Read also
Let me say right away that compared to its predecessor, Windows 8 offers significantly improved capabilities for setting up multi-monitor setups. Although these features may be of great interest to desktop users, they will not be discussed in this article.
Windows 7 (and Vista) offered Aero effects, which provided transparency and color variations to Explorer windows and other desktop interfaces. There are no Aero effects in Windows 8 (they have been removed in order to save mobile device batteries), they have been replaced by a new opaque interface (strangely, for some reason the taskbar has retained its transparency effects). Therefore, some of the customization options you were familiar with are also gone.
But Windows 8 lets you change your desktop wallpaper, and you can still change the color of the borders of now-opaque Explorer windows. As before, you can also save combinations of these settings as themes. However, if previously, in Windows 7, you configured these themes manually (for example, if you had a green wallpaper with a view of Ireland and wanted to make the windows green, you had to do it yourself), then in Windows 8 this can be done automatically.
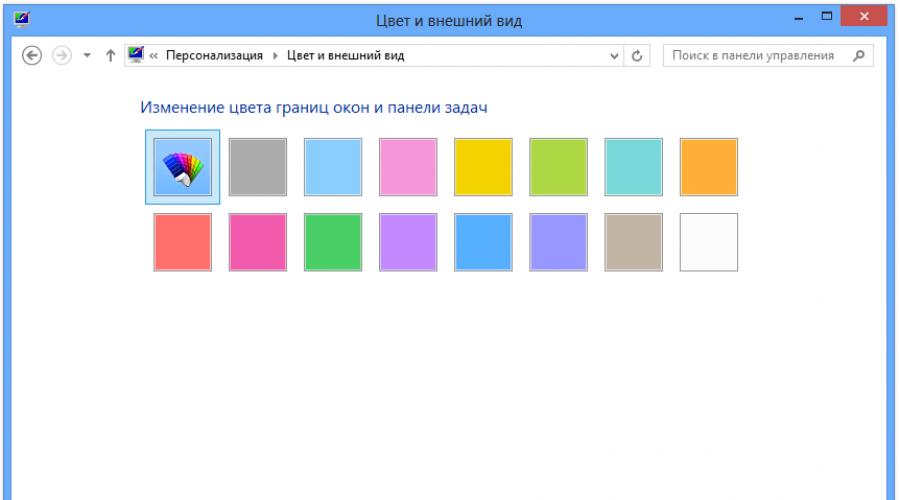
To see how this works, launch the Personalization Dashboard. The easiest way to do this is to right-click on the desktop and select Personalization from the menu that appears.
Then, at the bottom of the window, click on the Color icon. As a result, you'll see a color and appearance control panel that's a little simpler than it was in Windows 7. It does have a new option, Automatic Color (the first in the list of 16 window border colors to choose from).

By selecting this option (it is set by default), the border colors of Explorer windows and the taskbar will automatically change to match your desktop wallpaper.


With the transition to the Aero interface in Windows Vista, Microsoft added a screen scaling feature to the OS, making it easier to view on-screen elements on large, high-resolution screens (as screen size and resolution increase, on-screen elements such as icons and menus become smaller; as a result they become unreadable).
Windows 8 retains this ability, but also gives us a unique new interface that allows us to independently control the size of some on-screen elements.
This interface, called the Screen control panel, is not at all easy to find, especially if you don’t know where it is. However, there are two fairly quick ways to detect it: by searching for the Start screen (we wrote about setting it up) and by using the Personalization control panel, which we used in the previous part. At the bottom left of this control panel there is a link to the Display panel.
The top half of this window works as before, allowing you to adjust the new screen scale if desired. But at the bottom of this window there is a new option. There you can individually resize some desktop interface elements, such as title bars, menus, message boxes, icons, context windows, etc.
Instead of resizing everything on your desktop, you can only change the text size of an individual element. This can be very useful, especially for those who have difficulty seeing small elements.
If you want to change anything in this window, do not forget to write down the original values of the options being changed. After all, there is no button to return to the original version.

When you sign in to Windows 8 using a Microsoft account—which is what I use and what I recommend for you—you can take advantage of syncing your settings from computer to computer. It all works via SkyDrive. Synchronization includes synchronization of desktop settings.
You can set up synchronization using the “Sync Settings” interface in “PC Settings”. The easiest way to call it is to use the key combination WINKEY + I, then select change computer settings, and then select synchronize settings.

This interface says that synchronizing desktop settings includes “themes, taskbar, contrast, etc.”, which is not very clear, and indeed not accurate at all. For example, Windows 8 does not sync pinned taskbar items. What is actually synchronized is: the desktop theme (including background, Explorer window color, sounds and screensaver), taskbar settings and photo slideshow options.
Moreover, the desktop sync switch is not the only element that affects the desktop. For example, synchronization includes information about which application or applications you use to open certain types of files. So if you prefer to use the Adobe Reader desktop app instead of the Windows Reader app for Metro, this will also sync from computer to computer.
The password switch enables web passwords (via IE10). The app settings switch includes some app settings and files purchased through apps. And other Windows settings are also important for desktop users. These include File Explorer and Mouse settings.
Even though the SkyDrive app - which adds SkyDrive storage to Windows 8 - doesn't come with Windows 8, it is in fact a necessary part of Windows 8. That's why it's included in the free Windows Essentials 2012 add-on, which also provides other useful desktop apps like Windows Mail and Photo Gallery. You can download the SkyDrive app and the rest of Windows Essentials 2012 from the Essentials website.
By installing SkyDrive, in addition to settings, you can also synchronize documents, pictures and other content between computers. This will allow you to always see all your data, no matter what computer or even mobile device you are working on today.

Already, some people are trying to sync small collections of music using SkyDrive. It is possible that video file synchronization will be added over time. Although, given the size of the latter, not all people will be able to use it right away.
That's all for today! Good luck to you!
The greatest dissatisfaction among users of previous versions of Windows when switching to a new operating system was caused by two things:
- By default, a new Start screen with “Tiles” opened, so to go to the “familiar” desktop you had to click on the corresponding tile. The next time I logged in, the same thing happened again.
- To turn off/restart the computer using the mouse, you had to “call up the magic buttons, go into the parameters, select the shutdown item and select the desired action.
The "Start" button appeared in its usual place. On click right By clicking on this button, a convenient menu appears with the ability to immediately choose to shut down or restart the PC.

However, when the system starts, tiles still open, not the desktop. To configure the desktop to open instead of "tiles", you must first go to the "Desktop". Then you need to click right mouse button on the "Taskbar".

Next, select “Properties” from the pop-up menu. A window will open dedicated to all the taskbar and “navigation” settings. It is the “Navigation” tab that we need to configure the opening of the desktop instead of the “start screen”. On this tab, find the item “When you log in and close all applications, open the desktop instead of the Start screen” and check the box.

Don't forget to click the "Apply" button, otherwise your changes will not be taken into account. Now, when you turn on your computer or laptop, instead of the start screen (tiles), the good old desktop will always open.
Let us remind you that owners of licensed Windows 8 can upgrade their system to Windows 8.1 absolutely free of charge - this can be done through the Windows Store. If you purchase one version of a Windows 8 product or
After the release of the Windows 8.1 operating system, users had the option to complete the download of the Windows 8.1 operating system directly to the Desktop. Microsoft Corporation, in the new version of the Windows operating system, has provided the user with the ability to choose what the operating system will look like immediately after booting. What exactly will be opened - the Desktop, or the “start screen” with a tiled interface will be opened.
Previously, when using the Windows 8 operating system, in order for the Desktop to be immediately opened when it started, it was necessary to make some changes in the operating system settings. Now this can be done much easier.
Getting an update to Windows 8.1
All users of the licensed Windows 8 operating system can upgrade their operating system to Windows 8.1 for free. To do this, they will need to go to the Windows Store to download the system update to Windows 8.1. The Windows 8.1 operating system will be downloaded to your computer from the Windows Store in the edition and bit level that was installed on your computer.
There are several options that vary depending on the requirements.
After updating the system, the Windows 8.1 operating system will be installed on your computer. In it, the developers introduced the ability to choose how to load the Windows display when loading the operating system.
By default, when you start or restart the Windows 8.1 operating system, the “Start screen” or otherwise “new user interface” (Modern UI), formerly known as Metro UI, opens. Now the user has the opportunity to choose what exactly will need to be opened when starting or rebooting the operating system.
Many users don't like the default tiled interface. After opening the “start screen”, they will be forced, immediately after that, to open the Desktop. Such unnecessary movements cause irritation for many users.
Still, using the Desktop is more convenient on a desktop computer, because in one place you have wider access to different functions of your computer than launching applications in a tiled interface, and switching to other functions and commands is not very convenient with non-touch controls . Moreover, to perform many actions you will still have to open the Desktop.
Boot to Desktop in Windows 8.1
In order to change the display of Windows after loading, you will need to right-click on an empty space in the “taskbar and navigation bar”. After this, a context menu will open in which you will need to select “Properties”.

In the “Start Screen” field, opposite the item “When you sign in and close applications, open the desktop instead of the Start screen”, check the box, and then click on the “OK” button.

After this, the display of the Windows 8.1 operating system, after booting the system or after closing all applications, will be changed to the Desktop.
Conclusions of the article
Now your computer will load the Desktop in Windows 8.1 immediately after starting the operating system. You can immediately get to the Desktop without making unnecessary movements.
Moreover, switching to the tiled interface in Windows 8.1 is very easy. To do this, you just need to left-click on the “Start” button, immediately after that the “start screen” with a tiled interface will open.
Good afternoon, dear readers of the site. I remembered here how at the beginning of 2013 our organization switched to Windows 8. Yes, it was a shock for almost all the staff when, instead of loading the desktop, some strange tiled screen appeared (called the metro interface). “What is this strange thing?”, “How can I get to my desktop or my computer?”, “Can I remove these tiles?” I heard these questions almost every day. I didn’t know this then, but now I know and want to tell you how to launch Windows 8 from the desktop to avoid the initial tiled screen.
Yes, the eight presented many surprises. There were both supporters and haters of this system. Yes, many people were really annoyed by the initial screen, since it was not clear how to work in it at all. Well, if you have read my previous articles or watched this amazing video course If you work in Windows, then you should already be used to it and understand it well. Moreover, the course is free and everything is clearly explained in it.
Well, okay, let's get started, otherwise I'm already carried away by something. And we will start with the simplest method.
If you have Windows 8.1
In the usual eight, the good people from Microsoft did not provide a built-in function so that your operating system boots immediately from the desktop. But in version 8.1 such a function appeared and everything happens quite simply.
If you have Windows 8
As I said above, such a topic will not work in an ordinary group of eight. Well, then we’ll have to resort to some tricks, namely, we’ll configure this function using the task scheduler. It turns out that you will not get past the metro initial screen, but when it appears, literally in a second you will find yourself on the desktop automatically.
- Go to the task scheduler. I usually find it through searching, i.e. I press WIN+Q or just go to the search, and then set the search value to “Options”. After that, I begin to enter the word “Schedule” into the search field and on the left you will have a single item "Task execution schedule". Come in there.

- After you have opened the task scheduler, in the right column, find the item "Create task" and click on it.

- Now in the “General” tab, be sure to give your task a name (any), and also do not forget to select the item from the drop-down menu at the bottom "Customize for Windows 8". Now go to the "Triggers" tab.

- In the “Triggers” tab, click create, and in the new window that opens, in the “Start task” column, select “At login”, and then click OK. By the way, as you can see, you can configure a task both for all users and for a specific one. Is everything clear yet? No questions? If there is, then do not hesitate to ask.

- Now go to the “Actions” tab and click on the “Create” button. In the new window that opens, make sure that the “Actions” column is set to “Run a program.” And now in the line "Program or script" write this path - C:\Windows\explorer.exe, or click on “Browse” and find the explorer.exe file on drive C (or wherever you have your Windows installed) in the windows folder. Now click OK. And in general, in all the following windows, click OK until you exit to the main program window.

That's all. Now you can close the scheduler and see how this feature works. After the reboot, you will see that the initial tiled screen has opened, and literally after 1-2 seconds you will be automatically thrown to the desktop. But there is one side effect. When you exit to the desktop, the “Libraries” folder opens. But I think this is no longer scary.
But if you are not satisfied with this option, then you can use another feature to download directly to the Desktop. More on this below. But if you are tired, you can take a break and make yourself a cup of tea or coffee. For example, I cannot live without black tea (I don’t like green tea), especially with bergamot. Well, in general, I somehow digressed from the topic. Go ahead.
Solving the issue using a third-party program
To solve our question, we can use the excellent ClassicShell program, which can also be used, but I wrote about this in another article.

So if you don’t want to see the metro initial screen when loading windows, then here are a few options for solving this problem. Was everything clear? Hope so. But if you have any questions, don’t hesitate to ask them in the comments. Let's try to decide.
And that’s all I have for today. I will wait for your return, and for this I will try to write articles that are interesting for you more often. Don't forget to subscribe to updates on my blog articles and don't forget about social networks. See you in the next lessons. Bye bye!
Best regards, Dmitry Kostin
Much more attention was paid to the new Windows Runtime environment, associated Metro applications and the start screen, the software giant did not forget about the classic desktop, implementing a number of useful and long-desired innovations for it.
This is good news for those who choose to continue to use this environment primarily or exclusively - mainly, I believe, users of traditional desktops, laptops and netbooks.
But to understand what's new on the desktop, it doesn't hurt to figure out where and how it launches its tentacles into the classic Windows interface. Keep in mind that Metro, not the desktop, is the primary platform, or operating system, for this release. The desktop is treated as just another application. And although many will probably call this statement controversial from a technical point of view, it is very easy to substantiate.
All key system functions are now implemented through Metro interfaces, and not on the traditional desktop, as before. These include a new Start screen, a new Back function, a new task switcher, a Charms bar, notifications (both full screen and pop-up), Snap function (placing two applications on the screen), search and setting parameters. All of these interfaces open “on top” of the desktop, pushing this once proud work environment into second place. The line between old and new is drawn very clearly.
I've written about the Metro features mentioned many times already, so let's talk about the desktop features that have been enhanced in this release.
Improved Windows Explorer
In Windows 8, Explorer has a new ribbon menu that replaces the old command bar with a more functional and rich interface. This interface brings to the forefront all the options that a user might ever need. Fortunately, based on the extensive feedback received during preliminary testing of Windows 8, Microsoft has decided to hide the ribbon menu by default. Therefore, the Explorer looks like this:
But just expand the menu, and all the necessary commands will immediately be at hand. And exactly the necessary ones: the ribbon menu is sensitive to content, so the set of commands and tabs in which they are located differs when viewing different types of folders and selecting different types of files.

Additional tabs that appear depending on the context include the Manage: Library Tools tab, available only when viewing libraries, as well as the Manage: Picture Tools and Manage: Picture Tools tabs. Drive" (Drive: Disk Tools).
Copying and moving files
In Windows 8, Microsoft has significantly improved the process of copying and moving files, making it faster and more convenient. In Windows 7 and previous versions, each file move/copy operation creates a separate window, and with each subsequent operation this process becomes slower.
In Windows 8, everything is done much faster and more compactly. All operations of copying and moving files are summarized in one window, where you can pause any processes to give priority to another operation. In addition, copying and moving is now noticeably faster, even when there are several parallel processes. The resulting conflicts are also managed much more elegantly than before.

Pinned to Start Screen
Windows 7 allows you to pin applications to the taskbar, and Internet Explorer 9 allows you to pin web applications and sites in this way. In Windows 8, of course, you can pin Metro applications to the start screen, as well as desktop programs like Microsoft Word, Adobe Photoshop, etc. This can be done either from the search screen in Metro or directly from Explorer. In the latter case, you need to open in Explorer the place where the corresponding object or object shortcut is located, right-click on it and select the option “Pin to Start”.

This method works for libraries and folders, but not for individual documents.
Mounting disk images to the file system
Windows 8 includes support for two very popular disk image formats, ISO and VHD, allowing users to view the contents of these images directly, as if they were connected to the computer as an optical drive or hard drive.
Windows 8 automatically "mounts" ISO and VHD files so that they essentially become part of the file system, just like any other connected device. For example, an external hard drive connected to a computer can become the "E:" drive or something like that. It's the same with ISO or VHD: just open the image file - for example, by double-clicking - and it becomes part of the file system, given the nearest available drive letter.

There are differences between these two types of images. On both VHD and ISO, you can browse the virtual file system and manage files - adding and deleting them, just like on physical media. But for VHDs, in addition, the full set of Windows 8 disk utilities is available. So these images are treated as permanent, not removable drives. However, both types of images can be “disabled” in the usual way.
SmartScreen
Internet Explorer 9 introduces a useful SmartScreen feature that helps protect your computer from malicious downloads. It does its job well, but of course it can't help if you use a different web browser or if the malware enters your computer through other means. Therefore, in Windows 8, this technology is implemented across the entire file system in the form of the Windows SmartScreen feature. It needs to be enabled manually through the Action Center because SmartScreen requires user consent to anonymously submit data to an online service that tracks app reputation (thank Microsoft, they're not Google). When a suspicious application is detected, SmartScreen immediately warns the user, and very persistently.

Task Manager
Windows has long had a Task Manager, which allows, among other things, manual termination of individual processes and applications. Sadly, this tool is one of the most commonly used in Windows. One way or another, in Windows 8 it was radically improved for the first time in many years, providing a new interface with an excellent set of already familiar functions.
By default, Task Manager now offers a very simple interface with a list of all running desktop and Metro applications. Any program can be terminated if desired by right-clicking on it - this is the most commonly used function of this tool.

Or you can click the “More details” button to turn Task Manager into a professional user’s dream.

This interface allows you to use filtering to more effectively manage applications, gives you the ability to manage startup programs, enable and disable services, and much more.
Finally
There is a lot more interesting things to tell about the desktop - for example, how the Metro interface is being implemented in this environment; significantly improved multi-monitor support for desktop users; about the upcoming application, which will complement the file system with cloud functions; the ability to boot the system immediately with the desktop interface, bypassing the start screen; and many many others. But I will talk about this in more detail – I will talk about the functions mentioned today in the following articles. In the meantime, don't despair if you're not happy with Metro: Microsoft is making significant improvements to the desktop environment in Windows 8. And if you, like me, plan to continue using this interface on traditional computers, upgrading to Windows 8 won't hurt you.
| Materials |