Word stretch last line of paragraph. Removing large spaces in Microsoft Word
Read also
The Microsoft Office Word word processor has perhaps the most advanced text formatting tools of any popular text editor. In particular, it has the ability to stretch text horizontally and vertically in several ways. The easiest way to do this is to increase the font size, but if this option is not suitable for some reason, you can use other Word features.
You will need
- Word processor Microsoft Office Word 2007 or 2010.
Instructions
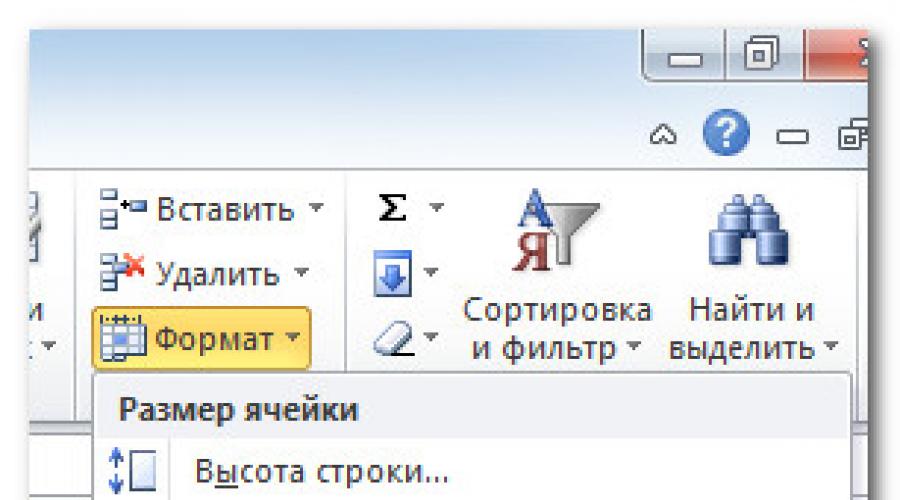
When you open a new workbook, all cells in it are of the default size. You have the ability to modify cells, insert and delete columns, rows and cells if necessary.
In this tutorial, you'll learn how to change row heights and column widths, insert and delete rows and columns, wrap text in a cell, and merge cells.
Working with Rows, Columns, and Cells
By default, every row and every column of a new workbook has the same height And width. Excel allows you to change column widths and row heights in a variety of ways.
To change the column width:
If you see (#######) characters in a cell, the column is not wide enough to display the contents of the cell. Simply increase the column width to display the cell's contents.
To set an exact column width:

Select AutoFit Column Width from the Format command's drop-down list, and Excel will automatically adjust the width of each selected column to match the text you enter.
To change the line height:

To set the exact line height value:

Select AutoFit Row Height from the Format command's drop-down list, and Excel will automatically adjust the height of each selected row to match the text you enter.
To insert rows:

When you insert new rows, columns, or cells, you may see a button next to the inserted cells Paste options. This button allows you to choose how Excel should format them. By default, Excel formats inserted rows or columns the same as the cells in the row above the inserted one. To access more options, hover over the Paste Options button and click the drop-down arrow.

To insert columns:

By default, Excel formats inserted columns the same as the columns to the left of them. To access more options, hover over the Paste Options button and click the drop-down arrow.
When you insert rows or columns, be sure to select the row or column by clicking on the header, that is, all its cells are selected. If you select only a cell, then only one new cell will be inserted.
To remove rows:

To remove columns:

Wrapping text and merging cells
If a cell contains more text than can be displayed, you can select the Wrap text in cell option or merge the cell with its empty neighbors. Wrap text causes text to appear in a cell in multiple lines. Merge cells connects adjacent cells into one.
To install Text Wrap:

If you change your mind about wrapping text, simply click the Wrap Text command button again.
To merge cells using the Merge and Center command:

If you change your mind about merging cells, simply click on the Merge and Place in Center command again.
To access the merge options:
Click the drop-down arrow next to the “Merge and Center” command on the Home tab. A drop-down menu will appear.

- Merge and place in the center: Merges the selected cells and places the text in the center.
- Merge by lines: Merges each row of selected cells into larger cells. This command is useful when you combine the contents of many cells in rows but don't want to create one large cell.
- Merge cells: Merges selected cells into one.
- Unmerge cells: Undoes merging of selected cells.
Practice!
- Open an existing Excel 2010 workbook.
- Resize the column.
- Change the line size to 46 pixels.
- Insert a column between columns A and B.
- Insert a line between lines 3 and 4.
- Delete a column or row.
- Try merging multiple cells.
Text The Microsoft Office Word processor has probably the most advanced text formatting tools of any major text editor. In particular, it has the ability to stretch text horizontally and vertically using several methods. It’s easier for everyone to do this by increasing the font size, but if this option is not suitable for some reason, you can use other Word options.
You will need
- Word processor Microsoft Office Word 2007 or 2010.
Instructions
1. In order to stretch the text in paragraph lines of a document, apply width alignment to it - “full justification”. To do this, first select each text (Ctrl + A) or the desired fragment of it, and then either press the key combination Ctrl + J, or click on the fourth icon in the bottom row of the “Paragraph” command group on the “Main” tab. After this, Word will format the paragraphs, increasing the spaces between words where appropriate. This will not increase the total number of lines and pages in the document.
2. If you need to stretch the text vertically, increase the line spacing used in the document. To do this, you also need to select each text or part of it. Having done this, expand the drop-down list attached to the “Space” button in the same group of “Paragraph” commands - it is located to the right of the one described in the previous step. In the list, select one of the six proposed options or open a window to manually set the required value by clicking on the line “Other line spacing options.” As a result of the metamorphosis of this parameter, the number of lines in the document will not change, but they will be stretched over a larger number of pages.
3. If it is necessary to preserve both the current alignment and the line spacing to stretch the text, you can change the proportions of the letters - make them wider while maintaining the height. To do this, select the required piece of text and click on the small icon located on the “Main” tab to the right of the name of the “Font” command group - it opens a separate settings window of 2 tabs. You can also open this window using the hotkey Ctrl + D.
4. Go to the “Additional” tab and in the drop-down list next to “Scale” select the value 150% or 200%. If these two options do not suit you, use the drop-down list from the next line - “Gap”. Set it to “Sparse”, and then select the appropriate gap between the letters in points - for this there is a window to the right of the drop-down list. Finally, click OK.
Working window The computer is part of the system interface. But for beginners who have just mastered the very first basics of managing their own personal computer, this term is unknown and will probably cause obvious difficulties when trying to understand it. If the variety of menus in the window can be somewhat confusing, then the inability to control its size can cause real inconvenience.

You will need
- Computer running Windows operating system, basic computer skills
Instructions
1. In order to stretch window, move the cursor to the upper right corner of the working window. You will need a square icon located between the closing cross and the line that closes it. So you will expand window on every screen. With one click of the left mouse button on it you will achieve the desired result. By clicking there again you will return the window to its previous dimensions. Fully expand window It is also permitted in another way. To do this, simply double-click on the top edge of the window, or rather, on its header. In this case, metamorphoses are also reversible with repeated exposure.
2. Use the cursor arrow at the edges of the window if you want to freely control its size. Move your cursor around each edge until it turns into a double arrow. After that, hold down the left mouse button and pull the edge to the side. The type of changes you want to set depends on the selected side of the window. Accordingly, the height changes when you grab the bottom or top edges, and stretching the right and left edges adjusts the width. It is not so easy to obtain a true square shape in such ways. If you need proportional square working window, pull it out while keeping the cursor on one of the corners. That is, you can expand or contract window diagonally, entirely.
If, while using the Word program, you encounter a problem such as long gaps between words, then this article will help you eliminate these inconveniences. In it we will talk not only about how to remove the gap between words in Word version 10, but also about the reasons for the appearance of such artifacts. We will analyze their nature in detail and indicate three ways to solve them. By the way, the methods below should work on other versions of the program, but perhaps with some nuances.
Justification
The first reason, and also the most common among users, is incorrect width alignment. Now we will analyze everything in detail and demonstrate how to remove the gap between words in Word in this case.
First let's talk about the nature of emergence. Large spaces may appear because the program does not display the contents of the document correctly. That is, the problem is in formatting. However, it is worth noting that the formatting problem directly depends on the user himself. But don’t be afraid, this nuance can be easily corrected. And there are two ways to solve it.
The first method may not work for everyone, but if you don't need the text to be justified, then align it to the left. This should fix the problem. But still, this method does not always work. If it doesn’t work for you, then pay attention to the method below.
The second method is to manually replace large spaces with short ones. It's easy to do. You need to highlight the large space and press CTRL+SHIFT+SPACEBAR. This combination creates a short space.
"End of line"
So, we learned the first way to remove the gap between words in Word, and also found out the first reason - incorrect width alignment. But if this is not the reason, then the above method is unlikely to help you. Then perhaps your problem is related to the non-printing End of Line character. Let's figure out what to do in this case.
This same "End of Line" sign appears when you press SHIFT+ENTER. In this case, the program does not make a paragraph, but switches to another line, stretching the previous one across its entire width. Because of this, long gaps appear.
To fix this “problem”, you must initially enable the display of invisible characters. This is done by pressing the corresponding button in the program. You can see its location in the image below.

Turn on display, all invisible characters will appear in your text. We are only interested in one - a curved arrow pointing to the left (the same as on the ENTER key). Now you need to remove it. Once you do this, the text will become normal.
So we figured out how to remove the gap between words in Word if you need text in width.
Non-printing Tab character
The problem may also lie in another non-printing character - the "Tab". This character is entered when you press the TAB key. Let's figure out how to remove the gap between words in Word when faced with this problem.
Just like last time, you will need to enable the display of invisible characters. Just now pay attention to the arrow symbol pointing to the right - this is the tab sign. This time you don't need to delete it, but replace it with a regular space. To do this, highlight the character and press SPACEBAR. By performing these manipulations with all tab characters, you will fix the problem.

This was the last reason and the last way to remove large spaces between words in Word. But what if there are a lot of these symbols throughout the text? After all, few people want to remove them all manually. Now let's talk about this.
Quickly replace gaps between words
Everyone probably knows about the function in the Word program called “Replace”. This is what we will use. First, open its window. This is done on the top panel or by pressing CTRL+H. The window we need will appear in front of you with two fields for entering text: “Find” and “Replace”. As you might guess, you need to place a tab character in the “Find” field. To do this, turn on the display of invisible characters in Word and copy the tab character and paste them into the “Find” field. And in the second field, enter a simple SPACE.

Once you have made all the preparations, feel free to click “Replace All”. After this, all unnecessary characters in the document will be replaced, and you will no longer see a large space between words.
The article presented all the ways to remove the gap between words in Word. However, they are not interconnected in any way, so if you decide to fix this problem, use all three methods, one of them will help in any way.
We learned how to create tables in various ways. In this case, let's look at options for editing them, that is, modifying them - reducing or increasing the size of the table itself, rows or columns.
Resize table
Most often, tables with a small number of cells are not proportionally placed on the sheet. You can select the entire table and choose one of the alignment options (left, center, right), but this will only change its location on the sheet. To stretch or enlarge the entire table in Word you need to:
1. Move the mouse pointer to the border of the lower right cell. In this case, the pointer will change from a regular white arrow to a straight line with two arrows at its ends.
2. Next, press the left mouse button and without releasing it. The mouse cursor will change again and will now appear as a black cross. As you will also notice, the table will automatically be highlighted.
3. Then move the mouse cursor down.

4. Your table column and row widths will change automatically.

Change columns in a table
After creating a table in the Microsoft Word text editor, all columns have the same width. You can change the width of individual columns manually or allow the system to automatically change the width of each column, depending on its content.
Each individual column can be changed (expanded or narrowed). To do this, just move the mouse cursor to the edge of the column being changed, and it will automatically take the form of two parallel lines with arrows. Hold down the right mouse button on the column border and move it to the right or left.
Column sizes can also be adjusted using the right column border on the ruler.
For more convenient use of the ruler, hold down the " Alt" - then the widths of each column will be displayed on the ruler.
Change rows in a table
Rows in a table can be changed in the same way as changing columns: by dragging the edges of the row (only now you need the top or bottom border of the cell) or using the ruler (it's located on the left side of the screen).
There is also another way to change the row height.
1. Right-click on any cell in the table. In the context menu that appears, select " Table Properties».