Turning GIMP into a convenient editor. H Turning GIMP into a convenient editor in drafts From the sandbox Tutorial Control using the mouse wheel
Read also
Good day!
In this post I want to talk about how to turn GIMP into a more or less convenient graphics editor.
Until recently, I myself, to put it mildly, Very I didn’t like him, like probably 90% of many of those who came across him after Photoshop.
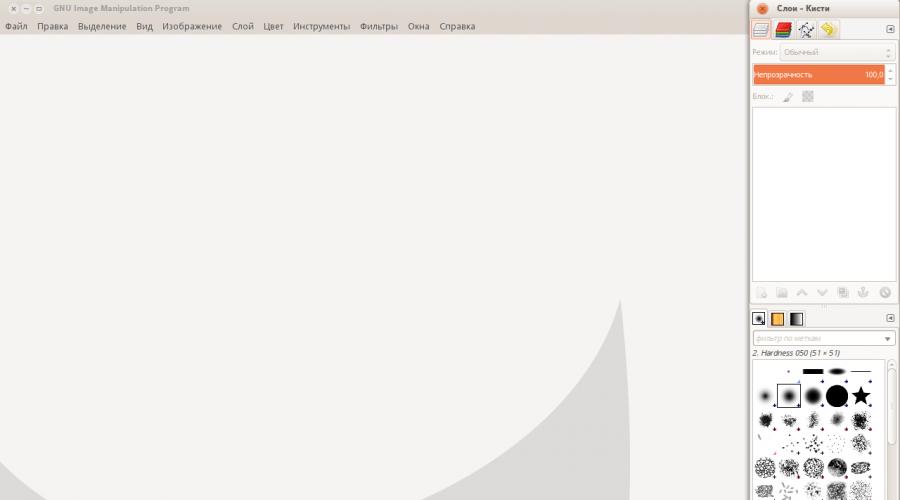
Here's a screenshot of what I ended up with:
Note: All actions described here were performed on Gimp 2.8.10 under Ubuntu 14.04 Trusty.
Toolbar
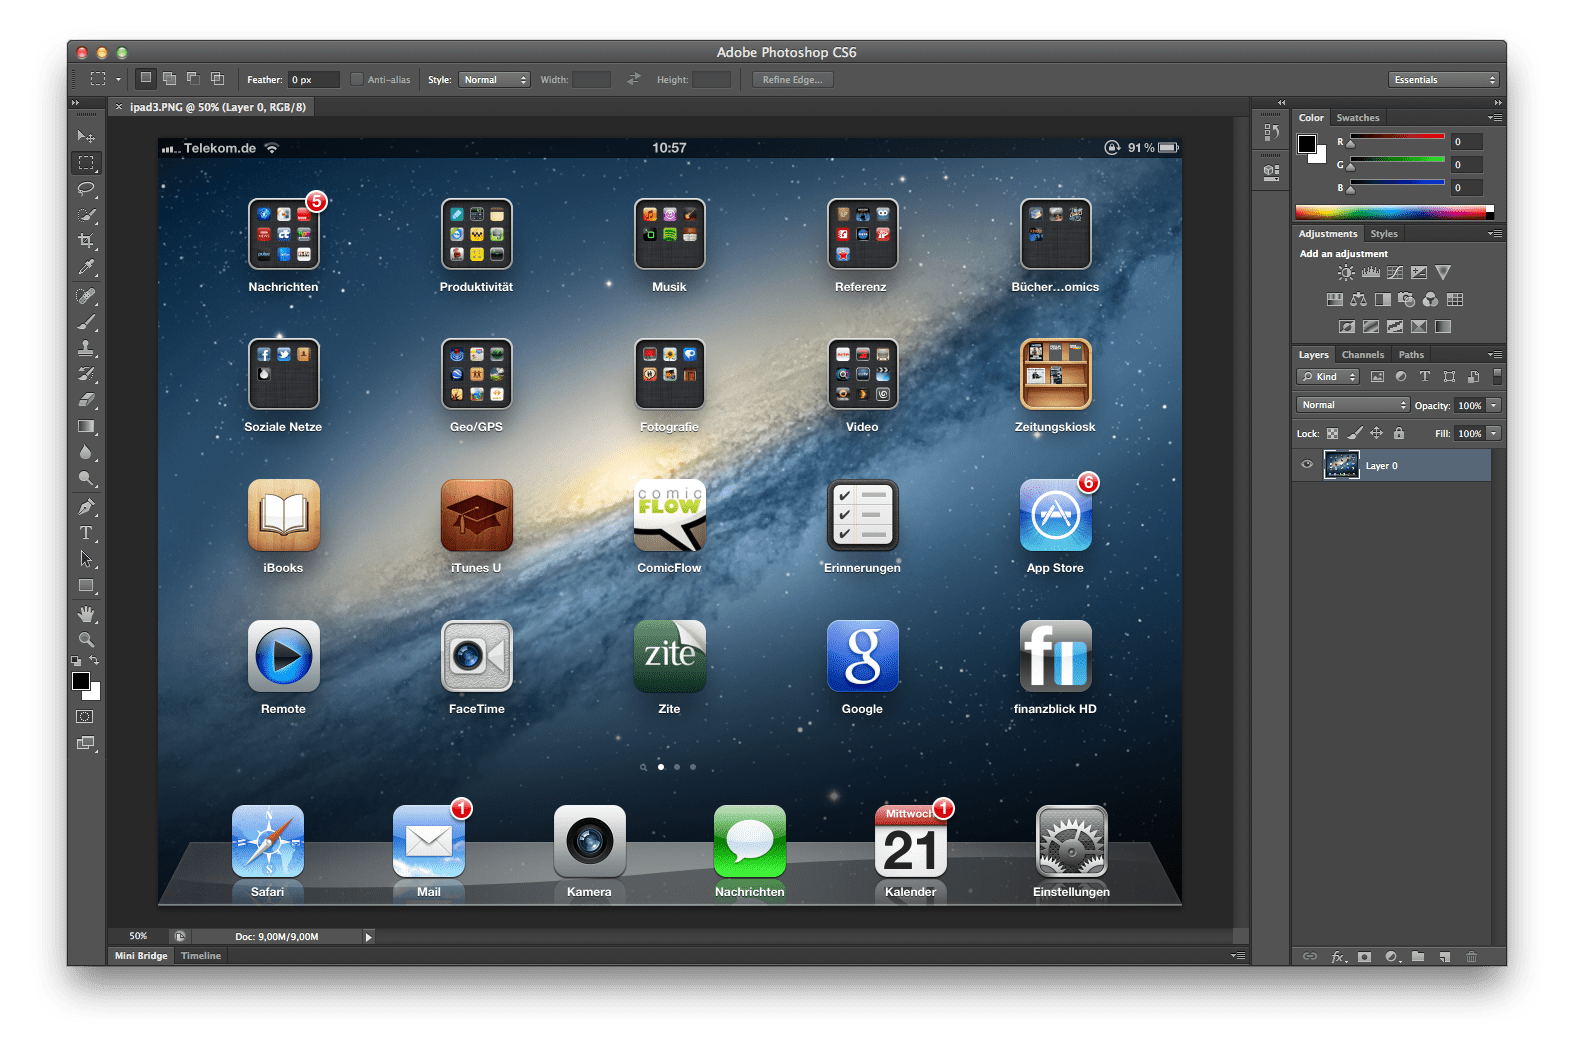
I will be guided by this screenshot Photoshop CS6.After the first launch, the program greets us with a very scary, unfamiliar and dull appearance:

Let's start by switching GIMP to single-window mode. In the menu item Windows>Single Window Mode. Looks better already. To customize the toolbar, go to Edit>Options and there in the tab Toolbar:

The interface here is quite simple; you can adjust the visibility and position of toolbar elements. Trying to choose tools similar to the screenshot, I set the following settings:

But for some reason our panel is not in the window! Using a keyboard shortcut Ctrl+B we make her appear. Already something similar to PS, isn’t it:

Right panel
Next, let's change the panel on the right. It's even easier here. By simply dragging and dropping, you can achieve the optimal arrangement for you. Also be sure to enable Windows>Dockable Dialogs>Colors to display the color panel. I got it like this:
Hotkeys
Another thing I really didn’t like about GIMP was the inconvenient hotkeys. Solving this problem and returning PS hotkeys, as it turned out, is not at all difficult. Download the file from freeshell.org ps-menurc. In the folder ~/.gimp-2.8/ is your file menurc just in case, rename it to menurc-old, and save the downloaded file to the same folder and instead ps-menurc we call menurc.Gradients, brushes and patterns
In my subjective opinion, standard gradients, brushes and patterns in GIMP are completely “uninteresting”. That is why, after quite a long Google, I found what I needed. You don’t have to use what I chose, but If you like it, I'm all for it.Gradients
While I found what I needed, I had to go through a lot of options, and I didn’t like all of them. But, truth be told, the one I ultimately chose is also not the best thing that can be composed.130 Ultimate Web 2.0 Gradients for Gimp 
130 Web 2.0 gradients. To install them, copy all the gradient files from the archive to the ~/.gimp-2.8/gradients folder.
Patterns
Do you know a great site called subtlepatterns.com? Why not add the entire collection of beautiful patterns from there to GIMP? It turned out to be very easy to do. We go to their repository and download all the files in a zip archive. The archive, in turn, is unpacked into the folder ~/.gimp-2.8/patterns. After restarting you will have access to the entire unique set of textures. In this case, by the way, I am even more pleased with GIMP. Just drop the .png file into the desired folder and the patterns are already available. Very comfortably.Brushes
I like the standard minimal brush set in older versions of Photoshop (CS4 and below if I'm not mistaken):
I couldn’t find ready-made brushes like this, but they’re not at all difficult to make yourself. You can download the set I created using this link. Unpack it by analogy with previous additions - ~/.gimp-2.8/brushes . If you want to replace the standard ones with these brushes, replace the contents of the /usr/share/gimp/2.0/brushes/Basic folder with them (with backup if desired). This is what it looks like in GIMP: 
It is worth saying that GIMP allows you to use any brushes for Photoshop! So if you have favorite sets in abr format, you can use them here too.
Some features
Although GIMP is a fairly powerful editor, I did not find some, albeit small, useful functions. For example: Content Aware Fill(Content-aware fill), Layer Styles, Move Tool only for the active layer, and not all at once, " Adhesion"to guides and boundaries, creating a new layer from a selection. It won’t be too difficult for us to add all this to GIMP. So, in order.Content Aware Fill
This good feature, which first appeared in Photoshop in version CS5 in GIMP, was implemented by the Resynthesizer plugin even before that, and is now implemented by the Heal Selection plugin with better quality. In order to make it work you need to install Resynthesizer too. You can download plugins from the links. Setting them is similar to hot keys - Resythesizer to the ~/.gimp-2.8/plug-ins folder, and Heal Selection~/.gimp-2.8/scripts . After restarting the program, you will see the item Filters>Enhancement>Heal Selection in the menu.Layer Styles
Layer styles seem like a small thing, but sometimes they really help out. Like Content Aware Fill, we will add styles using a plugin. From gimp.org, download the .scm version of the plugin and copy it to the known folder ~/.gimp-2.8/scripts . After the restart, the Script-Fu>Layer Effects item will appear in the menu.Normal movement
In order to make a normal movement of the layer, as it turned out, just put a dot in front of the option Move active layer(you need to do this in the tool settings panel with the move tool active):
And, by the way, sometimes you need the old mode, but for some reason it does not highlight the layer you click on. To fix this, go to Edit>Settings, tab Tool Options, check the box " Make a layer or path active".
"Adhesion"
To enable snapping to borders, you need to open the config file ~/.gimp-2.8/gimprc and add the line at the end of the file:(default-snap-to-canvas yes)
Save the file and after restarting the sticking will work.
Creating a layer from a selection
In PS using keyboard shortcut Ctrl+J you can create a new layer from a selection. Download the plugin. From the folder in the “Locale/ru” archive, unzip the .py file into the ~/.gimp-2.8/plug-ins folder (don’t forget to make the file executable). After restarting, the Layer>Cut/Copy to New Layer menu item will appear.Cosmetics
Besides the theme and icons, which are described below, there are a few other things I don't like.Remove the yellow dotted highlight from the current layer
As you probably already noticed, the active layer is highlighted with a disgusting yellow dotted line:Let's take it away! Just go to Edit>Options, Image Window tab>Appearance. There you need to uncheck two boxes" Show layer boundaries".
Subject
Now comes the fun part. Subject. You can download it from gnome-look. From the archive folder Gimp-CS6-Theme put it in ~/.gimp-2.8./themes/ . Restart GIMP so that it can read the new topic; again go to Edit>Options tab Themes. Choose Gimp-CS6-Theme.
And here it is! Agree, now GIMP is much nicer.
And now you can even change the screensaver image. There are some good options on this blog. I'll choose this one:

We go along the path /usr/share/gimp/2.0/images. Replace the file gimp-splash.png to the downloaded one (don't forget that you need to have root rights!). Now when we start we are greeted by a beautiful welcome window:

Bottom line
I am now personally happy with GIMP and have started using it in my daily work. If you know anything else interesting about how to make GIMP more usable, I'll be happy to add it to the post.But I still have some questions that I hope they will help me find answers to.
1. Is it possible to attach the panel at the top/bottom similar to PS?
2. Is it possible to make the color selection circle exactly the same as in PS?
3. How to improve PSD import into GIMP?
4. How to make separators on the toolbar?
5. How can I change the type of guides?
6. How to set, for example, standard Photoshop brushes instead of standard brushes? SOLVED
7. How to group tools on the panel?
UPD: At the request of Meklon, I am posting an archive with the folder.gimp-2.8, although there is no 100% guarantee that after copying the folder you will have the same thing as in the screenshot at the beginning.
UPD: Added a section about textures and gradients.
UPD: Added a section about brushes
Some users of the photo editor for Windows have a problem with hot keys. They simply don't work. In order for the hotkeys to work as expected, GIMP must be launched with an English keyboard layout, and after launching, make sure that the layout is in English when creating new images. For ease of use, it is better to make the English keyboard layout the default.
Changing hotkeys
Hotkeys via menu
The Gimp developers were very particular about the placement of hotkeys, which is probably why they are so inconvenient. The conditioned reflexes of a seasoned Photoshopper may turn out to be superfluous when switching to Gimp if you don’t take up the settings in time. Hotkeys can be configured in the menu "Edit - Keyboard shortcuts".
Dynamic hotkeys
By default, the function of using dynamic keyboard shortcuts is disabled in Gimp, thanks to which hot keys can be assigned by typing them in the desired menu item. For example, you can open the menu "Color", move the cursor over the item "Color balance..." and press Ctrl+B, after which Ctrl+B The color balance adjustment will be constantly called up.
The function of using dynamic keyboard shortcuts can be enabled in the tab "Interface" Gimp Options Dialog. By the way, with this function you can set key combinations for frequently used filters, which, in my opinion, is missing in Photoshop.
July 2005." href="/text/category/iyulmz_2005_g_/" rel="bookmark">July 2005, it may not work well enough with new versions of Gimp, and some hotkeys in Photoshop have already changed.
Move around the canvas using Spacebar
Gimp developers have delighted users who migrated from Adobe products. In addition to the standard ways to move around the image, they added the ability to move around the image by pressing the spacebar.
Mouse wheel control
After downloading the brushes, you can significantly speed up the process of working on the image by changing the size, angle or opacity of the brush right while drawing. When I draw, I use the mouse. I installed a function to change the brush size on the mouse wheel. In my opinion, this is a very convenient feature.

In order to do this, you need to go to "Edit > Options > Controls", choose "Mouse Wheel"(“Main Mouse Whell”) and make it active by moving it to the right side of the window. Then double-click on it and a window with controller settings will appear. Nothing should be specified opposite the Scroll Up and Scroll Down events, double-click on Scroll Up and select in the window that appears "Context - Increase Radius More", do the same with the Scroll Down event, only in the context select "Decrease Radius More".
http://www. *****/gimp/settings/hot_key/
Good day!
In this article I want to talk about how to turn GIMP into a more or less convenient graphics editor.
Until recently, I myself, to put it mildly, Very I didn’t like him, like probably 90% of many of those who came across him after Photoshop.
Here's a screenshot of what I ended up with:
Note: All actions described here were performed on Gimp 2.8.10 under Ubuntu 14.04 Trusty.
Toolbar
I will be guided by this screenshot of Photoshop CS6.
After the first launch, the program greets us with a very scary, unfamiliar and dull appearance:

Let's start by switching GIMP to single-window mode. In the menu item Windows>Single Window Mode. Looks better already. To customize the toolbar, go to Edit>Options and there in the tab Toolbar:

The interface here is quite simple; you can adjust the visibility and position of toolbar elements. Trying to choose tools similar to the screenshot, I set the following settings:

But for some reason our panel is not in the window! Using the keyboard shortcut Ctrl+B we make it appear. Already something similar to PS, isn’t it:
Right panel
Next, let's change the panel on the right. It's even easier here. By simply dragging and dropping, you can achieve the optimal arrangement for you. Also be sure to enable Windows>Dockable Dialogs>Colors to display the color panel. I got it like this:

Hotkeys
Another thing I really didn’t like about GIMP was the inconvenient hotkeys. Solving this problem and returning PS hotkeys, as it turned out, is not at all difficult. Download the file from freeshell.org ps-menurc. In the folder ~/.gimp-2.8/ is your file menurc just in case, rename it to menurc-old, and save the downloaded file to the same folder and instead ps-menurc we call menurc.
Gradients, brushes and patterns
In my subjective opinion, standard gradients, brushes and patterns in GIMP are completely “uninteresting”. That is why, after quite a long Google, I found what I needed. You don’t have to use what I chose, but If you like it, I'm all for it.
Gradients
While I found what I needed, I had to go through a lot of options, and I didn’t like all of them. But, truth be told, the one I ultimately chose is also not the best thing that can be composed.

130 Web 2.0 gradients. To install them, copy all the gradient files from the archive to the ~/.gimp-2.8/gradients folder.
Patterns
Do you know a great site called subtlepatterns.com? Why not add the entire collection of beautiful patterns from there to GIMP? It turned out to be very easy to do. We go to their repository and download all the files in a zip archive. The archive, in turn, is unpacked into the folder ~/.gimp-2.8/patterns. After restarting you will have access to the entire unique set of textures. In this case, by the way, I am even more pleased with GIMP. Just drop the .png file into the desired folder and the patterns are already available. Very comfortably.
Brushes
I like the standard minimal brush set in older versions of Photoshop (CS4 and below if I'm not mistaken):

I couldn’t find ready-made brushes like this, but they’re not at all difficult to make yourself. You can download the set I created using this link. Unpack it by analogy with previous additions - ~/.gimp-2.8/brushes. If you want to replace the standard ones with these brushes, replace the contents of the /usr/share/gimp/2.0/brushes/Basic folder with them (with backup if desired). This is what it looks like in GIMP:

It is worth saying that GIMP allows you to use any brushes for Photoshop! So if you have favorite sets in abr format, you can use them here too.
Some features
Although GIMP is a fairly powerful editor, I did not find some, albeit small, useful functions. For example: Content Aware Fill(Content-aware fill), Layer Styles, Move Tool only for the active layer, and not all at once, " Adhesion"to guides and boundaries, creating a new layer from a selection. It won’t be too difficult for us to add all this to GIMP. So, in order.
Content Aware Fill
This good feature, which first appeared in Photoshop in version CS5 in GIMP, was implemented even before that by the Heal Selection plugin, and is now implemented by the Resynthesizer plugin with better quality. You can download plugins from the links. Setting them is similar to hot keys - Resythesizer to the folder ~/.gimp-2.8/plug-ins, and Heal Selection~/.gimp-2.8/scripts. After restarting the program, you will see the item Filters>Enhancement>Heal Selection in the menu.
Layer Styles
Layer styles seem like a small thing, but sometimes they really help out. Like Content Aware Fill, we will add styles using a plugin. From gimp.org, download the .scm version of the plugin and copy it to the known folder ~/.gimp-2.8/scripts. After restarting, the Script-Fu>Layer Effects item will appear in the menu.
Normal movement
In order to make a normal layer movement, as it turned out, just put a dot in front of the option Move active layer(you need to do this in the tool settings panel with the move tool active):

And, by the way, sometimes you need the old mode, but for some reason it does not highlight the layer you click on. To fix this, go to Edit>Settings, tab Tool Options, check the box " Make a layer or path active".
Adhesion
To enable snapping to borders, you need to open the config file ~/.gimp-2.8/gimprc and add the line at the end of the file:
(default-snap-to-canvas yes)
Save the file and after restarting the sticking will work.
Creating a layer from a selection
In PS, you can use the keyboard shortcut Ctrl+J to create a new layer from a selection. Download the plugin. From the folder in the “Locale/ru” archive, unzip the .py file into the ~/.gimp-2.8/plug-ins folder (don’t forget to make the file executable). After restarting, the Layer>Cut/Copy to New Layer menu item will appear.
Cosmetics
Besides the theme and icons, which are described below, there are a few other things I don't like.
Remove the yellow dotted highlight from the current layer
As you probably already noticed, the active layer is highlighted with a disgusting yellow dotted line:
Let's take it away! Just go to Edit>Options, Image Window tab>Appearance. There you need to uncheck two boxes" Show layer boundaries".
Subject
Now comes the fun part. Subject. You can download it from gnome-look. From the archive, place the Gimp-CS6-Theme folder in ~/.gimp-2.8./themes/. Restart GIMP so that it can read the new topic; again go to Edit>Options, Themes tab. Select Gimp-CS6-Theme.

And here it is! Agree, now GIMP is much nicer.
And now you can even change the screensaver image. There are some good options on this blog. I'll choose this one:

We go along the path /usr/share/gimp/2.0/images. Replace the file gimp-splash.png to the downloaded one (don't forget that you need to have root rights!). Now when we start we are greeted by a beautiful welcome window:

Bottom line
I am now personally happy with GIMP and have started using it in my daily work. If you know anything else interesting about how to make GIMP more usable, I'll be happy to add it to the post.
UPD: At the request, I am posting an archive with the folder.gimp-2.8, although there is no 100% guarantee that after copying the folder you will have the same thing as in the screenshot at the beginning.