How to properly hide a sheet in Excel. Recovering missing sheets in Microsoft Excel
The ability in Excel to create separate sheets in one workbook allows you, in fact, to create several documents in one file and, if necessary, link them with links or formulas. Of course, this significantly increases the functionality of the program and allows you to expand the horizons of the tasks. But sometimes it happens that some sheets you created disappear or all their labels completely disappear in the status bar. Let's find out how you can get them back.
Navigation between sheets of the book is possible using shortcuts that are located on the left side of the window above the status bar. We will consider the issue of their restoration in case of loss.

Before we start studying the recovery algorithm, let's figure out why they might disappear in the first place. There are four main reasons why this can happen:
- Disable the shortcut bar;
- Objects were hidden behind a horizontal scroll bar;
- Selected shortcuts have been set to hidden or super hidden;
- Delete.
Naturally, each of these reasons causes a problem that has its own solution algorithm.
Method 1: Enable the Shortcut Bar
If there are no shortcuts above the status bar in their proper place, including the active element shortcut, this means that their display was simply disabled by someone in the settings. This can only be done for the current workbook. That is, if you open another Excel file with the same program, and the default settings are not changed in it, the shortcut bar will be displayed in it. Let's find out how you can re-enable visibility if you disable the panel in the settings.


Method 2: Move the Scroll Bar
Sometimes there are cases where the user accidentally drags the horizontal scroll bar over the shortcut bar. Thus, he actually hid them, after which, when this fact is discovered, a feverish search begins for the reason for the absence of labels.


Method 3: Enable showing hidden shortcuts
You can also hide individual sheets. In this case, the panel itself and other shortcuts on it will be displayed. The difference between hidden objects and deleted objects is that they can always be displayed if desired. In addition, if on one sheet there are values that are pulled up through formulas located on another, then if an object is deleted, these formulas will begin to display an error. If you simply hide the element, then no changes will occur in the functioning of the formulas, there will simply be no shortcuts for transition. In simple terms, the object will essentially remain as it was, but the navigation tools to navigate to it will disappear.
The hiding procedure is quite simple. You need to right-click on the corresponding shortcut and select the item in the menu that appears "Hide".

As you can see, after this action the selected element will be hidden.

Now let's figure out how to show hidden shortcuts again. This is not much more difficult than hiding them and is also intuitive.


Method 4: Show Super Hidden Sheets
In addition to hidden sheets, there are also super hidden sheets. They differ from the first ones in that you will not find them in the usual list of displaying a hidden element. Even if you are sure that this object definitely existed and no one deleted it.
Elements can disappear in this way only if someone purposefully hid them through the VBA macro editor. But finding them and restoring the display on the panel will not be difficult if the user knows the algorithm of actions, which we will discuss below.
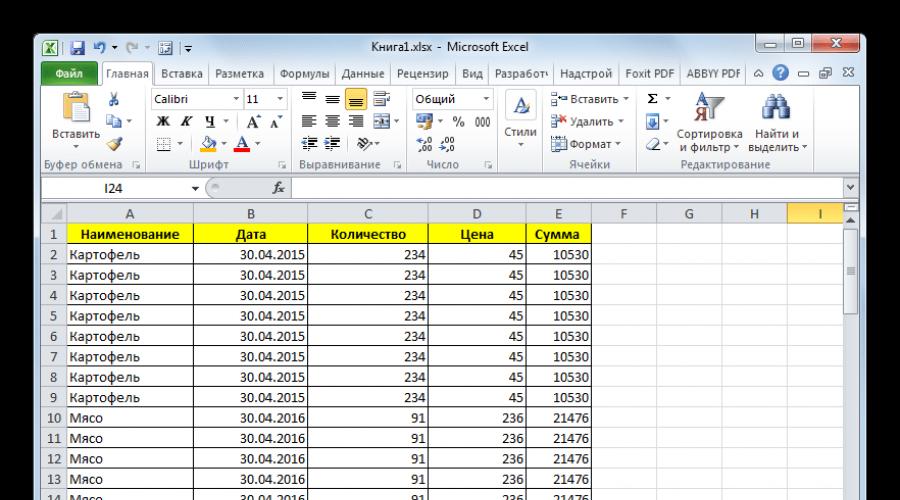
In our case, as we see, the panel lacks the labels of the fourth and fifth sheets.

Going to the window for displaying hidden elements, in the way that we talked about in the previous method, we see that it displays only the name of the fourth sheet. Therefore, it is quite obvious to assume that if the fifth sheet is not deleted, then it is hidden using the VBA editor tools.

- First of all, you need to enable macro mode and activate the tab "Developer", which are disabled by default. Although, if in this book some elements were assigned the status of super-hidden, then it is possible that the specified procedures have already been carried out in the program. But, again, there is no guarantee that after hiding elements, the user who did this did not again disable the necessary tools to enable the display of super-hidden sheets. In addition, it is quite possible that enabling the display of shortcuts is not performed on the same computer on which they were hidden.
- In the Excel Options window that opens, click on the item "Customize the Ribbon". In the block "Main Tabs", which is located on the right side of the window that opens, check the box, if not, next to the parameter "Developer". After that we move to the section "Security Control Center» using the vertical menu on the left side of the window.
- In the window that opens, click on the button "Trust Center Settings...".
- The window is launching "Security Control Center". Go to the section "Macro Options" through the vertical menu. In the toolbox "Macro Options" set the switch to position "Enable all macros". In the block "Developer Macro Options" check the box next to the item "Trust access to the VBA project object model". After working with macros is activated, click on the button "OK" at the bottom of the window.
- Returning to the Excel parameters, so that all settings changes take effect, also click on the button "OK". After this, the developer tab and work with macros will be activated.
- Now, to open the macro editor, move to the tab "Developer", which we just activated. After that, on the ribbon in the toolbox "Code" click on the big icon "Visual Basic".

You can also launch the macro editor by typing the keyboard shortcut Alt+F11.
- After this, the macro editor window will open, on the left side of which there are areas "Project" And "Properties".

But it is quite possible that these areas will not appear in the window that opens.
- To enable area display "Project" click on the horizontal menu item "View". In the list that opens, select a position "Project Explorer". Or you can press the hotkey combination Ctrl+R.
- To display an area "Properties" click on the menu item again "View", but this time we select a position in the list "Properties Window". Or, as an alternative, you can simply press the function key F4.
- If one area overlaps another, as shown in the image below, then you need to place the cursor on the border of the areas. At the same time, it should transform into a double-headed arrow. Then hold down the left mouse button and drag the border so that both areas are completely displayed in the macro editor window.
- After this in the area "Project" We highlight the name of the super-hidden element, which we could not find either on the panel or in the list of hidden shortcuts. In this case it is "Sheet 5". At the same time, in the area "Properties" the settings of this object are shown. We will be specifically interested in the point "Visible" ("Visibility"). Currently, the parameter opposite it is set "2 - xlSheetVeryHidden". Translated into Russian "Very Hidden" means “very hidden”, or as we previously expressed “super hidden”. To change this parameter and return visibility to the shortcut, click on the triangle to the right of it.
- After this, a list appears with three options for the state of the sheets:
- "-1 – xlSheetVisible"(visible);
- "0 – xlSheetHidden"(hidden);
- "2 - xlSheetVeryHidden"(super hidden).
In order for the shortcut to appear on the panel again, select the position "-1 – xlSheetVisible".
- But, as we remember, there is still a hidden "Sheet 4". Of course, it is not super hidden and therefore its display can be set using Method 3. It will even be easier and more convenient. But, if we started talking about the possibility of enabling the display of shortcuts through the macro editor, then let's see how it can be used to restore ordinary hidden elements.
In the block "Project" highlight the name "Sheet 4". As we see, in the area "Properties" opposite the point "Visible" parameter set "0 – xlSheetHidden", which corresponds to a regular hidden element. Click on the triangle to the left of this parameter to change it.
- In the list of parameters that opens, select the item "-1 – xlSheetVisible".
- After we have configured the display of all hidden objects in the panel, we can close the macro editor. To do this, click on the standard close button in the form of a cross in the upper right corner of the window.
- As you can see, now all the shortcuts are displayed in the Excel panel.


Method 5: Recovering Deleted Sheets
But it often happens that the labels disappear from the panel simply because they were removed. This is the most difficult option. If in previous cases, with the correct algorithm of actions, the probability of restoring the display of shortcuts is 100%, then when they are deleted, no one can give such a guarantee of a positive result.
Removing a shortcut is quite simple and intuitive. Just right-click on it and select the option in the menu that appears "Delete".

After this, a warning about deletion will appear in the form of a dialog box. To complete the procedure, just press the button "Delete".

Recovering a deleted object is much more difficult.


But you should pay attention to the fact that by restoring a sheet in this way, you will lose all the data entered into the document, starting from its last save. That is, in essence, the user has to choose between what is more priority for him: the deleted object or the data that he managed to enter after the last save.
But, as mentioned above, this recovery option is only suitable if the user did not have time to save the data after deleting it. What to do if the user saved the document or even exited it and saved it?
If, after deleting the shortcut, you already saved the book, but did not have time to close it, that is, it makes sense to delve into the file versions.


But if you saved and closed the file, and the next time you open it you see that one of the shortcuts has been deleted, then you won’t be able to restore it using this method, since the list of file versions will be cleared. But you can try to restore through version control, although the likelihood of success in this case is much lower than with previous options.


However, the likelihood of finding the book you need is low. In addition, even if it is present in this list and contains a deleted element, it is likely that its version will be relatively old and not contain many of the changes that were made later.
As you can see, the disappearance of shortcuts on the panel can be caused by a number of reasons, but they can all be divided into two large groups: the sheets were hidden or deleted. In the first case, the sheets continue to be part of the document, but access to them is difficult. But if you wish, having determined the way in which the shortcuts were hidden, adhering to the algorithm of actions, restoring their display in the book will not be difficult. It's another matter if objects were deleted. In this case, they were completely extracted from the document, and their restoration is not always possible. However, even in this case, it is sometimes possible to recover data.
Sometimes you need space for information that users cannot read or change. Build a secret place in your workbook, a place where you can store data, formulas, and other little things that are used but not visible on your sheets.
The easiest way to hide such a sheet is to right-click on the sheet tab and select the option Hide(Fig. 1). However, slightly more experienced users will be able to display a sheet hidden in this way by clicking on the tab of any visible sheet and selecting the option Show. You can simply protect the sheet by going through the menu Review –> Protect sheet. However, it will still be completely visible - data, formulas and everything else.
Rice. 1. Team Hide sheet
Download the note in or
This note proposes an even more radical means of hiding data - changing the worksheet property Visible, by assigning it a value xlVeryHidden in the VBA editor, but without writing VBA code.
Go through the menu Developer –> Visual Basic or press Alt+F11 to open the VBA Editor window (Figure 2).

In the Project - VBAProject window, find your workbook name (Book1 in our example) and expand its hierarchy by clicking the plus sign to the left of the workbook name. Expand the Microsoft Excel Objects folder to see all the sheets in the workbook (in Fig. 2, these manipulations have already been completed).
Select the sheet you want to hide (in our example, Sheet1) and open its properties by selecting the menu command at the top of the Editor window View –> Properties Window(or by pressing F4). Make sure the tab is selected Alphabetic and find the property Visible at the very bottom in the (Name) column. Click the property value field on the right Visible and select the last value, 2 – xlSheetVeryHidden(Fig. 3).

Rice. 3. Change property Visible for sheet Sheet1
After you have selected option 2 – xlSheetVeryHidden – in the properties window Properties, Sheet1 disappears from the list of sheets in the book (Fig. 4). To display this window, you can, for example, right-click on the left or right arrow in the lower left corner of the Excel window next to the sheet labels.

Rice. 4. Sheet hidden using property Properties, not in the list of sheets in the book
This method of hiding a sheet is not completely reliable, since an advanced user can do the opposite operation - go to the VBA editor and return the -1 xlSheetVisible property.
Based on materials from the book by D. Kholey, R. Kholey. Excel 2007 Tricks, pp. 36–37
In order to be able to hide information from prying eyes, and perhaps from your own, Excel 2007 and higher provides the ability to hide sheets. In this case, you can make the sheets of the workbook either hidden or very hidden, and, if necessary, make them visible again, that is, display (show).
How to make a sheet hidden?
Making a sheet hidden is very simple; to do this, you need to right-click on the tab of the desired sheet and select “Hide” in the context menu that appears. In order to hide several sheets in a row, or all sheets except the active one (the workbook must contain at least one visible sheet), you need to left-click on the first desired sheet, then, while holding down the Shift key, click on the last one, then right-click mouse button in the area of the selected sheets and select "Hide" from the context menu. All selected sheets become hidden at once. Similarly, you can selectively select sheets by using the Ctrl key instead of the Shift key.
How to make a sheet very hidden?
Workbook sheets can be made very hidden. Such sheets cannot be displayed using standard Excel tools; when calling the context menu, the “Display...” item (in some versions it is called “Show...”) is not active. To make a sheet very hidden, you need to go to the VB (Visual Basic) editor, this can be done in different ways, but the easiest way is by using the Alt+F11 key combination, select the desired sheet in the VBA workbook project, and then in the “Visible” property of this sheet select the "xlSheetVeryHidden" parameter.
To return the sheet to visibility, you need to change the "Visible" property back to xlSheetVisible.
How to show hidden sheets?
The reverse procedure, when it becomes necessary to display hidden sheets and make them visible, may require a lot of patience. To show hidden sheets you need toRight-click in the sheet name area and select the "Display..." menu item.

After this, a window appears with a list of hidden sheets and hidden sheets are displayed on the screen by selecting one sheet from the entire list. It will not be possible to display them all at once.

You will have to make the sheets visible one at a time. Displaying even ten hidden sheets will be quite a tedious task, let alone more of them.
What should I do if I can’t hide or show a sheet?
If the workbook structure is protected, the “Hide” and “Show” items of the context menu will be inactive. In order to perform any actions with sheets, you must remove book protection .
Displaying all sheets, selectively displaying and hiding sheets by mask
The Excel add-in presented below allows you to facilitate and speed up some of the manipulations performed with workbook sheets. The add-on allows you to:
1) Make all sheets hidden except the active one;
2) make all sheets except the active one very hidden;
3) display all hidden sheets at once, regardless of whether they are hidden or very hidden;
4) hide and show sheets by mask, using special matching characters for sheet names.
Excel has three levels of sheet visibility: visible, hidden, and very hidden. Visible The sheet appears in the sheet list of sheets in the workbook. Hidden The sheet is not displayed in the list, but it can be displayed using standard methods. So-called Very hidden a mode that can only be set and removed using macros. Very hidden sheets are not displayed in the list of sheets, moreover, they are not displayed in the "Display Hidden Sheet" dialog box.
Since most Excel users do not know about this method, it is convenient to use if you need to hide part of the information.
How to make a sheet very hidden
Method number 1. Via VBA-Excel add-in
The most convenient way, which does not require special knowledge and also allows you to quickly hide a large number of sheets, is to install the VBA-Excel add-in. In order to hide or show sheets in Excel you must:
Method number 2. Using the sheets property in the code editor
To hide a sheet you need to:

To display a hidden sheet, you can set the value in a similar way -1 - xlSheetVisible.
Method No. 3. Using Macros
We can say that this is the most difficult method, but also more universal. Using programming, you can set various conditions for hiding sheets and much more. But let’s just focus on hiding/displaying for now.
- Open the code editor with a keyboard shortcut Alt+F11.
- In the left menu, expand the project with the same name as your book.
- Create a new module (if you don't already have one) in which we will write the code to hide the sheets.
- Go to the module and paste the following code into it:
