How to install Windows on Mac? Step-by-step instruction. Methods for installing Windows OS on Mac Installing windows 7 from a flash drive on a macbook
Read also
The article provides detailed instructions on how to install Windows 7 on a MacBook.
Everyone is used to working with Windows, and when you buy a MacBook, you need to install it for the usual work with documents.
Installing Windows 7 on Macbook Air using Boot Camp
Installing Windows 7 on Macbook Air will not take much time. Installation requires a USB optical drive or 16 GB USB flash drive. Before installation, you need to check for software updates on your computer.
- Turn on your MacBook and launch Boot Camp.
- Uncheck the box at the top where you want to create a disk. Check the box if the installation will be carried out from an image.
- Use a USB flash drive to save drivers and other information. All information on the drive will be deleted, so use an empty drive.
- Split the disk into two equal parts for the two operating systems.
- Connect a USB DVD drive and insert the Windows distribution into it.
- Wait while Boot Camp downloads the latest software from the Internet and reboots your computer.
- Install Windows following the instructions, select the suggested settings.
Windows installs in just over an hour. For those who don’t know how to start Boot Camp: on the desktop at the top, click the magnifying glass. In the search window write down the name of the application and click “Continue”.
Creating an image
If you have a disk to install the software, you need to create an image of it.
- Use an optical drive.
- Using Finder on your laptop, open Disk Utility.
- In the window that opens, select the installation disk.
- Go to the “File” menu, “New image” and then click “DVD disc”.
- In “DVD/CD Wizard”, find “Image Format” and "Encryption". Check "No".
- Create a file name, enter a password and wait until the new image is created.
- When finished, disconnect the optical drive.
- Use Finder to find the new image.
- Rename the file name from .cdr to .iso.
- If you are using removable storage devices, make sure they appear as removable devices in the Finder.
- Connect the USB drive.
- After creating the ISO image, proceed to install the program.
Keyboard
After downloading the software, you can use the keyboard in several ways. Keys in different operating systems can perform different functions. Many keys on laptops with the Windows operating system have analogues on the Apple layout.
Formatting Windows OS
To format, use the installer, after being asked about the installation location, select the Boot Camp partition. Next, we begin formatting by selecting “Disk Setup”.
The new partition can be renamed, formatted, or deleted. Once two partitions are created, they cannot be resized. To resize, you will have to delete the partition and create the required partition again. To rename a partition, boot the operating system itself and rename the partition in it. Do not use other programs to resize the partition; this may cause problems.
Be careful! Deleting a partition results in loss of files.
Boot Camp app
The application consists of three sections:
- selecting a system to boot;
- setting up the keyboard operation;
- setting up the trackpad.
The first partition will allow you to boot one of two operating systems. Using the second section, you can control the functions of the F1 - F12 keys. In the third section, choose familiar gestures for working in any OS.
Starting Windows
On a Macbook Air 11 or Macbook Pro there is no choice of operating system when booting, so to work in Windows 7, press Alt. A menu will appear in which select the desired system and boot. If you do not press the Alt button when turning on, MacOS will start loading.
Uninstalling Windows
To uninstall, simply launch Boot Camp in OS X and select "Delete"". After removal OS X will take up all the space. It will take less than a minute for a previously installed operating system to be completely removed.
Software updates
Use the App Store program to check for updates on your laptop. Select Update from the Updates section. In the application settings, set the options to “Download recently released updates in the background.” Then updates will be carried out automatically. Once the latest update has installed, you can begin installing Windows.
If you have an update disc, follow these steps:
- Boot your MacBook into MacOS.
- Connect the Windows update disk.
- Unzip and transfer the files to a USB drive.
- Restart your laptop and turn on the installed version of Windows.
- Perform the update using the installation program.
Driver
Some users have a question: “What is a driver?” A driver is a program without which the connected device will not work with the computer. At least once in their life, everyone has installed a laptop driver to operate a scanner or printer. Usually the OS already has drivers for different devices, but sometimes updates are needed, so check for updates. For example, for audio systems to work correctly, download the free realtek driver from the Internet.
Apple does not provide technical support for installing or repairing Windows. Consultation can be obtained by phone about the special Boot Camp assistant, its installation or recovery.
Microsoft and Apple operating systems occupy the leading places in distribution in the world. At the same time, the share of Windows is 82.5%, and macOS – 12.5%. Given this ratio, it is not surprising that corporate software is developed mainly for Microsoft products. As an example, we can take the 1C Enterprise platform, which does not have a desktop version for macOS. Installing Windows on Mac as a second OS helps solve this problem.
The tasks that require the use of a second operating system on a MacBook vary. Depending on what programs you intend to use, you can choose one of the available options:
- installing the OS on a dedicated hard disk partition using the built-in Bootcamp utility. In this case, the user, having booted into Windows, can fully use all the hardware resources of the laptop. Suitable for working with resource-intensive applications;
- use of virtualization technologies. The most convenient option is offered by Parallels Desktop. Using Coherence mode, Windows programs can be used without rebooting directly in the macOS environment. In full screen mode, the user can switch between the two operating systems as if between different desktops. In this case, hardware resources are limited by the user independently.
Let's look at how to install and use Windows in both options.
Boot Camp Assistant
Users who have had to install two operating systems know that Windows does not tolerate “competitors” by overwriting their boot sector. Even two different operating systems from Microsoft do not get along well with each other, fighting for boot priority. Apple solved this problem in an original way by introducing the Boot Camp utility into the system. It is included in the standard set of software installed on both iMac and MacBook Air, Rro and Retina 12-inch versions.
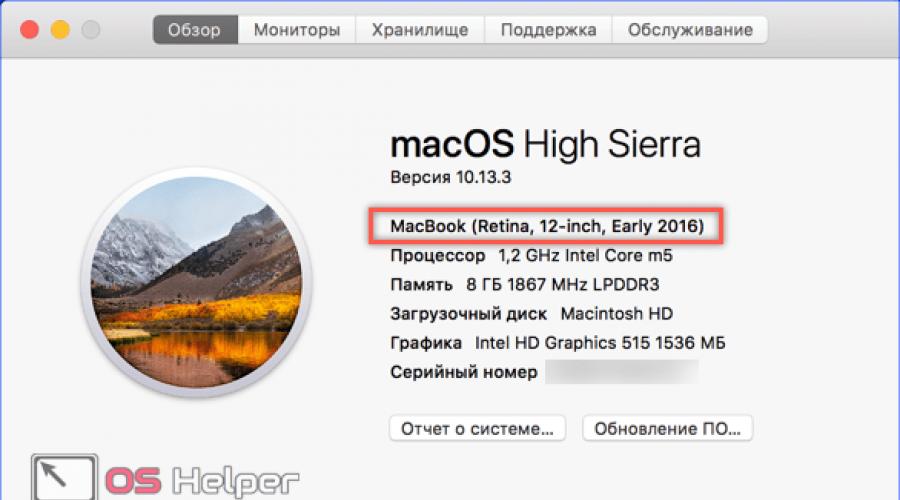
- Before we start installing Windows, let's check if our Mac meets the hardware requirements. Click on the apple logo in the menu bar and open computer information. We look at the model and year of manufacture indicated in the screenshot.

- We go to the technical support page. For example, let's check the possibility of installing Windows 10.

- Open the list and check the matches. Our model falls into the group marked in the screenshot as “later”, released in 2016.

- Launch Finder, find the “Utilities” folder in programs and open it. The Boot Camp Assistant we need is marked with a frame. Before you run it, make sure your system is updated to the latest build of High Sierra and the latest versions of other Apple software are installed. This is a necessary condition for the utility to work properly.

- The first window is informational. Following the recommendations, make sure that your MacBook is connected to power.

- We indicate the location of the ISO file with the Windows distribution package obtained from the Microsoft website. By clicking on the point indicated by the arrow between the hard disk partitions, we set the desired size. After completing the preparation, click the “Install” button.

- The system automatically downloads the necessary hardware drivers. Some MacBooks may require a flash drive to save support software. For older Pro models equipped with a DVD drive, the distribution ISO file must be burned to a disc. Installing Windows on them from a clean image is not supported and you cannot do without external media.

- After completing the preparatory steps, macOS will ask you for confirmation to partition your hard drive.

- The computer will reboot and launch the standard Windows installer. Further actions are no different from installing this OS on a regular PC. The last step is to activate the Boot Camp wizard. All drivers necessary for the operation of the second system are contained in one package, which was downloaded before partitioning the disk. As a result of the operations performed, a BootCamp partition was created on the MacBook, on which Windows will “live.”

Switching between the two OSes is done by rebooting while holding down the Option key ⌥. At startup, the computer will display a selection menu. By moving the arrow pointer, we select the system we will use.

If you've gotten used to gesture controls in macOS, it's time to think about the mouse. It is impossible to work without it on a MacBook in Windows. Despite all Microsoft's tricks, the system does not support even a fifth of the trackpad's capabilities.

Removing the BootCamp partition
When there is no longer a need to use a second operating system, the BootCamp partition along with Windows can be deleted. The operation is fast and does not require a reboot.
Mac OS Extended
The file system used by Apple prior to the release of macOS High Sierra is called HFS+ or Mac OS Extended. If your Mac uses a regular hard drive, it remains unchanged after the update.
- Launch Boot Camp Assistant and skip the first information window. At the stage of selecting actions, we check that the checkbox is only in the place marked with an arrow. Click “Continue”.

- The system shows the new disk partitioning scheme. As you can see, the BootCamp section is no longer on it. Click on the “Restore” button.

- Confirm your desire to change the partition scheme by entering a password.

- The operation is accompanied by the appearance of a bar with a progress indicator. After a few minutes you will see the following window.

The disk again consists of one partition and there are no traces of Windows left on it.
APFS
After upgrading to macOS High Sierra on Macs using SSD storage, the file system changes to AFPS. This file system is better optimized for solid-state drives and is used by default in all new Apple computers. However, when trying to delete a Windows partition using the method described above, the user will receive an error. The system will report that the operation cannot be completed because the boot volume is formatted in a file system other than HFS+.
- Open Boot Camp’s neighbor in the “Utilities” folder.

- In the navigation area, select the volume on which Windows is located. Click the “Erase” button marked with an arrow.

- We confirm the choice made.

- After successful completion of the operation, close the information message.

- Click the button marked with a tick. Using the “-” sign indicated by the arrow, delete the extra BootCamp and “*” partitions.

- The disk layout should look like this: Click the “Apply” button.

- As you can see in the screenshot, the operation was completed successfully. We were able to remove the Windows partition and return the SSD to its original state.
Parallels Desktop is the best virtualization solution on macOS. With its help, you can install any version of Windows or Linux and use the necessary software that only works on these operating systems.
- Since we have already downloaded the ISO image for installation on Boot Camp, we select the marked item in the wizard.

- We specify the location of the distribution manually or let the program find it automatically.

- Enter your existing Windows digital license key.

- By default, the application offers us optimization for using office programs.

- At this stage, check the box indicated by the arrow to manually set the parameters of the virtual machine.

- Here we can configure the allocation of disk space, memory, use of network resources and peripheral devices. The specified parameters must not be lower than the minimum requirements set by Microsoft for a PC. For example, for RAM this value is 2 GB. After the preliminary setup is completed, the Windows OS installer will launch.

- After completing the necessary installation steps, you get a second operating system on your Mac in the form of a virtual machine. The buttons marked in the left corner of the window are responsible for the operating mode. The green one turns Windows into full-screen mode and outwardly it will look like a regular desktop, occupying a separate workspace. Blue activates full compatibility mode. It allows you to open Windows applications directly on your Mac desktop.

- If you no longer need to use the VM, you can easily remove it from the Parallels Control Center by selecting the appropriate item in the context menu.

- Files can be kept for later use or completely deleted in the trash.

Using the built-in memory snapshot function, you can test any software on a VM without worrying about the integrity of the system. You can return it to its original state in a few movements.
Finally
As you can see, installing Windows on a MacBook as a second system is an easy task. The choice of use case depends only on the software's needs for hardware resources.
Video instruction
The videos below will help you better understand the intricacies of installing and using Windows OS on Mac computers.
Installing one operating system side by side with another is standard practice in the computing industry. You can install both Mac OS on a Windows computer and vice versa. On our information portal you will find instructions for your computer. Below are detailed steps that will help you answer the question: how to install Windows on Mac?
Possible methods
To install the OS, you do not need special skills or professional help. Installing Windows 7 or 10 on Mac is carried out in the following ways:
- through ;
- Parallel Desktop program;
- built-in Bootcamp utility.
- Let's look at each case in more detail.
Using an emulator

To install Windows on a MacBook using this method, you need to download the free Virtual Box utility and install it. After that, follow the steps according to the instructions:
- launch Virtualbox;
- click the “Create” button;
- select the type and version of the operating system;
- determine the size of RAM that will be allocated for using the OS through the virtual machine;
- then click on “Create a new virtual hard disk”;
- select the virtual disk type and volume;
- then click the “Run” button;
- After the installation is complete, you will be able to install Windows on your Mac and use it.
How to install Windows on Macbook air or pro?

For the second method, you will need the Parallels Desktop utility. After downloading the program on Mac, follow the guide below:
- run the program;
- click the File button and select New from the context menu;
- then click install;
- select the installation source (image with the operating system);
- click the “Continue” button;
- in the new window, enter the software activation key;
- enter the name of the virtual machine and select the location;
- Click "Continue" to begin installation.
You can use either a free trial version or the full version of Parallela Desktop. For normal use of the software, the standard version is sufficient.
How to install Windows 10 on mac via Boot Camp?

With the help of BootCamp, Windows will be able to use all the resources of the Mac to the maximum, so this option is considered the most profitable and optimal. In the latest versions of Mac OS, this program is installed by default. Run the utility, first closing all running applications and open files:
- check the boxes next to “Download the latest software...” and “Install or remove Windows 7 or later”;
- click the “Continue” button;
- then select one of the options: make a copy of the support software to disk or save to external media;
- Next, set the size of the hard drive that will be used for Windows. For normal operation of the software, 20-30GB is enough;
- wait until the files are copied, after which the Mac will restart automatically;
- During reboot, press the Alt button to display a window with OS selection;
- select the Windows section;
- Now wait for the final installation and configure the settings.
Now you know how to install Windows 7, 8 or 10 on a macbook or imac. All the instructions described are suitable for any OS, starting with “seven” and newer.
Installation Features
After installation, you may encounter compatibility and driver problems. To fix this, you must download the drivers to a USB flash drive in advance, so that you can install them on a clean OS.
After the presentation of the Windows operating system in its seventh and then tenth variations, many owners of Apple devices wanted to install it on the iMac. The easiest way to cope with this task is to use Boot Camp software. The application allows you to install a new operating system from “windows” as a second system.
Apple has also released drivers for quick installation of new applications. They are easy to use and even beginners can handle the installation.
However, there are users who cannot perform this operation in any way. Something happens to them all the time - the keys do not function, there is no sound and other interference. In this article, we will look at the basic steps for installing Windows on an iMac. How to carry out the process as comfortably as possible - read below.
Before moving on to the main topic of the conversation, let’s find out why one operating system is better than another. And in general, is it worth jumping from one solution to the second? Look at the differences and make the right decision for yourself.
- Apple's design is second to none. And you can hardly argue with this statement. The company spends as much time and money on developing the appearance as it does on the “stuffing” of the devices. The details are treated with due attention. By the way, the hardware also looks neat, although no one sees it.
But Microsoft is not much inferior... A revolution has occurred with the Surface Studio all-in-one PC. It looks as cool as any computer from the Apple company. By the way, the tablets and laptops of this company are very impressive in terms of design. In addition, devices for Windows are created by many manufacturers. Many products with this operating room look strange or have an outdated design, but you can also find good options.
1 Gadgets on Mac operating systems are more expensive. And much more. Even if another Windows laptop has similar functionality and capabilities, the price difference will be very significant. Windows fans have nicknamed this phenomenon the “Apple” tax. The exception is anomalous variants. For example, there is the super expensive Surface Book or highly advertised products for gamers. The average solution will cost the buyer an average of $500. By comparison, the most budget laptop from the Air line costs at least $1,000. At the same time, a quite decent PC device can be purchased for $300. Here the decision is up to the individual user, or more precisely, his financial capabilities. 2 For gamers, Windows is much more comfortable. Game lovers will choose Windows, if only because it is easier to customize. Serious gamers constantly disassemble and assemble their devices to replace video cards and processors, adding RAM. Of course, they won't be satisfied with Mac black boxes. Even super cool MacBooks will become outdated in a couple of years, and you won’t be able to simply insert additional RAM into them. Many more toys do not install on Mac. This problem dates back to the 1990s and is still relevant today. When Jobs left Atari he probably lost interest in games. But in vain! 3 Mac technical support is better (of course, if it is available in your region). If your device fails, you can always go to an Apple store near your home. A specialist will diagnose and repair it. Moreover, if the problem is minor, the repair will be completely free. But again it all depends on the presence of such a point in your city. If it is missing, you will have to rack your brains or run. With a PC, everything is easier in this regard. Some things can be repaired yourself, others can be entrusted to a familiar programmer. And if that doesn’t help, spare parts are available in any store. In large cities there are official Microsoft stores with services. So residents of megacities are lucky in this regard. There are still few such outlets, but the company is actively developing in this direction. 4 It's harder to catch a virus on a Mac. There are much fewer devices on this operating system (including due to their high price), so hackers are not so interested in creating spies and viruses for them. Although in recent years such “specialists” have been increasingly pressed, and they are becoming more attentive to narrower areas. Therefore, the Apple company is also not asleep and is taking measures to get ahead of the scammers. Every year, new security systems are introduced into iOS gadgets. 5 OSes look completely different. This is immediately noticeable. In Windows 10, they combined the comfort and friendliness of the 7 with the touchscreen functionality of the 8. And this idea was a success. You can jump between the tablet and regular desktop options. And the latter looks familiar - with a start element at the bottom. The tablet displays a list of software.So, most likely, you have decided. Now let’s take a step-by-step look at how to install Windows on an iMac.

Preparing to install Windows 7 on your iMac
Of course, we are talking not only about the seven, but also about any other version of this operating system - Windows 10 and others. Installing Windows 7 or Windows 10 is a serious operation that requires setting up the device on which it will be installed.
But first, let’s find out why the owner of an iOS device needs to install Windows 10. Especially considering that the developer deliberately moved away from “windows”. There can be a lot of reasons, for example:
- Not every program that is installed on a PC has an analogue for Mac. A typical example is “1C: Enterprise”.
- If you have just purchased an Apple gadget, you may be confused about its functions. Here everything is completely different. And the second operating system will return the user to a familiar environment and will not let him get confused until he gets used to the Mac.
For the operation, you will need the required distribution (a version of the version that you decided to install). You also need a disk with iMac OS X. Checking the free space on the disk is a mandatory stage of preliminary preparation. It must be at least 10 GB. Finally, the most important thing is Boot Camp.
Attention! PC installation is not possible for every model. So, nothing will work with iMac 17 and 20 inches. These are outdated products manufactured in 2006. With more modern products there should be no problems. If your model is unknown, check Apple's online resource for information.
Installing Windows 10 on iMac
From the instructions below you will learn how to install Windows on an Apple operating system. The installed PC is implemented into the iMac through Boot Camp, a set of software. This solution will be required when creating a partition for Windows and rebooting the installation system. Drivers will provide the functionality of the operating system and its interaction with the hardware component of the computer. It would be nice to automatically “refresh” the drivers.
Before installation, we update the operating system itself. For this purpose, go to the updates section on the Apple resource on the Internet. In addition, we create a backup so that if data is lost, we can restore it.
- Launch the Boot Camp assistant.
- Click on the continuation element and select the hard drive size for the “fresh” operating system. To do this, we drag the partition between the names of the operating systems.
- We break it down into sections using the appropriate element. We are waiting for the operation to complete and float to the BootCamp table with the selected volume.
- We insert the disk with the PC distribution kit and click on start installation.
- We wait for the reboot to complete and select the previously specified disk for installation.
- Click on disk properties.
- Let's move on to formatting.
- We observe the installation itself - at this step the process will start. Here you will need to select the language and other parameters.

Note that after the appearance of the second operating system on the device, various kinds of problems often arise. And the most common one concerns sound. To correct the situation, you will need a disk with OS X. You need to place it in the drive and click on the next item in the pop-up window. The software is asked to accept the terms of the contracts, which is what needs to be done. Once the installation is complete, click on the Finish button.
This should be followed by another reboot, after which you can rest assured that your iMac has two operating systems. Before the operation, do not be lazy to think seriously and weigh all the advantages and disadvantages of such a decision. If you take hasty steps, you may lose personal information and content. And in the worst case, damage the “native” operating system. Objective arguments at the beginning of the article will help you make the right decision.
Start: A comparison of installation methods is described in the article.
According to available data on the Internet, installing Windows 7 on a Mac via boot camp is possible with the following modifications:
32 bit version:
- - MacBook, Mac mini, Mac Pro assembled on an Intel processor.
MacBook Pro, iMac released since 2007
- - Mac mini released since mid-2010
iMac (21.5", 27", starting in late 2009)
iMac (21.5", 2010 and later)
MacBook (13" since late 2009)
MacBook Pro (15" and 17" since 2008, 13" since 2009)
Mac Pro since 2008
OS X version must be at least 10.5 Leopard. Those. if you have OS X Mountain Lion, then it will work, because... came out later than OS X 10.5 Leopard.
Preparation:
What you will need:-
- Windows 7 disk and an external drive, if the Mac doesn’t have one or the built-in one refuses to read it.
- Important to remember:
- Flash drive and Internet access to download drivers from the apple website.
1) We start by updating OS X by clicking on the apple icon in the upper left corner, then “Software Update”.

2) Before you start installing Windows 7 on a Mac via bootcamp, it is recommended that you back up your data, for example using the built-in Time Machine utility or another method, to avoid losing information when the disk is partitioned.

4) We select 2 checkboxes: “Download support software” so that the drivers necessary for correct operation are copied to our USB drive and “Install Windows 7”. Insert the USB flash drive to copy the support software, click next.


Within 10-15 minutes. The necessary files will be copied from the apple website and the "WindowsSupport" folder will be created in which the drivers are located. After finishing, remove and remove the flash drive from the mac, if it has autorun, so that when the installation starts, it will boot from the DVD, not the USB.
5) The next step is to set the partition size, the size of which depends on how many programs and games you will use. For example, if your tasks are limited to ordinary office tasks, then 25 GB is enough, but if you would like to play, then 100 GB may not be enough, because... only 1 game can take up more than 15 Gb. The operating system itself takes 10-15 Gb.
We insert the installation disc, if there is no optical drive or it does not read the disc, which is not uncommon, connect the external DVD drive and click “Install”.

After partitioning, the device will reboot and the installation of Windows on the mac will automatically begin using boot camp, in about 5-10 minutes. A menu will appear with a choice of language. If you want to interrupt the process and go to OS X, then press "alt" after rebooting and go to the desired environment.
Start:
Important to remember: In order to select the required operating system during startup, hold down the “alt” key immediately after pressing the power button.
6) At the beginning, a window will appear with a choice of language, marking the language used in the next item, click “Full installation”.


We mark the section with the inscription "bootcamp" and click the "next" button, if at the bottom there is the inscription "Windows cannot be installed...", then select the section with the inscription "boot camp" and go to -> "disk setup" -> "format".
7) After installing Windows 7 on a Mac via boot camp, you are prompted to enter your username and computer name.


8) The password field can be left blank; the key is usually located in the product box and is a 25-digit code. This code can be entered after installing Windows 7 on a Mac via boot camp, but no later than within a month.


10) We indicate the preferred network settings, in our case it is “Home Network” and then the desktop should appear. Also, you may be asked to select a Wi-Fi network to connect to the Internet; if this window appears, you can skip it.


Settings
The installation of Windows 7 on a Mac via boot camp is complete, but all that remains is to complete the setup, namely, install the drivers and boot camp in a new environment so that the video card and other components function without errors and with all the provided functions, this is especially important for the video card so that it can be used was used at 100% of capacity.
11) Windows will boot by default if you do not press the "alt" button at the beginning of boot to select native OS X. After loading, insert our flash drive with drivers, go to the "WindowsSupport" folder, click "setup" and then accept the default settings, itself the process lasts about 7 minutes. Upon completion, you will be prompted to reboot, and then you can begin full use.

12) At the bottom right in the Microsoft environment, the “boot camp” icon will appear, by clicking on it, then “boot camp control panel” you can select the operating system that will automatically load when turned on. You can also make the default selection in OS X in the “System Settings” -> “Boot Volume” section.


Data exchange
13) In Windows, the OS X partition is visible, but you can only read from it, open files, copy, but you won’t be able to write to it, because. file system types differ. OS X also sees the Microsoft partition, but can only read and cannot write. It is, of course, possible to exchange files this way, but it is extremely inconvenient. To record data on one medium, you can use a flash drive with the fat file system or a special utility, such as Paragon. There are 2 applications from Paragon: 1) NTFS for Mac to write and change files on Windows disk from mac and 2) HFS+ for Windows to write data to OS X from Win.
After installing these utilities, you can easily work in different environments without difficulty, changing and editing files, the only drawback is that Paragon is paid; at the time of writing, there was a free analogue, but it only allowed you to work with the NTFS system, and it was called “macfuse”.