How to completely remove the solitaire game from your computer. How to remove standard games? Uninstalling games on an older version of Windows
Read also
One of the components of any version of Windows OS is a set of standard games. This composition traditionally includes various solitaire games and the game “Mineweeper”. In addition, the latest versions have added the following applications: “Checkers”, “Backgammon”, “Spades”, as well as “Chess”, which can be played either alone or with an opponent online.
Uninstalling games in Windows 7 and Vista
Standard Windows games help pass the time on the computer, but sometimes their availability is a nuisance. They can be a distraction for an employee who must be working or a student who is using a computer to do homework.
In this case, these games can and should be disabled. This is done through the “Control Panel”. In Windows 7, find the Programs and Features icon. Open this menu. On the side, select the “Turn Windows features on or off” submenu. A window will appear in front of you with a list of all available standard components of this operating system.
Find the “Games” folder in this list and uncheck it. This will remove all standard Windows games. Through the same menu you can add games if they are not installed. By opening the “Games” folder, the user has the opportunity to install or remove a particular game, regardless of other applications.
Uninstalling games on an older version of Windows
If your computer has an older system installed - Windows XP or Windows 98, then open the Control Panel and go to the Add or Remove Programs menu. Next, select “Install Windows Components.” Here go to the sub-item “Standard and utility programs”, in which select “Games”. From the window that appears, you can remove and install these game programs.
Some users are worried that games may take up too much space on their computer's hard drive, which is why they are trying to find out how to remove stock games. If this is the only reason for wanting to remove the standard set of games, then there is no need to worry, since these games are not capable of taking up much disk space on modern computers.
Some components and programs of the Windows operating system are timeless. With the release of each new version, the developers not only kept them, but also improved and supplemented them. And one of these components includes standard games in Windows 7.
But let’s imagine a situation: You bought a brand new laptop or computer and discovered that there are no standard games in the operating system. Sometimes this may indeed be the case, because the Windows 7 Starter and Home base games are not installed. But if you have a different OS, then you don’t need to worry. As a rule, for OS versions such as Professional and Enterprise they are simply disabled.
And what is disabled can always be enabled. Moreover, the developers have improved the appearance of the games and added something new.
First, go to the Start menu and go to the tab "Control Panel".
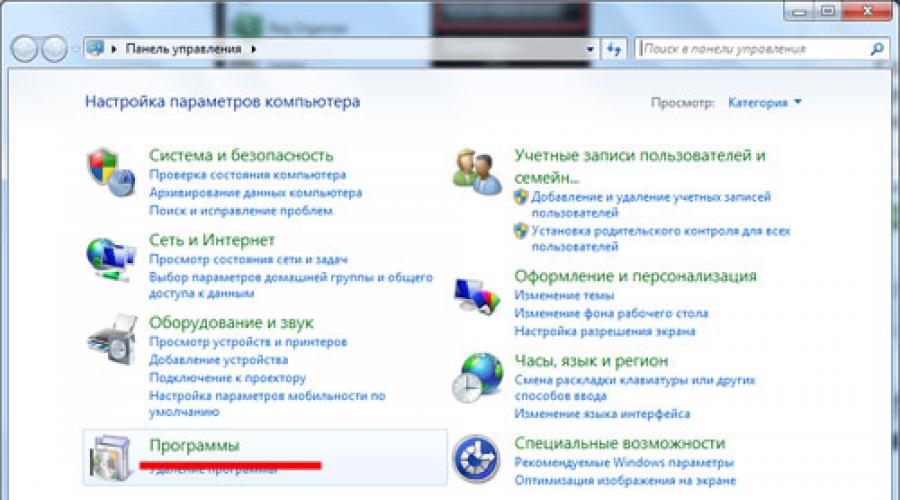
A new window opens, in which we select the item “Programs”.

Now in the section "Programs and Features" follow the link.

We wait a few seconds and in the window that opens, check the box next to the “Games” item. By clicking on the “+” next to it, you can see which games will be included; if you don’t need some of them, just uncheck the box next to the unnecessary game and it will not turn on. A blue square that appears next to the “Games” item will mean that the games have been partially selected. To save the settings, click on the “OK” button.

Wait for Windows to finish installing.
There is another way to enable standard games in Windows 7, which in my opinion is faster and easier.
Click “Start” and type in the search field “Turning on or...”, the beginning of the phrase is quite enough, then select the item "Turn Windows features on or off".

A familiar window will open, in which we put the necessary checkboxes and press the “OK” button to save the settings.

That's all - how to enable standard games in Windows 7 we figured it out. Now you will see the “Games” folder in the “Start” menu.

You will need
- Computer mouse
Instructions
You will need
- - Windows XP;
- - Windows XP installation disk.
Instructions
- How to add or remove standard games in Windows XP
One of the components of any version of Windows OS is a set of standard games. This composition traditionally includes various solitaire games and the game “Mineweeper”. In addition, the latest versions have added the following applications: “Checkers”, “Backgammon”, “Spades”, as well as “Chess”, which can be played either alone or with an opponent online.
Uninstalling games in Windows 7 and Vista
In this case, these games can and should be disabled. This is done through the “Control Panel”. In Windows 7, find the Programs and Features icon. Open this menu. On the side, select the “Turn Windows features on or off” submenu. A window will appear in front of you with a list of all available standard components of this operating system.
Find the “Games” folder in this list and uncheck it. This will remove all standard Windows games. Through the same menu you can add games if they are not installed. By opening the “Games” folder, the user has the opportunity to install or remove a particular game, regardless of other applications.
Uninstalling games on an older version of Windows
If your computer has an older system installed - Windows XP or Windows 98, then open the Control Panel and go to the Add or Remove Programs menu. Next, select “Install Windows Components.” Here go to the sub-item “Standard and utility programs”, in which select “Games”. From the window that appears, you can remove and install these game programs.
Some users are worried that games may take up too much space on their computer's hard drive, which is why they are trying to find out how to remove stock games. If this is the only reason for wanting to delete games, then there is no need to worry, since these games are not capable of taking up much disk space on modern computers.
Standard Windows games don't take up much space, about 20 MB, but if you don't play them or don't want your child to spend time playing them, then why store them on disk? There is only one reason why you still haven’t deleted them - you don’t know how to do it.
You will need
- Computer with Windows operating system
- Computer mouse
Instructions
Click the "Start" button and in the "Settings" tab, select "Control Panel".
In the menu on the left, find the "Install Windows Components" icon. Activate it.
Check the box at the very bottom of the list, next to the line “Standard and utility programs”.
Click the "Composition" button.
In the menu that opens, select “Games” and click “OK” and then “Next”. The games will be deleted.
You can not delete all games, but only a few or just one. To do this, when selecting “Games” in the list, click on the “Composition” button. You will see a list of games installed on your computer by default and will be able to check off only those that should be removed.
Removing solitaire "" in the Windows XP operating system is not the most common operation, but can be performed with standard OS tools and does not require the use of additional third-party software.
You will need
- -Windows XP-
- - Windows XP installation disk.
Instructions
Insert the Windows Xp boot disk into the drive.
Click the "Start" button to open the main menu of the system and go to the "Control Panel" item to perform the operation of removing the standard Solitaire game.
Select the "Accessories and Utilities" section in the "Windows Components Wizard" dialog box that opens and click the "Composition" button.
Check the Games box to install all standard games and click OK to execute the command. Confirm the application of the selected changes by clicking the “Next” button.
Uncheck the Games box and use the checkboxes of the desired games in the list to install some of the standard games offered. Click OK to confirm your selection, confirm the command by clicking OK again, and apply the selected changes by clicking Next.
Uncheck the Games box and click OK to remove all standard games. Click the "Next" button to confirm the operation.
Uncheck the "Games" box and the "Klondike" box in the list of games, leaving the checkboxes of all other games intact, to remove only the "Klondike" solitaire game. Click OK to confirm your selection, click the same button again to execute the command, and confirm your changes are applied by clicking Next.
Pay attention to the background of the checkbox: a white background means that all standard games are installed, a gray background symbolizes that one or more games are installed. The steps to remove the selected standard game remain unchanged.
Standard Windows games don't take up much space, about 20 MB, but if you don't play them or don't want your child to spend time playing them, then why store them on disk? There is only one reason why you still haven’t deleted them - you don’t know how to do it.
You will need
- Computer with Windows operating system
- Computer mouse
Instructions
Click the "Start" button and in the "Settings" tab, select "Control Panel".
In the menu on the left, find the "Install Windows Components" icon. Activate it.
Check the box at the very bottom of the list, next to the line “Standard and utility programs”.
Click the "Composition" button.
In the menu that opens, select “Games” and click “OK” and then “Next”. The games will be deleted.
You can not delete all games, but only a few or just one. To do this, when selecting “Games” in the list, click on the “Composition” button. You will see a list of games installed on your computer by default and will be able to check off only those that should be removed.
Removing solitaire "" in the Windows XP operating system is not the most common operation, but can be performed with standard OS tools and does not require the use of additional third-party software.

You will need
- -Windows XP-
- - Windows XP installation disk.
Instructions
Insert the Windows Xp boot disk into the drive.
Click the "Start" button to open the main menu of the system and go to the "Control Panel" item to perform the operation of removing the standard Solitaire game.
Select the "Accessories and Utilities" section in the "Windows Components Wizard" dialog box that opens and click the "Composition" button.
Check the Games box to install all standard games and click OK to execute the command. Confirm the application of the selected changes by clicking the “Next” button.
Uncheck the Games box and use the checkboxes of the desired games in the list to install some of the standard games offered. Click OK to confirm your selection, confirm the command by clicking OK again, and apply the selected changes by clicking Next.
Uncheck the Games box and click OK to remove all standard games. Click the "Next" button to confirm the operation.
Uncheck the "Games" box and the "Klondike" box in the list of games, leaving the checkboxes of all other games intact, to remove only the "Klondike" solitaire game. Click OK to confirm your selection, click the same button again to execute the command, and confirm your changes are applied by clicking Next.
Pay attention to the background of the checkbox: a white background means that all standard games are installed, a gray background symbolizes that one or more games are installed. The steps to remove the selected standard game remain unchanged.
Standard Windows games don't take up much space, about 20 MB, but if you don't play them or don't want your child to spend time playing them, then why store them on disk? There is only one reason why you still haven’t deleted them - you don’t know how to do it.
You will need
- Computer with Windows operating system
- Computer mouse
Instructions
You will need
- - Windows XP;
- - Windows XP installation disk.
Instructions
- How to add or remove standard games in Windows XP