How to adjust fan speed through BIOS. How to choose a fan speed controller
Read also
Question from a user
Good afternoon.
After playing one computer game for 40-50 minutes (note: the name has been cut out), the processor temperature rises to 70-80 degrees (Celsius). I changed the thermal paste, cleaned it from dust - the result was the same.
So I’m thinking, is it possible to increase the rotation speed of the cooler on the processor to the maximum (otherwise, in my opinion, it rotates poorly)? Temperature without processor load - 40°C. By the way, is this possible due to the heat? Otherwise, it’s about 33-36°C outside our window...
Arthur, Saransk
Good day!
Of course, the temperature of the components and the load on the cooling system greatly depend on the temperature of the room in which the computer is located (therefore, overheating is most often encountered in the hot summer months). The fact that your temperature reaches 80 degrees is not normal (although some laptop manufacturers allow such heating).
Of course, you can try setting the cooler rotation settings to maximum (if this is not already the case), but I would still recommend taking a set of measures (you can learn about them from the article on measuring and monitoring the temperature of the processor, video card, HDD -).
By the way, the other side of the coin also often arises: coolers spin at maximum and create a lot of noise (while the user does not load the computer with anything at all, and they could spin much slower and quieter).
Below I will look at how you can adjust their rotation speed and what to pay attention to. So...
Increasing/decreasing the rotation speed of coolers
In general, on a modern computer (laptop), the rotation speed of the coolers is set by the motherboard, based on data from temperature sensors (i.e., the higher it is, the faster the coolers begin to rotate) and loading data. Parameters from which the mat is based. The board can usually be set in the BIOS.
How is the rotation speed of a cooler measured?
It is measured in revolutions per minute. This indicator is designated as rpm(by the way, it measures all mechanical devices, for example, hard drives).
As for the cooler, the optimal rotation speed is usually about 1000-3000 rpm. But this is a very average value, and it is impossible to say exactly which one should be set. This parameter greatly depends on the type of cooler you have, what it is used for, the room temperature, the type of radiator, etc.
Ways to regulate the rotation speed:

SpeedFan
A free multifunctional utility that allows you to control the temperature of computer components, as well as monitor the operation of coolers. By the way, this program “sees” almost all coolers installed in the system (in most cases).
In addition, you can dynamically change the rotation speed of PC fans, depending on the temperature of the components. The program saves all changed values, operation statistics, etc., into a separate log file. Based on them, you can see graphs of temperature changes and fan speeds.
SpeedFan works in all popular Windows 7, 8, 10 (32|64 bits), supports Russian language (to select it, click the "Configure" button, then the "Options" tab, see the screenshot below).

Main window and appearance of the SpeedFan program
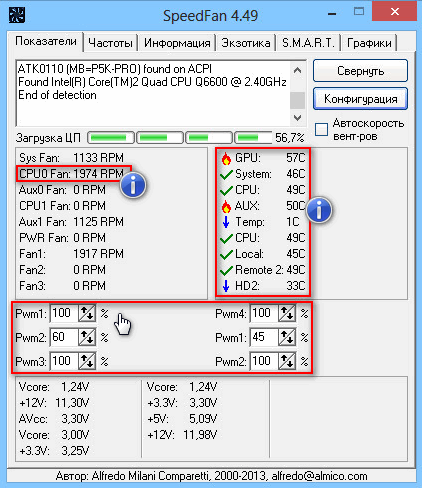
After installing and launching the SpeedFan utility, the Readings tab should appear in front of you (this is the main window of the program - see the screenshot below). In my screenshot, I conditionally divided the window into several areas to comment and show what is responsible for what.

- Block 1 - the "CPU Usage" field indicates the load on the processor and its cores. Nearby are also the “Minimize” and “Configure” buttons, designed to minimize the program and configure it (respectively). There is also a checkbox in this field “Automatic fan speed” - its purpose is to automatically regulate the temperature (I’ll talk about this below);
- Block 2 - here is a list of detected cooler rotation speed sensors. Please note that they all have different names (SysFan, CPU Fan, etc.) and opposite each has its own meaning rpm (i.e. rotation speed per minute). Some sensors show rpm at zeros - these are “junk” values (you can ignore them *). By the way, the names contain abbreviations that some may not understand (I’ll decipher them just in case): CPU0 Fan - fan on the processor (i.e. a sensor from a cooler plugged into the CPU_Fan connector on the motherboard); Aux Fun, PWR Fun, etc. - the rpm of the fans connected to these connectors on the motherboard is similarly shown. board;
- Block 3 - the temperature of the components is shown here: GPU - video card, CPU - processor, HDD - hard drive. By the way, there are also “garbage” values here that you shouldn’t pay attention to (Temp 1, 2, etc.). By the way, it’s convenient to take the temperature using AIDA64 (and other special utilities), about them here:
- Block 4 - but this block allows you to reduce/increase the rotation speed of coolers (set as a percentage. By changing the percentages in the columns Speed01, Speed02- you need to look at which cooler has changed speed (i.e. what is responsible for what).
Important! The list of some indicators in SpeedFan will not always coincide with the cooler it is signed with. The thing is that some computer assemblers connect (for one reason or another), for example, a processor cooler not into the CPU Fan socket. Therefore, I recommend gradually changing the values in the program and looking at changes in the rotation speed and temperature of the components (even better, open the roof of the system side and visually see how the fan rotation speed changes).
Setting the fan speed in SpeedFan
Option 1
- As an example, it will try to adjust the rotation speed of the processor fan. To do this, you need to pay attention to the column "CPU 0 Fan" - this is where the rpm indicator should be displayed;
- Next, change the values in the columns “Pwm1”, “Pwm2”, etc., one by one. When the value has been changed, wait a while and see if show has changed rpm, And temperature (see screenshot below);
- When you find the right one Pwm- adjust the cooler rotation speed to the optimal number of revolutions (about the processor temperature I , I also recommend for review) .
Option 2
If you want the smart operating mode to be enabled (i.e. so that the program dynamically changes the rotation speed, depending on the processor temperature ), then you need to do the following (see screenshot below):
- open program configuration (note: "Configure" button) , then open the "Speeds" tab;
- then select the line that is responsible for the cooler you need (you must first find it experimentally, as recommended in option 1, see just above in the article) ;
- now in the “Minimum” and “Maximum” columns, set the desired percentage values and check the “Auto-change” box;
- In the main program window, check the box next to "Auto fan speed". Actually, this is how the rotation speed of coolers is regulated.

Addition! It is also advisable to go to the “Temperatures” tab and find the processor temperature sensor. In its settings, set the desired temperature that the program will maintain and the alarm temperature. If the processor heats up to this alarming temperature, then SpeedFan will start spinning up the cooler at full power (up to 100%)!
For those who do not have SpeedFan
Setting up automatic adjustment of cooler rotation in the BIOS
The SpeedFan utility does not always work correctly. The fact is that the BIOS has special functions responsible for automatically adjusting the rotation speed of coolers. They can be called differently in each BIOS version, for example, Q-Fan, Fan Monitor, Fan Optomize, CPU Fan Control etc. And I’ll immediately note that they do not always work correctly, at least SpeedFan allows you to very accurately and subtly adjust the operation of the coolers, so that they perform the task and do not interfere with the user ☺.
To disable these modes (the photo below shows Q-Fan and CPU Smart Fan Control), you need to enter the BIOS and set these functions to Disable. By the way, after this the coolers will operate at maximum power and may become very noisy (this will happen until you adjust their operation in SpeedFan).
Hot keys to enter the BIOS menu, Boot Menu, recovery from a hidden partition -

That's all for today, good luck to everyone and optimal fan operation...
The cooling system is one of the most important mechanisms of any PC, but many users often do not even realize that most of the problems in their computer occur due to overheating of various devices. To avoid such troubles, it is better to configure the cooler in the BIOS in advance.
What does this affect?
The cooling system of modern computers has an extremely simple and uncomplicated design, which, in essence, is fans (coolers) installed inside the system unit. Such fans are placed near all the most important mechanisms that can overheat during operation - the processor, video card and power supply.
Since the BIOS can only configure the video card and other devices in the most primitive way, many may notice that from time to time they get too hot during operation, and this is often the cause of malfunctioning of the cooling system. It is worth noting that the reasons can be very diverse, ranging from improper operation of coolers to their banal clogging, as a result of which the devices cannot operate normally, causing overheating of the rest of the equipment. To eliminate the first cause of this problem, you have to configure the coolers yourself so that they work at full power and provide the required air flow.
If you don’t want to deal with BIOS settings, you can download the Speed Fun program, which also allows you to control the operation of coolers.
How to configure them?
There is nothing difficult about setting up coolers through the BIOS. This is done as follows:
It happens that some users write that they are using the “outdated” BIOS mode. Few people know what this problem is, since it occurs mainly among people using the operating system Windows 10 on relatively older motherboard models. To get rid of it, change the motherboard or simply go back to an earlier version of this operating system.
This article describes a program for adjusting the speed of the processor cooler, video card and other PC elements. It doesn't matter whether you need to change the fan speed due to excessive noise or overheating, SpeedFan will help in any case. The main condition for the correct functioning of the utility is the ability to adjust coolers from the BIOS.
SpeedFan
SpeedFan is an absolutely free program for video card coolers, CPU coolers and any other equipment with active cooling. The fan can be controlled automatically or manually.
Before running the utility, it is advisable to disable automatic speed change in the BIOS. If this condition is ignored, the correct functioning of the application is not guaranteed. After turning on, SpeedFan reads information about fan speeds and takes these values as maximum. It follows that if the BIOS settings do not allow you to spin the cooler to the limit, then the utility will not be able to do this.

For example, the CPU cooler was spinning at 1000 rpm when SpeedFan was turned on. The application will accept this value as an upper limit and will not be able to increase the frequency when it reaches a critical level. If the computer does not automatically turn off, its central processor will fail.
First start
After launching the program for adjusting the cooler speed, it will display a window with brief help. After studying the text, check the box next to the only item and close the window. After this, it will no longer appear on the screen.
Now the program will determine which equipment has active cooling with adjustable capabilities and reads sensor readings. After this, the display will automatically display a list of fan speeds and the temperature of the main components of the PC. In addition, in the application panel you can see information about processor load and voltage.
To switch the language to Russian, go to the "Configure" > "Options" menu. Set the "Language" switch to the "Russian" position. Click "OK".
Main window
The program for adjusting the speed of coolers in Russian displays all the information necessary for the user in separate blocks. In the middle of the window there is data describing all found fan controllers. Their names - etc. Moreover, the list may include many more coolers than are in the PC. Opposite some of them the actual fan speed will be displayed. Others will either show values equal to zero or “garbage” (less than 1000 rpm).

Opposite the data describing the operation of the screws, there is a block of information about the temperature of the main components of the PC:
CPU - processor.
GPU is the core of a video card.
HD0 - hard drive.
There may also be "garbage" here. To determine which values are not real, you need to think logically. For example, the temperature of instruments in a running car is unlikely to reach 5 or 120 degrees.
This is the only drawback that the program for adjusting the cooler rotation speed has not lost over all the years of development. It is worth saying that the official website offers a collection of necessary utility settings for popular PC configurations. However, it is often much faster to do all the settings manually.
Main blocks of the utility
The utility block listing Speed01, 02, etc. contains the propeller speed switches. It is indicated as a percentage. The main task is to determine which switches from this block are responsible for which fans.
Go to the first selector and change its value to 20-30%. Observe the speed opposite which line “Fan” changes. Now change the settings of the next switch. Memorize or write down each match you find.
If you cannot identify the sensors, it makes sense to use the AIDA64 utility. Launch it and SpeedFan at the same time. Change the values of the Speed switches, and in AIDA see which specific fans start spinning at a different speed.
Configuration
Go to the "Configuration" menu. Here you can give all rows of blocks in the main window clear names. For example, rename the CPU cooler rotation sensor to "TempCPU". To do this, click on any item in the settings, wait a second and click again. After this, the line will be highlighted and a cursor will appear in it.

Highlight the name of the required sensor and pay attention to the bottom of the application window. Here you should enter what temperature of each PC device the program for adjusting the cooler speed will consider normal. When the equipment has cooled to this level, the fan speed will become minimal. The alarm temperature should also be specified. Heating to this level will turn on the maximum speed of the cooler.
To find out which values to use, check the official websites of your PC device manufacturers.
Now click on the "+" next to the sensor name. Uncheck all the checkboxes from the "Speed" list. Leave only the one that matches the regulator of this device.
Go to the "Fans" tab and, if necessary, rename them in the same way as the sensors. Disable unused ones by unchecking the boxes.
Speed
To have the program for adjusting the cooler speed perform automatic control, open the “Speeds” tab. Select the line of the desired fan and rename it as you see fit. Now pay attention to the bottom block of the window. There are two points here:

Today we will talk about coolers. The term “cooler” was formed by transcribing the English word “cooler,” which translated means “cooler.” To put it simply, a cooler is a regular fan used to cool the central processor, video card, power supply and other heating elements of the computer.
The cooler has one unpleasant side - they make noise during operation. And the more coolers your PC uses, the more noise they make. In this article, we will look at how to simply and effectively reduce the noise produced by a fan.
Why are coolers noisy?
If you do not take into account special fanless modifications, then each computer has two or more coolers. As mentioned earlier, this can be a cooler on the processor, on the graphics accelerator, in the power supply, as well as fans installed on the side and rear walls of the system unit case. And each of the listed fans creates a separate noise, and together it sometimes turns into a rather unpleasant hum. Some PC users have simply gotten used to this noise in their system unit and do not pay attention to it, believing that such a hum is in the order of things and nothing can be fixed. But there is good news! In 98% of cases, the noise from computer fans can be reduced by at least 10%, and at most by 90%.
As you may have guessed, the noise level in a working fan depends mainly on its rotation speed. As the rotation speed decreases, the cooler noise also decreases. Fortunately for us, there are wonderful programs with which you can easily control coolers by changing their rotation speed. Of course, you can reduce the fan noise by replacing it with a more expensive and low-noise analogue. However, such a replacement will not always give the expected effect, proportional to the money spent. Therefore, we will consider a less radical way to reduce noise, which is a program for adjusting the speed of the cooler. Naturally, reducing the number of fan revolutions has its limit, which does not threaten overheating of the computer. And if the adjustment is made incorrectly, problems may arise. We will try to explain everything in as much detail as possible so that you have absolutely no problems when changing your settings.
To complete the picture, it is worth mentioning that in addition to programmatically changing the cooler rotation speed, there are several other ways in which you can reduce the fan speed: the cooler speed control system, which is hardwired into the BIOS; use of a special device - reobass; artificially lowering the cooler supply voltage.
If control works well from the BIOS on your computer, then you don’t need to read this article further. But, as practice shows, very often the BIOS regulates the cooler speed only superficially. The underestimation occurs with a large margin of safety, which, unfortunately, is not always justified and does not lead to a reduction in noise from the fan.
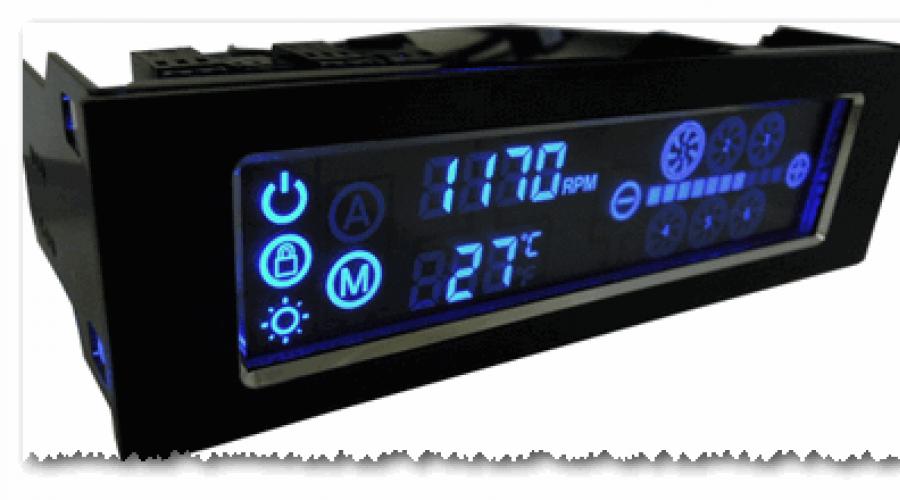
Now let's try to define rheobass. What is it and what does it serve? Most often, the rheobass is a device that is mounted in a computer bay measuring 5.25" or 3.5". It serves for manual adjustment of the rotation speed of coolers in the system unit.

Sometimes there are reobass models made for a PCI slot or even made in the form of a regular adapter for a cooler power cable. A similar device has one or several regulators on the front panel, with the help of which the fan speed is adjusted. When choosing a reobass, first of all you need to pay attention to the presence of a sufficient number of adjustment channels. In simple words, you need to buy a rheobass that can regulate the speed of all fans in the system. Also, when choosing a reobass, it makes sense to pay attention to the length of the wires, so that it is sufficient to connect all coolers. Additionally, you need to clarify the possibility of connecting the rheobass to the FAN connector on the motherboard, which is necessary to display changes in fan speed in the operating system. This option may, of course, not be needed if the selected rheobass has an LCD display, on which the temperature from the sensors and the rotation speed of the coolers will be displayed. But any reobas costs money, and not everyone has a free amount of money that can be spent on such a thing, which is far from essential. Therefore, to save your money, let's consider a program that serves to reduce the number of revolutions of coolers - SpeedFan.
SpeedFan cooler management software
SpeedFan is a multifunctional and completely free program. SpeedFan is capable of controlling the cooler speed automatically. You will immediately have to be a little disappointed that this program is not able to work on all modern laptops, but this fact can only be verified by running these utilities. In addition, the SpeedFan program is capable of adjusting the rotation speed of only those fans that can be controlled by the motherboard from under the BIOS. For example, in the case we are considering, from the BIOS you can enable cooler control exclusively for the central processor. But at the same time, you can view the current rotation speed of two more fans. Now the most important thing, before you start using the SpeedFan program, you must disable cooler management in your computer’s BIOS! If this is not done, then the operation of the coolers may proceed according to the following scheme. When the SpeedFan program is loaded, it reads the current speed of the coolers, which it takes as the maximum values. Therefore, if by the time the program starts the BIOS cannot spin up the fans to maximum speed, then the program will not do this either. Let’s assume the following situation: at the time the program was launched, the fan on the central processor was rotating at a speed of 1100 rpm; SpeedFan, taking this rotation speed as the maximum, was unable to increase it when the processor further warmed up. As a result, the processor will continue to heat up to a critical temperature and if its automatic overheating protection does not work, it may fail before it has time to shut down. An experienced user, of course, will be able to grasp this point, noticing that when the load on the processor increases (let’s say running a game), the fan does not increase its speed (read, the noise it produces increases), but such a risk is not justified. Therefore, we remind you once again that before launching the SpeedFan program, be sure to disable fan speed control in the BIOS.
When you first launch the SpeedFan program, a window will appear on the monitor screen offering a description of the program’s functionality. Here you can check the box and close it so that the next time you start this message, this message will not be displayed on the screen. After this, the program will read the parameters of the motherboard microcircuits and the values of the temperature sensors. As a result of successfully completing this task, a window should appear in front of you with a list of the current fan speed values, as well as the temperature of the sensors on the monitored PC components. After this, you need to go to the “Configure -> Options” menu and change the language to “Russian”.

As you can see in the screenshot, the window also displays the processor load level and voltage information.
Block “1” lists the detected fan speed sensors under the names Fan1, Fan2, etc. In this case, the number of sensors in the list may exceed what actually exists. Pay your attention to the values, for example, line 2 - Fan2 and line 4 - Fan1, they have real numbers of 2837 and 3358 revolutions per minute (RPM). But the rest of the indicators are either equal to zero, like the value of Fan3, or a value called “garbage” is indicated (in the picture this is the value indicated in the first line). We will delete the extra lines later.
Block “2” indicates the temperature sensors that are detected in the system. GPU is the video card chipset, HD0 is the hard drive temperature sensor, CPU is the sensor on the central processor (instead of the CPU in the Temp3 picture). The rest of the readings are garbage (the temperature of the sensors in the working system cannot be 17 or 127 degrees). This is the main drawback of the program, that it is necessary to guess which value corresponds to which component of the system unit. For the sake of truth, it is worth mentioning that on the official website you can select the necessary configuration from the known ones, but this procedure is not easy, and besides, all descriptions are available only in English.
If you have difficulty identifying sensors, you can use another utility that is used to obtain parameters of the system as a whole, for example AIDA64. And after launching this utility, you can easily compare its indicators with the SpeedFan parameters, thereby determining which temperature and speed indicators relate to which component of the system unit.
Block “3” contains speed adjustments Speed01, Speed02, etc. With these adjustments you can set the rotation speeds as a percentage (sometimes these can be designated as Pwm1, Pwm2, etc.). At this stage, we are interested in one question: which indicator out of the six Speed01..06 is responsible for which Fan1..6. To determine this, you need to change the value of each Speed one by one from 100% to 85-50% and observe how much the speed of a particular Fan has changed. Thus, after running through all the Speed lines, you remember which of them corresponds to which Fan line. We repeat once again that only those fans that the motherboard is capable of controlling from the BIOS will be regulated.
Fan assembly
SpeedFan Settings
Now let's move on to the program settings. To do this, go to the “Configuration” menu and rename all sensors with names that you understand, so that in the future you will no longer be confused about which value refers to which component. In our example, we will programmatically regulate the rotation speed of the cooler on the central processor.
Go to the “Temperatures” tab and find the temperature sensor you defined a little earlier on the processor (in our example it’s Temp3) and click on it first once, and then a second later again, after which you can enter absolutely anything you like in the name field name, for example "CPU Temp". Then, in the settings field below, enter the value of the desired temperature, which will be maintained by the program at the minimum possible rotation speed of the selected cooler, and also indicate the “alarm” temperature at which the maximum fan speed will turn on on the selected device.

In our case, the desired temperature is 40 degrees, and the alarm temperature is set to 50 degrees Celsius. Naturally, for each case this temperature will be different, so the optimal ratio can only be selected by experimentation.
After this, you need to expand the branch and uncheck all the boxes, except for the Speed one, which adjusts the Fan speed corresponding to your cooler. In our example this is Speed04. Next, uncheck the remaining temperatures that you do not want to be displayed in the main SpeedFan window.
On the “Fans” tab, find the necessary coolers, rename them in accordance with their purpose, and disable the rest.

Fans
After that, go to the “Speeds” tab. Go to the Speed line that is responsible for the desired fan, rename it (in our example it’s CPU Speed) and set the necessary parameters: minimum – the minimum percentage of the maximum cooler speed that can be set by the program; maximum – percentage of the maximum cooler speed. In our case, the minimum is set at 55%, and the maximum at 80%. It is not surprising that the program for controlling coolers cannot set a value equal to 100%, because in the “Temperature” tab we have already set the “alarm” value, upon reaching which the cooler speed will be forced to be set to 100%. Also, in order for the regulation to occur automatically, do not forget to check the “Auto change” checkbox.

Auto change
This completes the settings, you can go to the main program window and check the “Auto fan speed” checkbox. After this, the cooler speed will be adjusted automatically. Of course, you won’t be able to set the optimal fan speed settings the first time, so you’ll have to experiment a little.
Additional SpeedFan options
The SpeedFan program has a whole bunch of additional functions and parameters with which it can control the speed of each cooler individually. There is no point in considering all of them, since it may take another page; we will describe only a few that are the most useful from our point of view.
Go again to the “Configuration -> Options” tab. After that, check the “Launch minimized” checkbox. It is necessary, as the name suggests, so that SpeedFan starts when Windows boots in minimized mode. If you do not check this box, then after loading the operating system the main window will be displayed on the desktop. It should be noted that if the program does not start automatically, then its shortcut should be added to the startup folder.
The next checkbox that needs to be checked is called “Static icon”. You need to activate this option so that the program is displayed in the system tray as a simple icon, and not as numbers. But this, as they say, is a matter of taste.
The “Minimize when closing” checkbox should be checked so that after clicking on the “red cross” the program does not close, but simply minimizes it to the system tray.
The “Full fan speed on exit” checkbox is checked so that after closing the program (exiting it), the fan speed is set to the maximum. If this item is not activated, then after closing the program, the speed will remain at the level corresponding to the moment of closing. And this, when the load on the processor increases, is fraught with its overheating, since nothing controls the processor cooler.
Summing up the article, we can safely say that now, using the SpeedFan program, you can independently adjust the speed of the coolers in the system unit, and also reduce the noise in your apartment.
Good evening everyone. Another article is coming. Today the topic will concern the physical side of the computer, namely the noise of the fans. While working in technical support, I noticed that a lot of users ask to reduce the noise from their computer. First, find out the cause of this increased noise. It is possible that the computer simply has not been cleaned or lubricated for a long time. But there is a second option for this reason - the settings in the BIOS were lost/changed/reset. Regarding the first part, there is nothing difficult to take a vacuum cleaner and a rag and remove all the dirt and dust. Regarding the second case, some BIOS navigation skills are required. Just now I’ll tell you about this.
We reduce computer noise through the BIOS.
So we made sure that the computer is clean and the fans are working. Now turn on the computer and press the special key to get to the BIOS setup menu. You can find out which button to press by the starting picture, or by brute force. Most often these are the following buttons: Del, F2 and F10.
In my case, I came across an ASUS motherboard whose BIOS entry button is Del.

Immediately we get to the main tab -Main, there is nothing valuable for us here, so use the left arrow to move to Power.

Having stopped on this tab, we begin to go through the points and select “Hardware Monitor”.

A page will open with a whole list of various add-ons. Yes, and it is also possible that the CPU Q-Fan Control item will contain the inscription Disabled, we can change this by moving the arrow down to it and pressing Enter.

Well, accordingly, the full list of possible settings will now open. Here you can see both settings for the processor fan and case fans; by the way, case fans are designated by the word chassis.
Among all those presented, a very important point for us is the CPU Fan Profile. The same profile with settings that determines the maximum number of fan revolutions per minute.

Again, if you click on this item, a list (in my case) of three items will appear. The default was Optimal.
In short:
Optimal— this is an intermediate mode between productive and quiet;
Silent— this is the quietest mode;
Performance- this is a productive mode,
We choose Silent. Then we press the F10 button and the BIOS will prompt us to save the changes, we agree and the computer will reboot itself.

Already when turned on, the fans will first “buzz” strongly and then reduce speed to operate in quiet mode. If the noise still remains, then there are two reasons:
- There are two types of fan headers on the motherboard. Some are signed as “CHA_FAN” and “CPU_FAN”, others are simply “PWR_FAN”. So, only the first ones are controllable, while the second type is simply nourishing;
- Regular fans (with two or three pins) are connected; such fans are not controllable. The controlled ones have a connector of 4 legs.
Conclusion.
After following all the suggested instructions, we get a computer with a quiet operating mode. Now you are calm and your colleagues don’t complain. Good luck!