Widget pack comments for wordpress. Best WordPress Widget Plugins
WordPress widgets are functional buttons and blocks in the sidebar of a site that greatly facilitate the use of the site, improve its appearance and functionality.
Widgets are an optional component for the resource, but with them the user will feel more comfortable, since the site will not be empty.
And if you use the widget wisely, it can help you grow your site’s audience through improved indexing!
For beginners, WordPress widgets are a dark, dark forest. Adding or removing a widget for them is something bordering on fantasy. Although in reality there is nothing difficult in this activity. Even without adding different modules, you can place standard widgets on pages. And if you also download special plugins for this, your resource will turn into a treasure trove of useful additions! Let's look at all the possible methods for creating different widgets on WordPress pages.
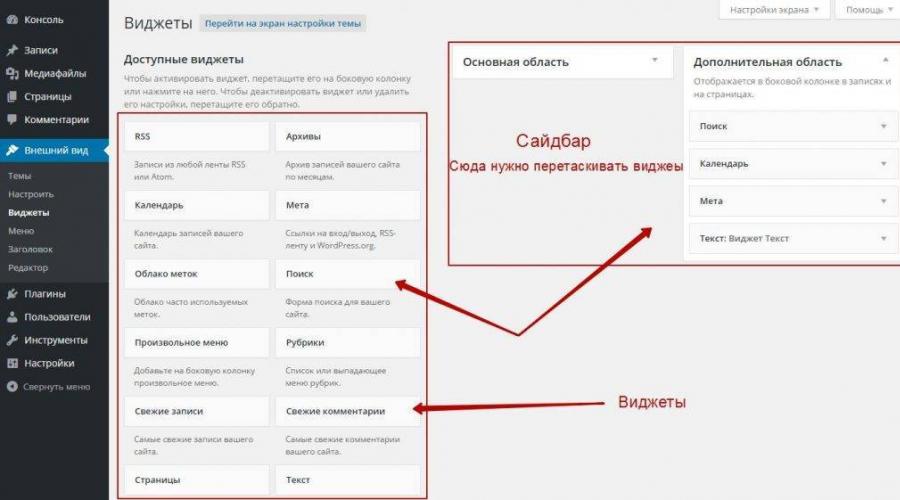
If you already have any theme (template) installed on your WordPress website, then you can add a widget somewhere right now. The menu for managing these functional blocks is located in the “Appearance” section in the admin panel - click the “Widgets” tab. After going to this section, all the blocks that can be activated and that are already on the pages will open in front of you. As a rule, the default template contains a set of different widgets for a WordPress site.
The WordPress engine is more designed for beginners, so right now, without preparation, in a few minutes you can create a widget on the page. To do this, select the appropriate one from the list (in the “Widgets” section) and drag it to the sidebar - the column in which it will be placed. Immediately after dragging and dropping, you can configure the settings for displaying the widget on pages. After configuration, the widget can be instantly added to the site. And if suddenly it becomes temporarily irrelevant for the resource, then drag it to the “Inactive” section.

Standard WordPress widgets
The widgets listed below are blocks that are included in many WordPress templates by default, meaning you don’t have to download an additional plugin to activate them. Here is the list:
1. Calendar. Many themes immediately add a calendar slider to the sidebar of the site. This is not the classic calendar you think of, but a calendar of your blog activity - it displays the days on which you left posts. Whether you add this widget or not is up to you, but keep in mind that it will make it easier for the user to navigate the materials on your blog, and search engines will positively appreciate the presence of links to other posts in the widget.
2. Cloud of marks. The creation of new posts is always accompanied by the addition of certain labels and tags to the material. When a large number of articles accumulate on a resource, using the “Tag Clouds” widget you can find out (and show the user) which tags are the most popular on your blog. But to a greater extent, such a slider is suitable for search engines - it will be easier for robots to navigate the blog content.
3. Headings. A very useful and almost mandatory widget for a website. It contains a list of all the categories you created that have articles. This widget makes it much easier for a new user to get to know your site.
4. Recent comments. This is a dynamic comment slider that displays the latest reviews and comments added under blog posts. This widget will not be particularly useful at the beginning, but if you already have a large project with a large audience, and the flow of comments is constantly growing, such a slider will become a live broadcast of user responses, which will increase trust in the resource.
5. Pages. Almost complete analogy with the “Categories” widget. Only with the help of this block will you be able to display all added pages and place them in a convenient order for you, sorting them according to different parameters. Essentially, this widget is a mini-site map for the visitor, which will not allow him to get confused.
6. RSS. This tool is not used often. It’s better to use it if you have other blogs or friends have projects on similar topics. Then you will activate this widget and be able to add a secondary feed from other resources to the sidebar.
7. Archive. Another standard widget that often appears on a blog after the template is activated. This widget contains the names of the months and the number of posts published. If you publish them unstable, then it is better to remove “Archive” from the side column.
8. Search. A very useful widget for large resources. With it, users can quickly search for the information they need on your blog. However, keep in mind that many templates have their own built-in search, so you may not need to add this element to your site.
9. Latest posts. It is recommended to configure the display of posts on the main page and in categories in the order you specify. When a user only sees the latest posts, they can get confused. Sort your materials and add a “Recent Posts” widget to the sidebar - with it, the visitor can quickly find new articles by title and publication date.
10. Text. This widget is most often used to add advertisements on pages. You can either add some important message for users, or enter the html code of a counter, banner, or add some kind of slider - this is an almost universal widget.
Of course, these widgets are not enough to ensure maximum comfort in using the site. It is recommended to download additional plugins - you will get much more features (you can add a slider, calculator, social networks and much more).
Plugins for adding widgets
1. Breadcrumb NavXT. There is a lot of debate about the usefulness of this plugin. It allows you to add breadcrumbs in the sidebar. On the one hand, this is useful, on the other hand, such navigation is usually built into the content header. Whether you use Breadcrumb NavXT or not is up to you.
2. NextGEN Gallery – a powerful slider for generating side galleries on the site. If you don't want to add massive slideshows, then a sidebar slider is the best solution! And if you want to place the gallery directly on the page, the slider can be moved. In addition, the slider can be customized as you wish.
3. Related Posts (YARPP) – a plugin that will help you improve article indexing. The module analyzes post labels and tags and displays similar materials in the widget. And the presence of similar articles means a high specialization of the resource on this issue, which is encouraged by search engines.
4. Easy Random Posts is an optional widget that will allow you to create a block with a list of random blog posts. It is unknown how much this tool affects indexing, but users will not see the same links, but different ones each time.
5. WP-Cumulus is an analogue of the standard “Tag Cloud” widget. Only unlike it, this plugin is a beautiful slider in 3D format.
6. Local Time Clock and WP-FlashTime Widget – a tool for adding clocks on website pages. It is not necessary to add them, only if your articles have some kind of time reference. The plugin allows you to create multi-style clocks with many parameters that can be changed.
7. Profile Builder – it’s difficult for any large resource to do without this widget. It is designed to display user registration and authorization forms. It also has a “Forgot password” button.
8. Ajax Event Calendar – a widget for planning upcoming events and activities related to your blog. Perfect for educational sites with webinars, seminars, etc.
9. WP-Polls is a tool that will allow you to better understand the interests of your target audience. It adds polls to pages.
10. EasyRotator – a simple plugin that will allow you to create a slider in a widget, or place it in any place on any page of the portal.
Use widgets wisely, and they will definitely benefit your Internet project! Don't go overboard with adding a lot of blocks - a lot of widgets are not very good.
Custom WordPress widgets can greatly enhance the functionality of your website. But widgets only come as part of the plugin, so you'll need to install some of them first. The official plugin repository on WordPress.org contains thousands of free extensions.
How to add WordPress widgets to your website?
It's pretty easy. Once you have installed the plugin, go to Appearance > Widgets in your WordPress dashboard and simply drag and drop the widget into the widget area of your choice.
Each theme has a different number and position of widget areas. They are originally intended to be placed on the sidebar. But most modern themes, like Monstroid 2 for example, have additional areas that you can use to place your widgets in more creative ways.
Today I want to introduce you to the most popular WordPress widget plugins that you can use on your website.
TinyMCE WordPress Plugin by Black Studio is a completely free WordPress extension that will allow you to add rich content to your widget areas. Its interface is exactly the same as the WordPress post editor, so you can include titles, images and shortcodes, and change the text color, etc.
Are you starting a YouTube channel and want to promote it? This simple yet powerful plugin gives you the ability to get YouTube subscribers directly from your webpage. Simply configure the plugin and add the widget to the widget area of your choice.
The TM WooCommerce package is a set of 5 widgets designed to enhance your online store and increase its functionality and efficiency. It is fully compatible with the latest versions of WordPress and WooCommerce.
Note: This plugin requires a working WooCommerce installation on your website.
Do you want to provide your visitors with all the contact information without sending them to a “Contact Us” page, which can be detrimental to your conversion rate? Then this widget developed by GoDaddy is exactly what you need. It allows you to place your contact details, including email, phone number, fax and physical address (it also supports Google maps) anywhere on the site. Highly customizable, it will fit any modern WordPress theme.
If you want to create even more buzz around your best blog posts, consider using this widget. You can simultaneously use Popular Posts to filter posts by time range, display post thumbnails, and even create your own widget layouts. The plugin is compatible with WPML and has multi-level support.
It is impossible to promote a modern business online without using social media channels such as Facebook, Instagram and others. The latter can be easily integrated with your WordPress website using this free WP Instagram Widget plugin. The widget is unstyled by default, so you can easily include it in your theme using custom CSS.
Accepting PayPal donations has never been easier for nonprofits and businesses. This plugin allows you to place a conversion optimized button using a widget or shortcode. The plugin is translated into 15 languages, including Russian, Italian, Spanish, French and German.
Display videos from your YouTube channel on your WordPress website with this customizable free plugin. It comes with tons of customizable options to change the look and functionality.
Note: To use the plugin, you need to paste your YouTube API key.
Social Count Plus is an advanced free WordPress plugin that adds a real-time tracking counter not only for the default social networks (Facebook, Twitter, LinkedIn and Pinterest), but also for Reddit, Steam Community, SoundCloud, Vimeo and Twitch. It also shows the number of comments and the total number of users. You can display numbers in your theme using Widget, Shortcodes or PHP functions.
Rotating Tweets is another cool WordPress plugin for social media marketing. It adds a widget that will display your latest tweets in the sidebar or other widget areas. It's completely customizable: you decide which tweets to show, how many to show, and whether to include retweets and replies. Additionally, the widget will function even if Twitter itself is down. The plugin also supports the new longer tweet format.
Monetize your WordPress website with BuySellAds, AdSense or any other advertising network with the WordPress Ad Widget plugin. With it, you can add any number of banners to the widget area of your web pages. The plugin provides two types of widgets: HTML/JavaScript Ad (for AdSense, etc.) and Image/Banner Ad (for direct advertising). They are very easy to manage, so don't hesitate and grab the plugin right away.
Ultimate Tag Cloud Widget is a highly customizable free WordPress plugin. As its name suggests, it generates a tag cloud that can display all tags, tags of one or several authors at once. It also comes with some coloring and organizing options. Although the plugin has not been updated for two years, the author keeps it compatible with the latest versions of WordPress.
This free WordPress plugin will allow you to display a recent posts widget on any page of your site. It offers many options, including the ability to display posts from a specific category. This plugin currently supports English, French and Brazilian Portuguese, but you can translate it using the source code on GitHub.
YITH WooCommerce Ajax Product Filter is a must-have free WordPress plugin for any WooCommerce store owner. It makes the search process more convenient for your customers, thereby increasing their loyalty and conversion rate. The plugin comes with 4 layouts: simple list, dropdown, colored and bulleted.
Instagram Slider Widget is a responsive slider widget that displays the latest 12 images from an Instagram account or 18 hashtag images. No API is required, but the account must be public to display posts. Various sorting options are available: by popularity, date or random.
This plugin provides you with a widget with the latest posts from the selected category. The plugin also includes shortcodes that allow you to insert lists of recent publications into your blog posts and pages.
NewStatPress is an analytics plugin for WordPress that allows you to collect information about visitors, search queries, and more without linking to Google Analytics. Use it if you need your own powerful tool to analyze your visitors' behavior. You can also add a sidebar widget and display statistics on the front end of your website.
Social Icons Widget is another essential WordPress plugin for social junkies. It contains 4 icon packs designed for 80+ social networks, including exotic websites like 500px, DeviantArt and StackOverflow, as well as many additional icons. Additionally, it supports email addresses, phone numbers, Skype and Viber.
This free plugin provides you with a widget to display information about the authors of posts on your blog. It automatically detects the author of each post, and you can change the size of the avatar or add a link to an archive of the author's posts.
This free WordPress plugin adds a dynamic countdown to the widget area of your choice. The countdown is made in HTML5, so it will be displayed even on mobile devices that do not support Flash. It has many appearance options and will fit perfectly into the style of your theme.
We continue to analyze the most useful and interesting plugins for wordpress website. Today you will learn how to add a collection of original widgets to your website, with various functions and additions. You can add 20 additional widgets to your site.

You can install the plugin – SiteOrigin Widgets Bundle directly from the WordPress admin panel. Go to the page: Plugins – Add New, enter the name of the plugin in the search form, press Enter, install and activate the plugin.

After installing and activating the plugin, go to the page: Plugins – SiteOrigin Widgets. Here you can enable or disable widgets. To enable the widget, click on the button – Activate, and to disable the widget, click on the button – Deactivate.

At your disposal there will be the following widgets: (description in order, top to bottom and left to right)
– Button, a widget for creating buttons.
– Call-To-Action, widget for creating a call to action.
– Contact Form, a widget for creating a simple contact form.
– Editor, a visual editor widget, just like when creating a post or page.
– Features, widget with a set of icons.
– Google Maps, a widget for creating Google maps.
– Headline, widget for creating headings.
– Hero Image, widget for adding images.
– Icon, widget set of icons.
– Image, a simple image widget.
– Image Grid, a widget for adding a grid of images to the site.
– Image Slider, a simple image slider widget.
– Layout Slider, a responsive slider with additional features.
– Post Carousel, a widget for displaying posts in the form of a carousel.
– Price Table, widget for creating price tables.
– Simple Masonry Layout, creating layouts, images with links.
– Social Media Buttons, a widget for adding social media buttons to your profiles.
– Taxonomy, a widget for displaying categories, headings, tags for the selected post.
– Testimonials, widget for creating reviews.
– Video Player, video player widget.
All enabled and activated widgets will be displayed on the page: Appearance - Widgets, and you can add them to your site.
Would you like to add a WordPress widget to the header area of your site? Widgets allow you to easily add blocks of content to specific locations in your theme. In today's article, we will show you how to easily add a WordPress widget to your website header.
Why and when you might need to add a widget to the header
Widgets allow you to easily add blocks of content to specific areas of your theme. These areas are called sidebars or widget areas.
The widget area in the header or in front of the content can be used to display advertisements, fresh content, etc.
This area is usually called “Under the fold” and is used by many popular resources to display important information.

Typically, WordPress themes add sidebars next to the content or in the footer. And only some themes have a widget area above the content or in the header.
That is why in this article we will tell you how to add a widget area to the header of your website.
Step 1. Create an area for widgets in the header
First we'll need to create our own widget area. In this step we will add a custom area that will be visible on the page Appearance » Widgets in the site console.
To do this, add the following code to the theme's functions.php file:
Function wpb_widgets_init() ( register_sidebar(array("name" => "Custom area for widgets in the header", "id" => "custom-header-widget", "before_widget" => "
", "before_title" => "", "after_title" => "
",)); ) add_action("widgets_init", "wpb_widgets_init");This code registers a new sidebar or widget area in your theme.
Now you can go to the page Appearance » Widgets and you will see a new area called ‘Custom widget area in header’.

Add a text widget to it for verification and save.
Step 2: Display a custom area for widgets in the header
If you go to the site now, you won't see the added text widget.
You won’t see it because we haven’t yet told WordPress where exactly to display this area for widgets. Now let's do this.
You will need to edit your theme's header.php file and add the following code where you want to display the widget area.
Now we go to the site and see the added widget in the header.

Of course, it all doesn't look very nice now, and therefore you need to add a little CSS in order to refine the result.
Step 3: Styling the Widget in the Header Using CSS
Depending on your theme, you'll need to add CSS to style the widget area in your header and each widget within it.
The easiest way to do this is to use the CSS Hero plugin. It allows you to use an intuitive interface to change the CSS of any WordPress theme.
If you don't want to use a plugin, then you can add CSS to your theme on the page Appearance » Customize.
The WordPress Theme Customizer interface will appear. Here we select the ‘Custom CSS’ tab.

The custom CSS tab in the customizer will allow you to add your own CSS and see those changes immediately.
Below is a code example for a minimal widget area design.
Div#header-widget-area ( width: 100%; background-color: #f7f7f7; border-bottom:1px solid #eeeeee; text-align: center; ) h2.chw-title ( margin-top: 0px; text- align: left; text-transform: font-size: small; background-color: #feffce; padding: 5px;
And this is how your custom widget area will look on the standard Twenty Seventeen theme.

Hello!
Today I will tell you about some super useful widgets for a WordPress site. In general, widgets on WordPress are a very convenient and useful feature that will help make your website more functional. WordPress already has widgets by default, but you must agree that few people use them, unless at first, when you don’t yet know that there are better widgets. How to add new widgets to wordpress? New widgets on Wordpress can be added using plugins, here are just a few of these plugins, read on...
TOP 5 Widgets for WordPress
5th Place – Add Widget After Content
This widget will allow you add any content after each post or page of your site. A very useful and convenient widget, for example, if you want to insert after each post - advertising, video, social network share buttons, etc., then agree to manually insert separately for each post, you will get tired of it, it takes a lot of time. And if you add this widget to your website, then you only need to add the content you need to this widget and it will be displayed after each post.
But what else is good if, for example, you want the widget content not to be displayed after a certain post, then you just need to check the checkbox on the post creation page and the content will not be shown for the selected post.
4 Place – Feature A Page Widget
This plugin will add to your website new widget for creating announcements of posts and pages. This widget has very interesting settings: you can create announcements with or without a photo, with a small photo or with a large one, add a link, title, etc. to the announcement. The widget is very simple and easy to use and can serve your site well.

3 Place – Restrict Widgets
Super useful plugin which should be on every WordPress site, and if you still don’t have such a plugin, then you are missing out on a lot. This plugin will allow you to manage widgets on your site, because probably every novice blogger has a question - How to make a widget appear on one page, but not on another. Agree, there are pages on the site on which there is simply no need to display all the widgets, for example the Feedback page, why are all the widgets needed there, because the page is small. Of course, this applies to those who have a lot of widgets on their site and who would like to sort them into pages.

2nd Place – Responsive Column Widgets
Another super useful plugin, with which you can add adaptive widgets to any page of your website. Moreover, widgets on the page can be arranged as desired in any order, vertically, horizontally, in a grid, you can set the size for widgets, arrangement order, etc. For example, you can do this: on the 1st row of the page - 2 widgets, on the 2nd row of the page - 4 widgets, on the 3rd row of the page - 5 widgets, etc., insert any numbers, there are no restrictions.

In general, the plugin will indeed turn out to be a very useful tool for those who want to create an adaptive grid of widgets on the page of their website.
1st Place – Black Studio TinyMCE Widget
Super plugin that should be on every WordPress site. It will add a widget to your site that has a built-in WordPress visual editor, the same as when creating a post or page. With this widget you can do whatever you want, use your imagination, come up with new tricks, experiment, take action. This plugin is good to use in conjunction with the plugin – Shortcodes Ultimate, I recommend it to everyone, you can come up with a lot of cool combinations.